Hola a todos, el último video con las bisagras de las puertas del M3 Marlboro ya está en Youtube!! Pronto las explicaciones en el correspondiente post!! Espero que os guste!!
Hi ti all, the latest vide with the doors hinges of the Marlboro M3 is already in Youtube!! SOon the explanation here!! Hope you like it!!
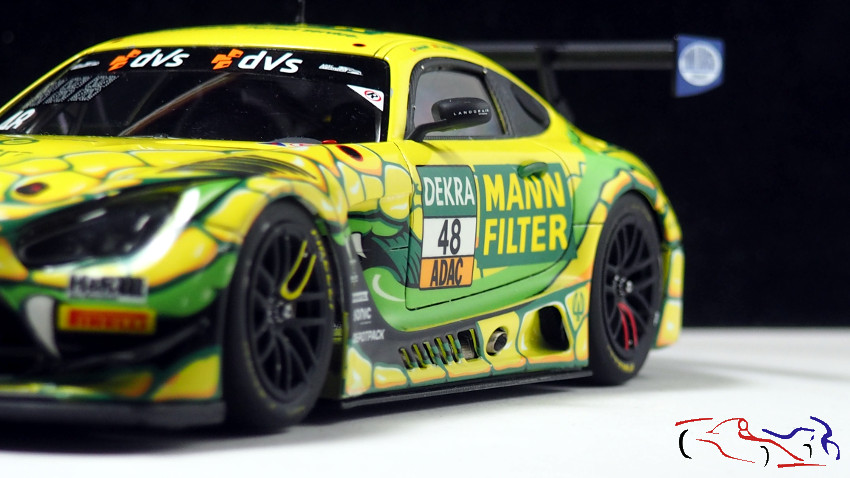
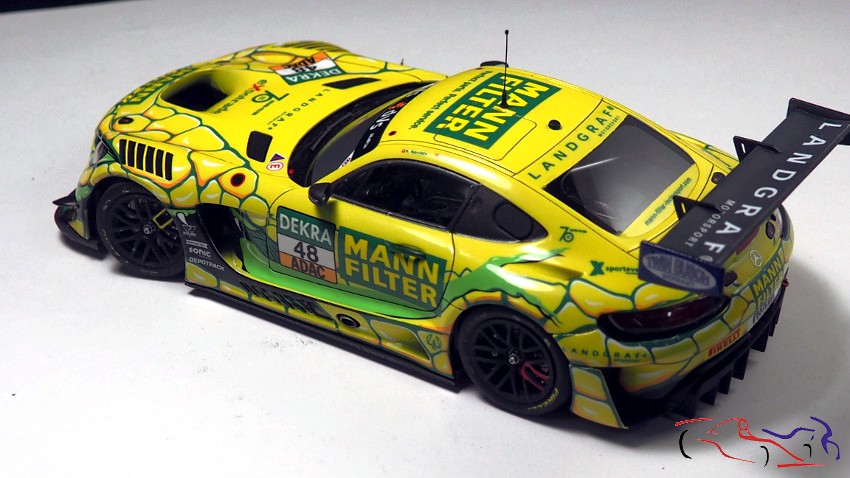
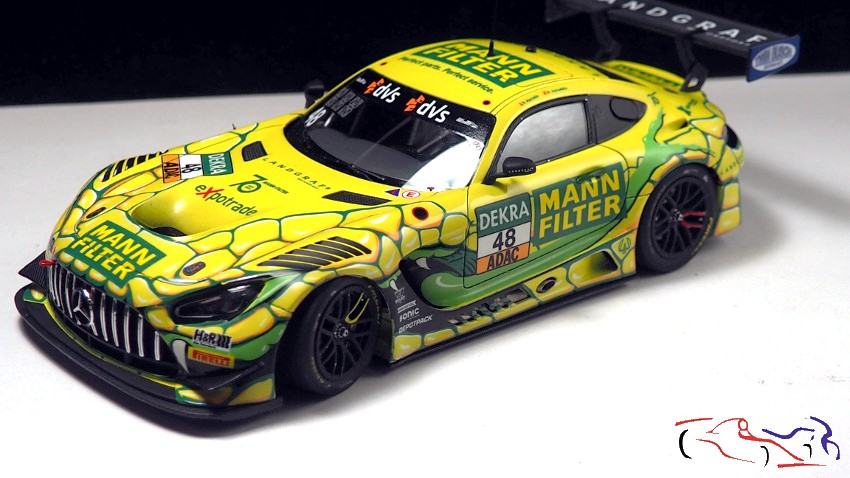
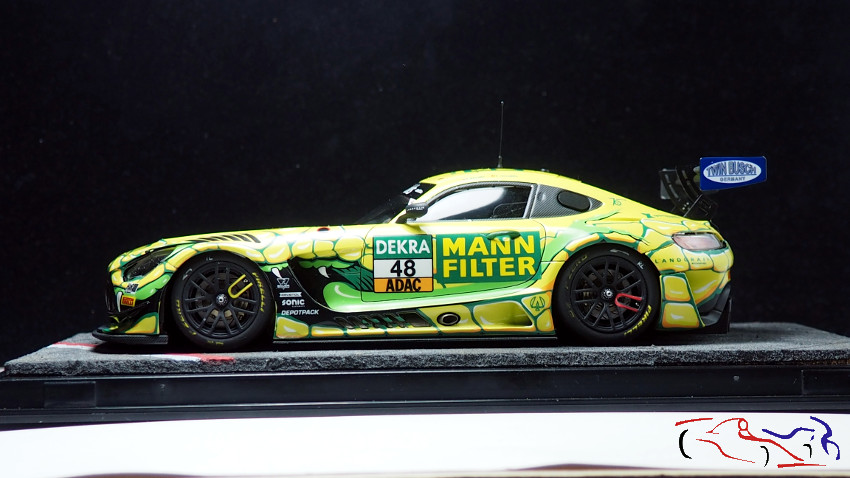
Finalmente he acabado este proyecto, de manera satisfactoria para mi, ya que es una maqueta divertida y fácil de hacer, como buena Tamiya que es. El único problema es adaptar el TK y la gran cantidad de calcas de LB Production. Pero todo eso lo explico a continuación.
I’ve finally finished this project, to my satisfaction, as it’s a fun and easy model to make, just like any Tamiya model. The only problem is adapting the TK and the large number of LB Production decals. But I’ll explain all that below.
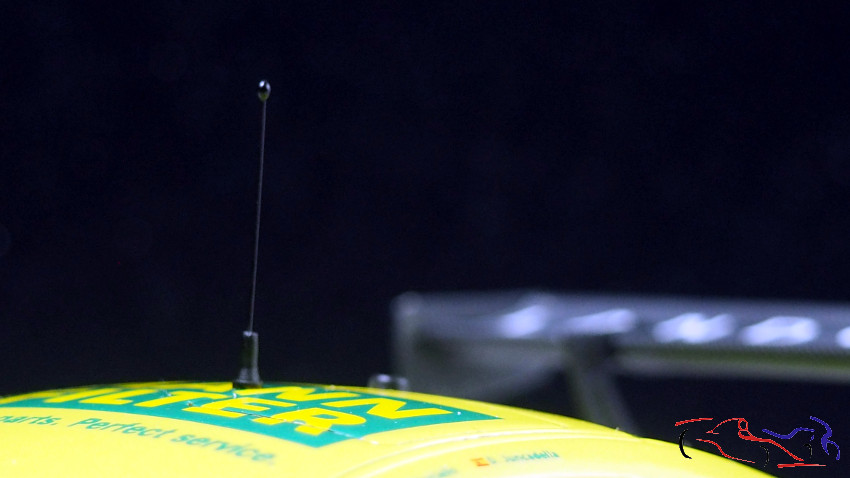
Kit Tamiya-. Como he comentado, el kit es un amaravilla con encaje de piezas corresto, sin casi rebabas, y con unas formas muy conseguidas. Esto no es nuevo en Tamiya con los ultimos modelos que produce. Como mejoras, si es que se le puede pedir alguna, la antena es un poco gorda, y una posible hoja de fotograbados con los cierres, aletines y, derivas y fijaciones del alerón trasero. Con eso, se quedaría un kit de 10!!!
Tamiya Kit – As I mentioned, the kit is a marvel, with its perfectly fitting parts, almost no burrs, and very well-designed shapes. This is nothing new for Tamiya, with its latest models. As for improvements, if any could be asked for, the antenna is a bit thick, and a possible photo-etched part sheet with the fasteners, fins, and rear wing mountings and vents. That would make a great kit!
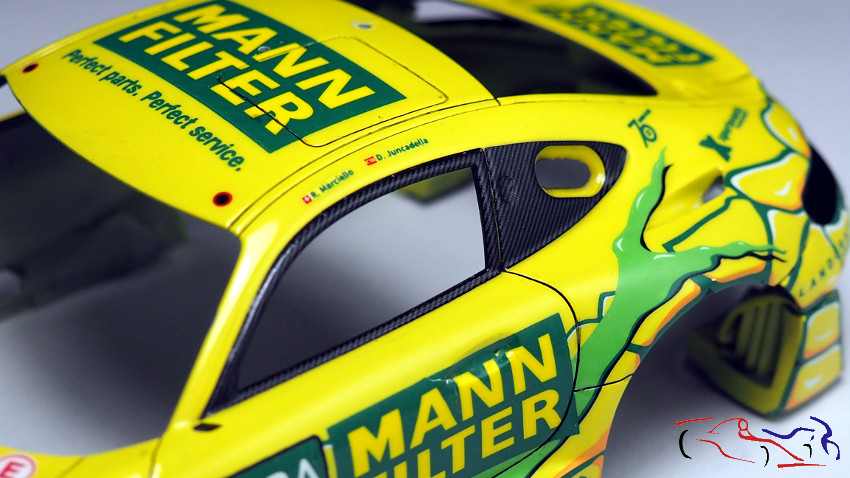
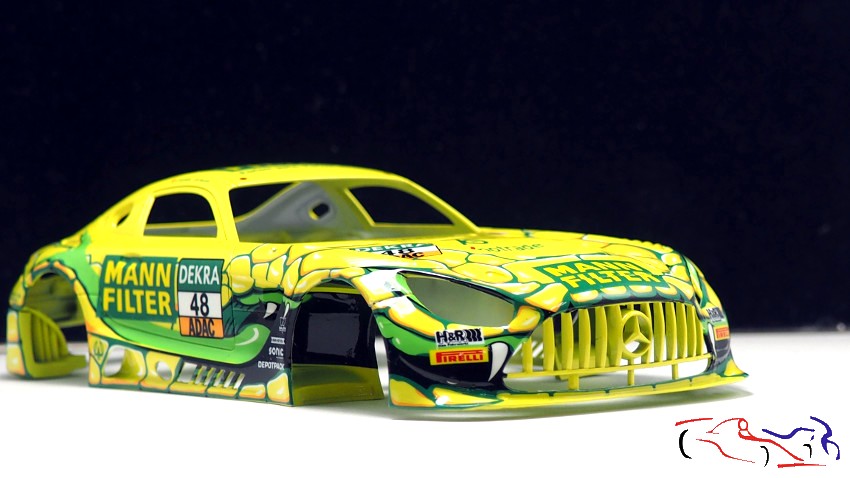
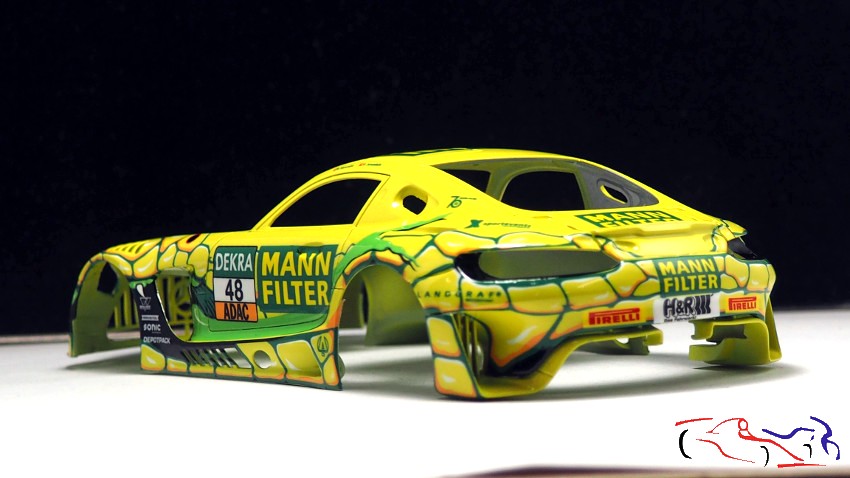
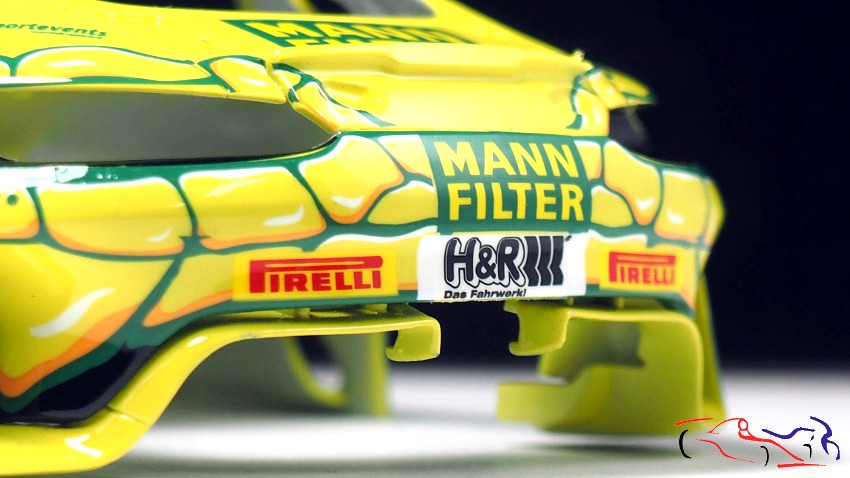
TK LB Production-. Con una resina de muy buena calidad, las piezas, a las que solo hay que pasarles un papel de lija para alisar parte de la superficie, encajan perfectamente donde se colocan las originales. Los dos faldones, anterior y posterior, se acoplan perfectamente dándole un aspecto realmente brutal e imponente. Los faros se deben pintar con cuidado puesto que son un conjunto indivisible, con cierto detalle. En cuanto a las aletas delanteras laterales, hay que tratarlas con respeto pues una se me partió (pero la pegue con ciano). Y las calcas metálicas del faldón delantero, se colocan bien con cuidado, paciencia, productos para calcas y el secador. En definitiva, es un muy buen TK!!
TK LB Production. Made with very high-quality resin, the parts, which only require sandpaper to smooth part of the surface, fit perfectly where the originals are placed. The two front and rear fenders fit perfectly, giving it a truly brutal and imposing look. The headlights must be painted carefully since they are an indivisible unit, with a certain amount of detail. As for the front side fenders, they must be treated with respect because one broke (but I glued it with cyanoacrylate). And the metal decals on the front fender are well applied with care, patience, decal products, and a hairdryer. In short, it’s a very good TK!
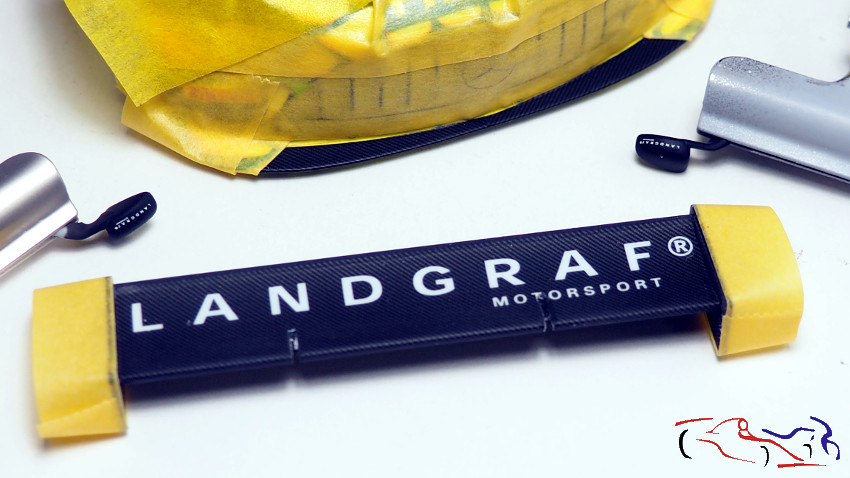
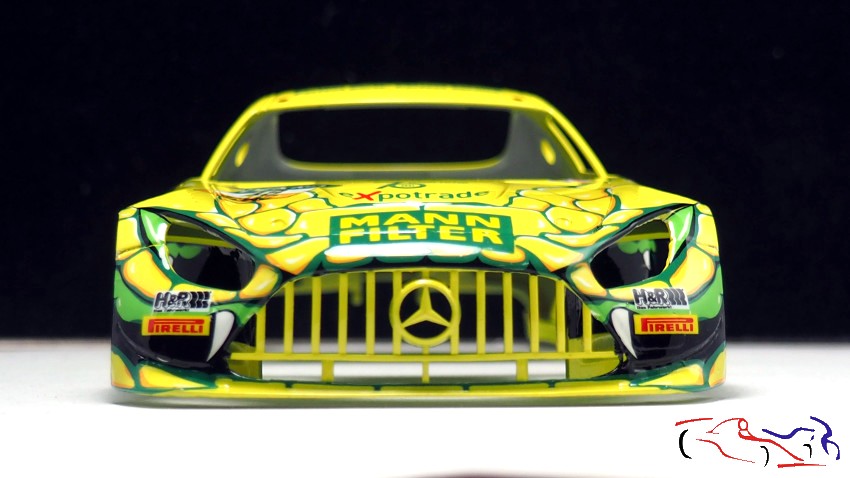
Calcas LB Production-. La hoja de clacas es muy completa y compleja. Hayq ue tener cuidad y seguir bien las referencias e instrucciones para que las siguientes encajen y formen un dibujo continuo. En cuanto a su calidad, son muy buenas aunque necesitan de los productos de calcas y del secador para que se adapten perfectamente, sobre todo en las curvas de la carrocería y en las lineas de los paneles.
LB Production decals. The decal sheet is very complete and complex. You must be careful and follow the references and instructions carefully so that the next decals fit together and form a continuous design. As for their quality, they are very good, although they require decal products and a dryer to adapt perfectly, especially on the body curves and panel lines.
Calcas fibra Miniature-. Estas calcas son como las de Studio27 que utilicé en mi anterior AMG GT3 de Gulf. Su aplicación es complicada puesto que las encuentro duras, necesitándo mucho liquido y secador.
Miniature Fiber Decals. These decals are similar to the Studio27 ones I used on my previous Gulf AMG GT3. They’re tricky to apply because I find them hard, requiring a lot of fluid and a hairdryer.
Pintura/Laca Number 5-. La pintura está muy acertada, aplicándose perfectamente. Al ser amarillo que no cubre tanto, y tal y como me gusta a mi pintar, tuve que aplicar 5 capas, para que dar un color liso y precioso. En cuanto a la laca, 2 manos suaves y una humeda para que aparezca el brillo y se estire muy bien, dan un resultado más que aparente, suficiente para no tocarla.
Number 5 Paint/Lacquer. The paint is very well applied, applying perfectly. Since it’s yellow and doesn’t cover well, and since I like to paint the way I do, I had to apply five coats to achieve a beautiful, smooth color. As for the lacquer, two light coats and one wet coat to enhance the shine and allow it to spread evenly give a more than noticeable result, enough to avoid touching it.
Pulimento Number5-. Una vez que la carroceria está lijada con granos 1000, 1500 y 3000, paso a pulir con Number 5. El resultado es inmediato dando un brillo constante y reluciente. Este brillo se realzó con un poco de Compound Cerámico, que es muy, muy bueno!!
Number 5 Polish- Once the body is sanded with 1000, 1500, and 3000 grits, I move on to polishing with Number 5. The result is immediate, giving a consistent, brilliant shine. This shine was enhanced with a little Ceramic Compound, which is very, very good!
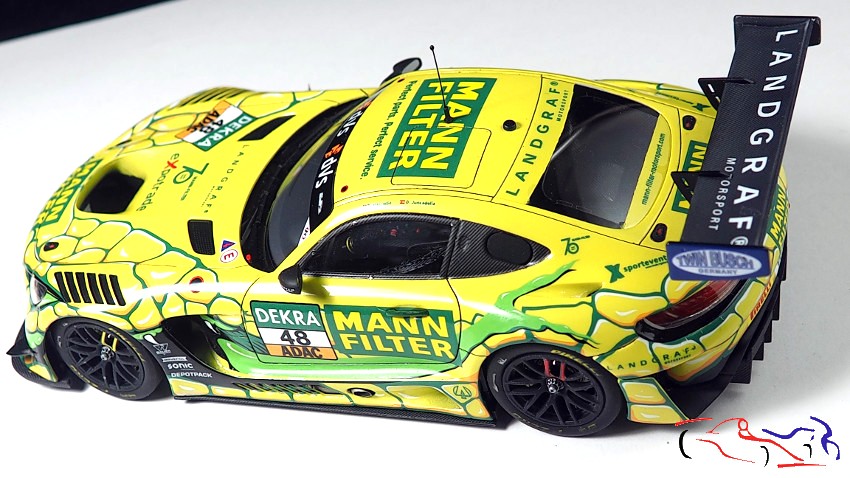
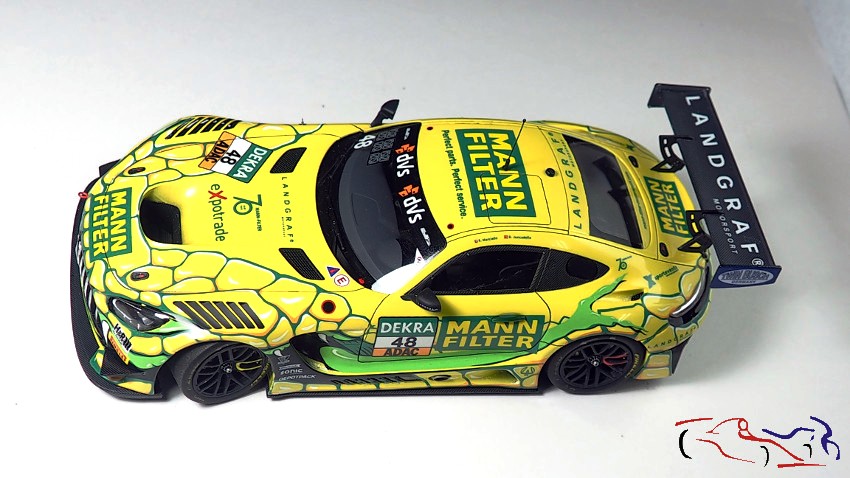
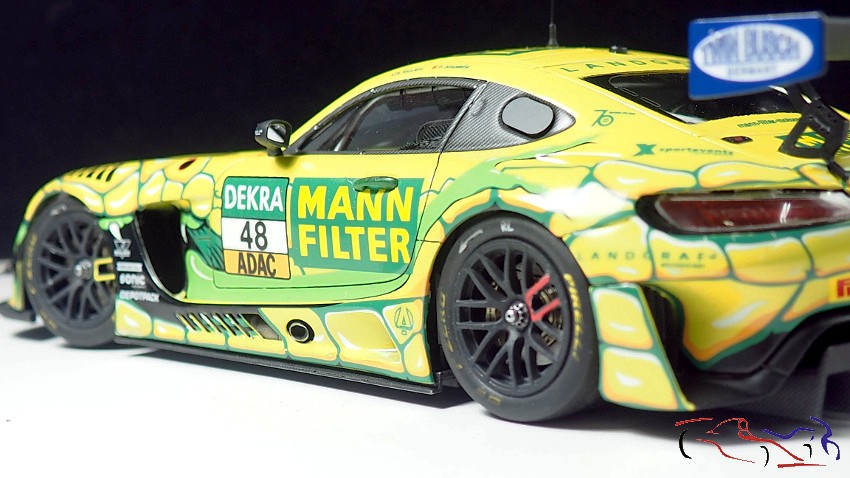
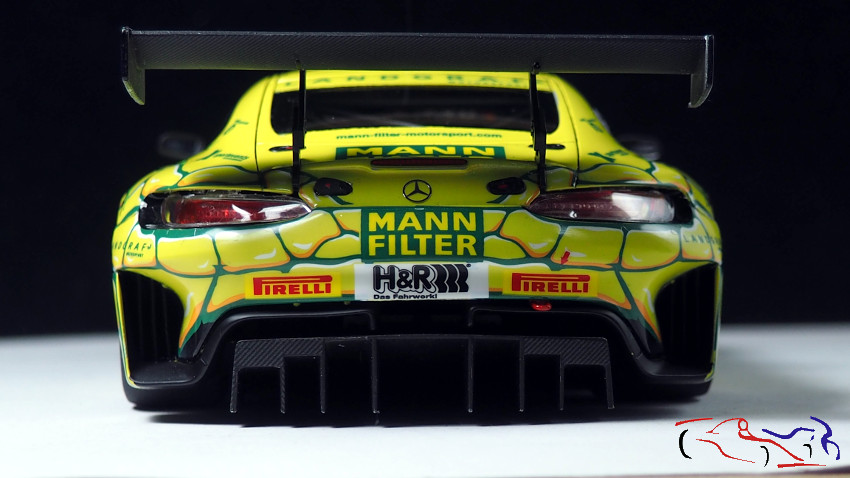
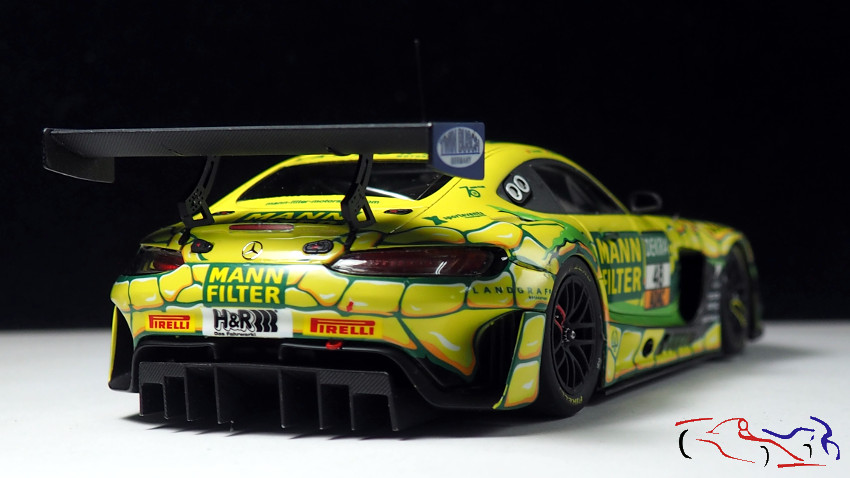
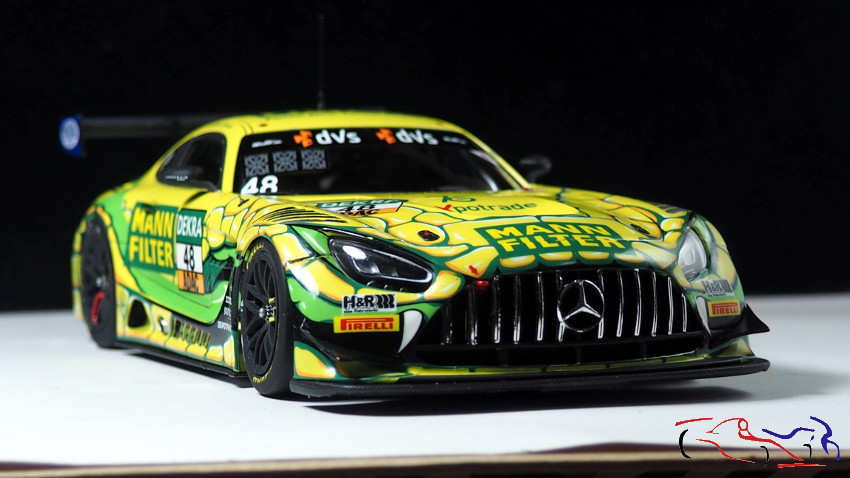
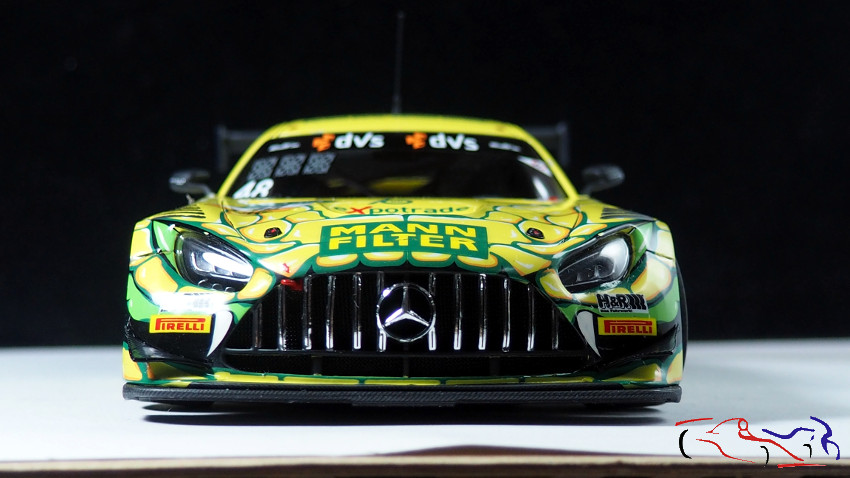
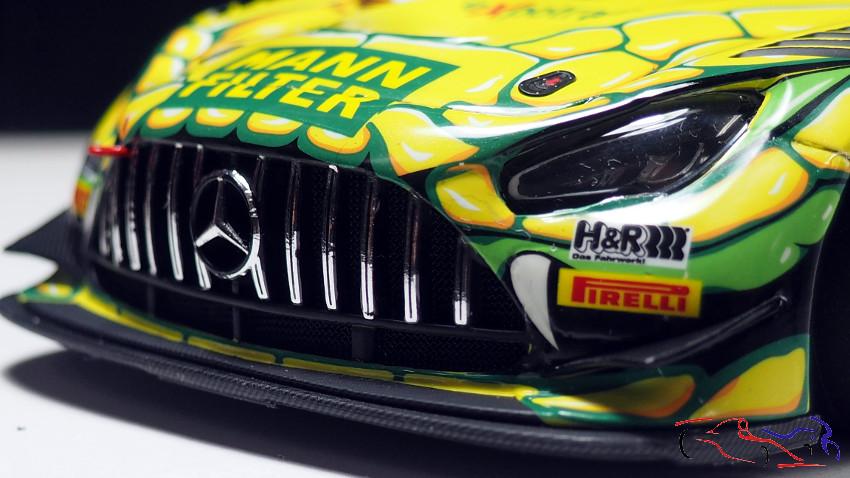
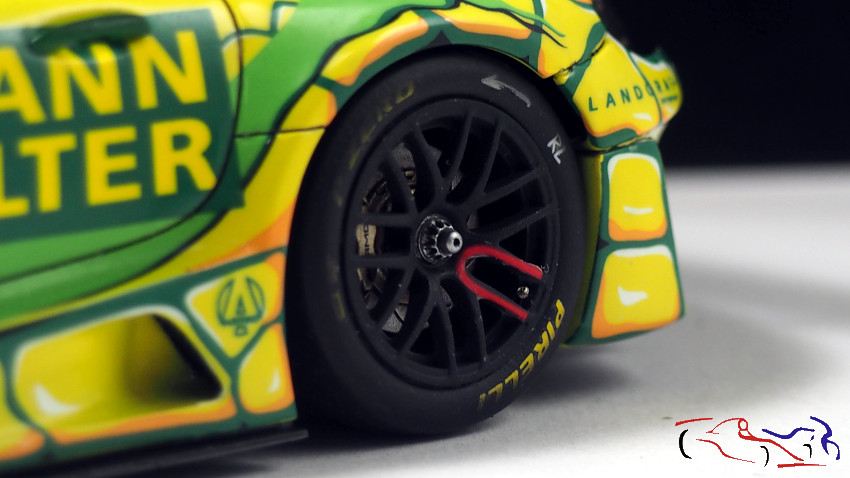
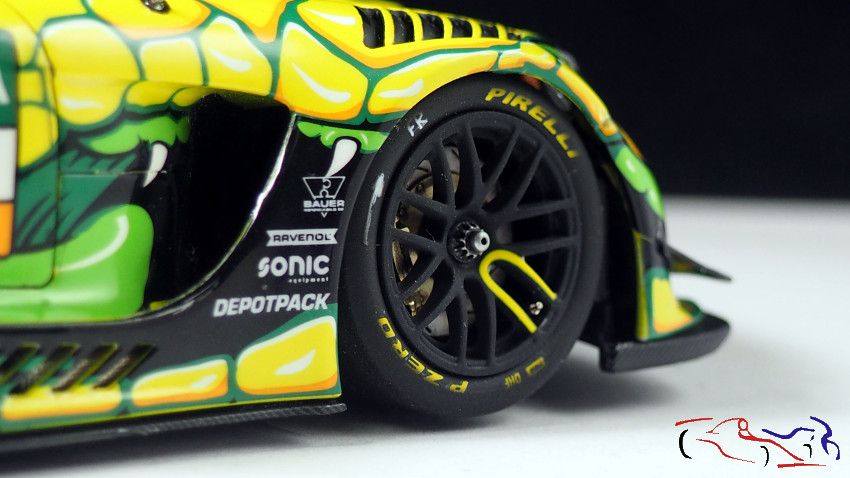
En definitiva, un proyecto agradable, entretenido y divertido, con un resultado impecable! Garcias por ver y comentar!!
All in all, a fun, entertaining, and enjoyable project with a flawless result! Thanks for watching and commenting!
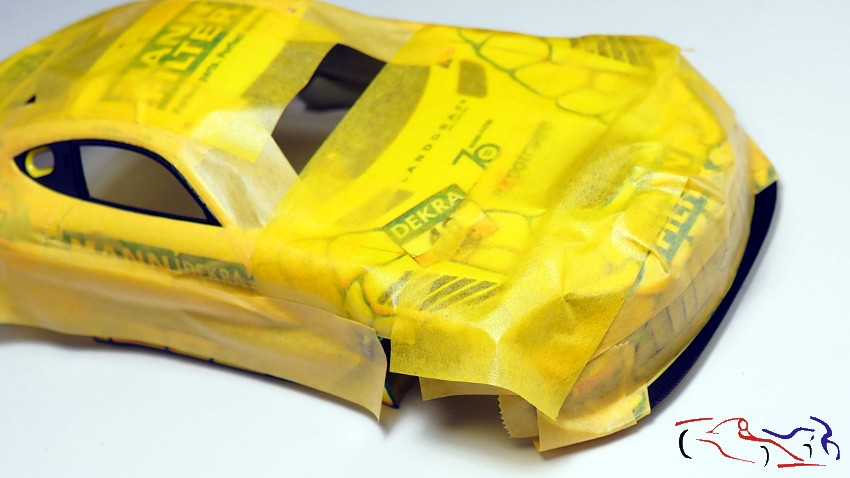
Hola de nuevo!! Ultimos detalles antes de las fotos finales!!! Una vez puestas las calcas de las ventanas y del faldón delantero, toca barnizarlas con LP Tamiya semimate:
Hello again!! Last details before the final photos! Once the window and front apron decals are applied, it’s time to varnish them with Tamiya semi-matte LP:
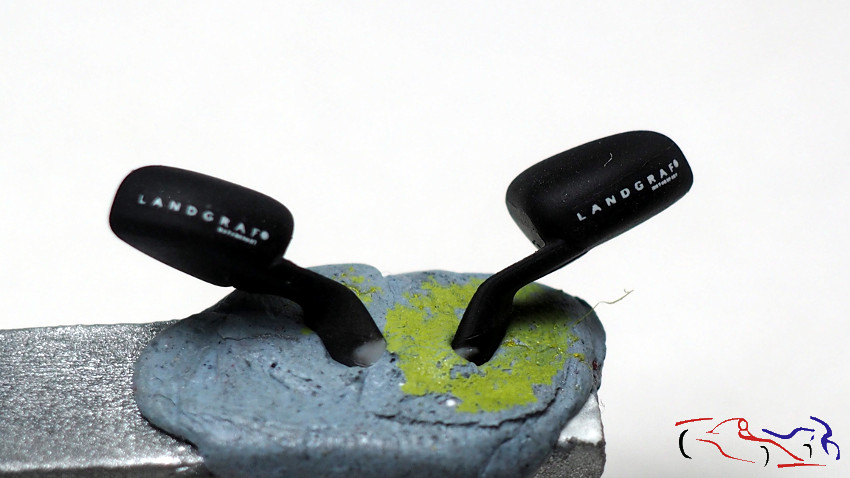
Y para ello, hay que enmascarar todo de nuevo, y aprovechamos para barnizar también los espejos retrovisores y la parte central del aleron trasero:
And to do this, we have to mask everything again, and we take the opportunity to also varnish the rearview mirrors and the central part of the rear spoiler:
Siendo éste el resultado:
This is the result:
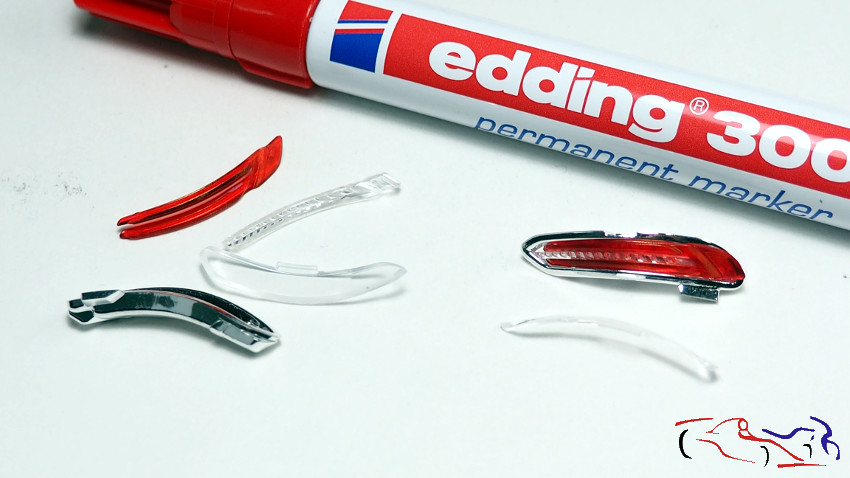
Pasamos a las luces, montando las traseras, una vez se pintaron las partes rojas con el rotulador permanente. Tanto las delanteras como las traseras, se pfueron pegando con resina UV.
We moved on to the lights, installing the rear lights once the red parts were painted with the permanent marker. Both the front and rear lights were glued on with UV resin.
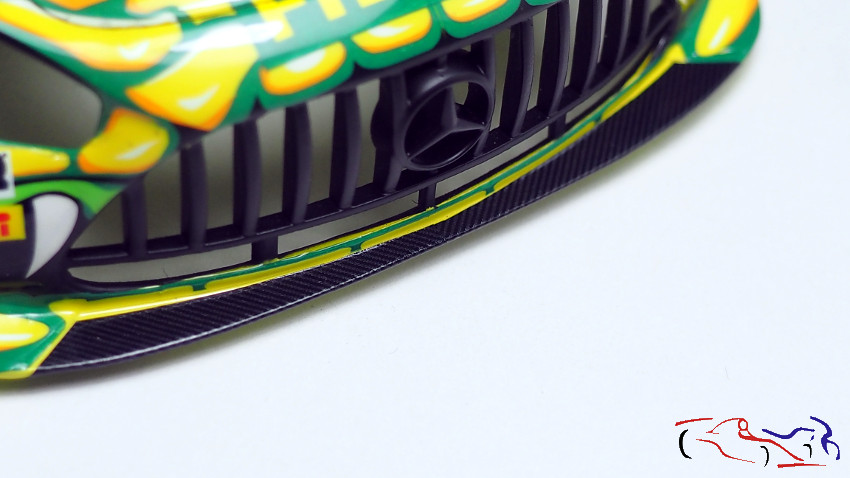
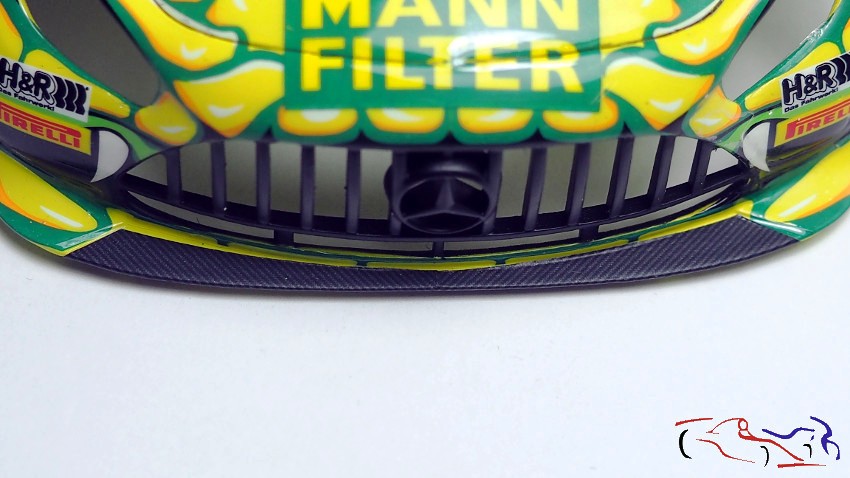
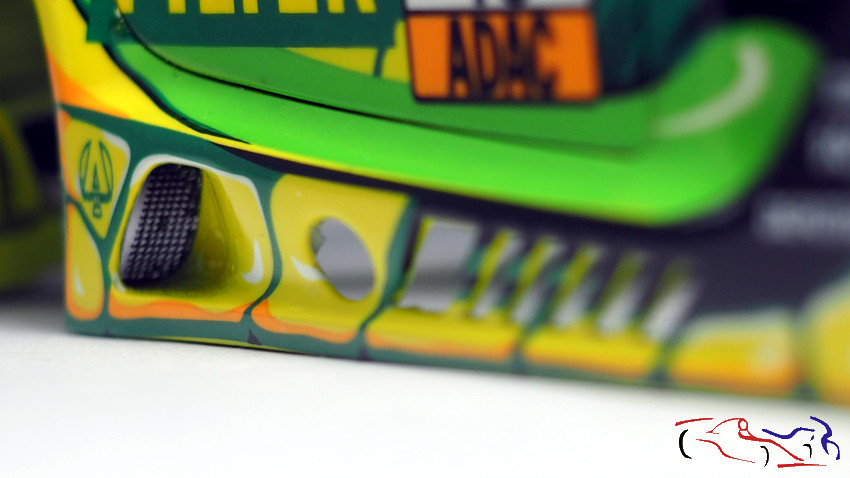
El siguiente paso fue recortar la rejilla del kit, para adaptarla al nuevo frontal del EVO, pengándola con resina UV junto a las otras entradas de aire:
The next step was to cut the kit grille to fit the new EVO front end, gluing it with UV resin next to the other air intakes:
Otro proceso que me llevó tiempo fueron las calcas metálicas del kit EVO de LB, para la rejilla delantera. En un principio no sabia si eran para pegar o eran directamente calcas. Con una prueba de un sobrante, comprobé que eran calcas, por lo cual, con productos para calcas Tamiya, secador y paciencia, las fui colocando todas:
Another process that took me a while was the metal decals for the LB EVO kit for the front grille. At first, I wasn’t sure if they were glue-on or just decals. By testing some leftover paint, I confirmed they were decals, so, using Tamiya decal products, a hairdryer, and patience, I applied them all:
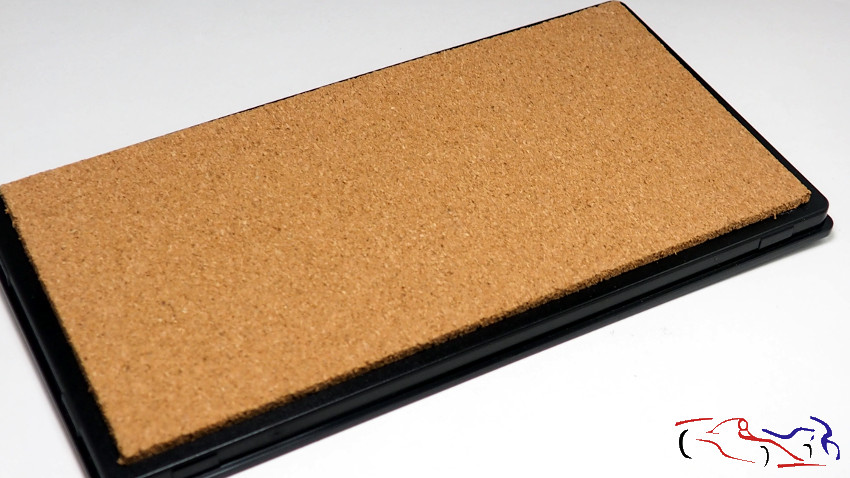
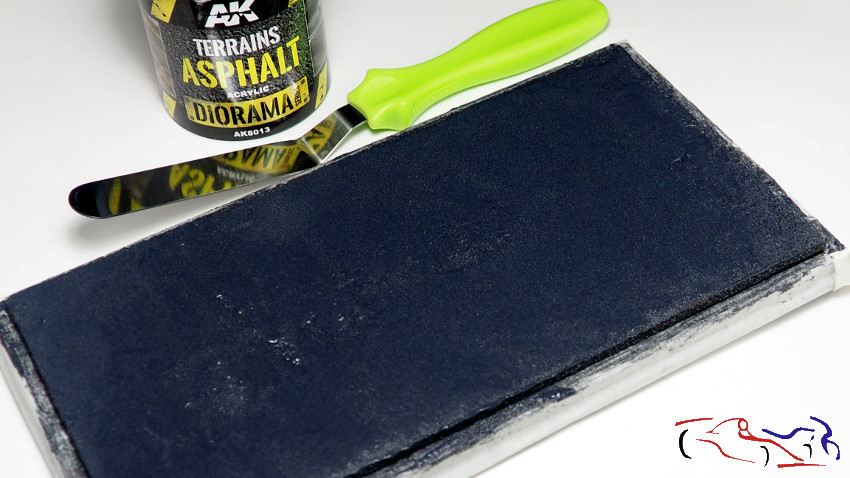
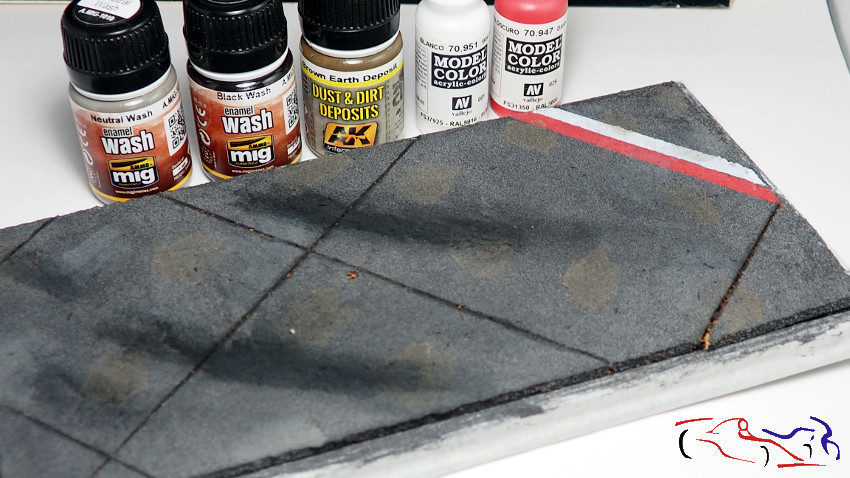
A partir de aquí, solo fue pegar el resto de partes, como alerón, retrovisores, antenas, etc… Pero…y donde lo coloco? Qué hago con la peana d ela urna? El proceso será parecido al del R5Turbo: primero pegamos una plancha de corcho, cortada con un cutter. Una vez seca, enmascaramos los bordes y aplicamos al “asfalto” de AK con una espátula. Y al secarse, pintamos las lineas blanca y roja, con una esponja habiendo enmascarado primero, para pasar a ensuciar el asfalto. Uso lavado negro para las lineas, suciedas natural y depositos de tierra con un pincel aleatóriamente, para terminar con tiza negra para marcas de neumáticos.
From here, it was just a matter of gluing on the rest of the parts, like the spoiler, mirrors, antennas, etc. But… where do I put it? What do I do with the urn’s base? The process will be similar to that of the R5 Turbo: first, we glue on a sheet of cork, cut with a utility knife. Once dry, we mask the edges and apply it to the AK “asphalt” with a spatula. Once dry, we paint the white and red lines with a sponge, having previously masked them, before moving on to dirtying the asphalt. I use black wash for the lines, natural dirt and soil deposits randomly with a brush, and finish with black chalk for tire marks.
Y esto es todo!! La próxima entrada tendrá las fotos del coche termiando, con mi valoración. Garcias por ver y comentar!!
And that’s all! The next post will have photos of the finished car, along with my review. Thanks for watching and commenting!
Estamos cerca del final de este proyecto y ya estamos dando los ultimos pasos. Si nos concentramos en el cockpit, podéis observar que después de ponerle el cableado, empiezo a poner las mallas de seguridad el piloto, para posteriormente, incluir el arco de seguridad el asiento y los paneles d elas puertas:
We’re nearing the end of this project and already taking the final steps. If we focus on the cockpit, you can see that after installing the wiring, I begin installing the pilot’s safety nets, and then adding the roll cage, seat, and door panels:
Una vez completado, lo unimos al chasis:
Once completed, we attach it to the chassis:
Y es hora de movernos a la carrocería. Y lo primero que hacemos una vez lacada, es tomar medidas con cinta de enmascarar de parte del faldon delantero, al que le pondremos fibra de carbono. Pegamos la cinta, recortamos el borde que da ala carrocería con el cutter, y marcamos por delante. Lugo lo pegaremos sobre la calca y recortaremos, para ponerla casi al final.
And it’s time to move on to the bodywork. The first thing we do once it’s painted is take measurements with masking tape of part of the front apron, to which we’ll apply carbon fiber. We stick the tape, cut the edge that meets the body with the utility knife, and mark it along the front. Then we stick it over the decal and cut it out, placing it almost at the end.
Y después de lacar, vamos a pulir, y lo primero es lijar la carroceria con agua y con esponjas de grano 1000, 1500 y 2000, en este caso d ela marca Dspiae:
And after lacquering, we are going to polish, and the first thing is to sand the body with water and with 1000, 1500 and 2000 grit sponges, in this case from the Dspiae brand:
Y este es el resultado, sin brillo, aunque poco se ve:
And this is the result, without shine, although little is seen:
Después de lijado, se lava, se seca, y a pulir. Utilizo el pulimento de Number5: primero el medio y después el fino:
After sanding, wash, dry, and polish. I use Number 5 polish: first the medium, then the fine:
Y a continuación, el resultado:
And then the result:
Y para terminar, y sacar un brillo limpio, aplico el compound ceramic de Hasegawa, que da un brillo final espectacular:
And to finish, and achieve a clean shine, I apply Hasegawa’s ceramic compound, which gives a spectacular final shine:
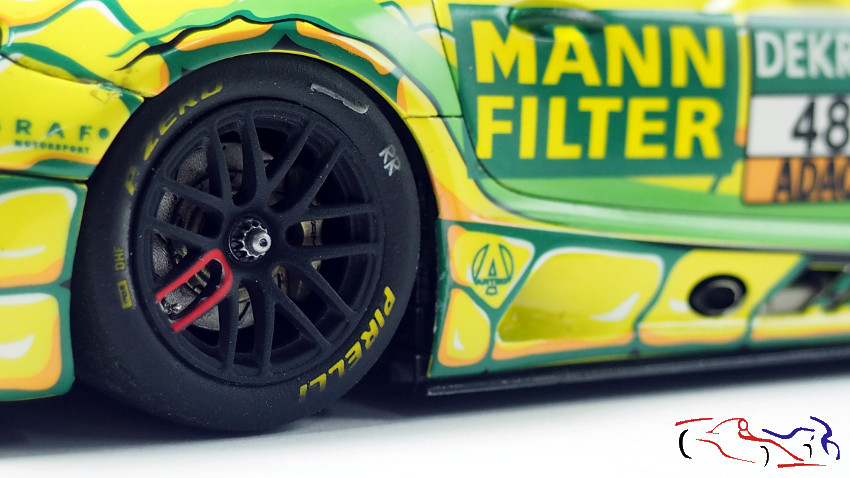
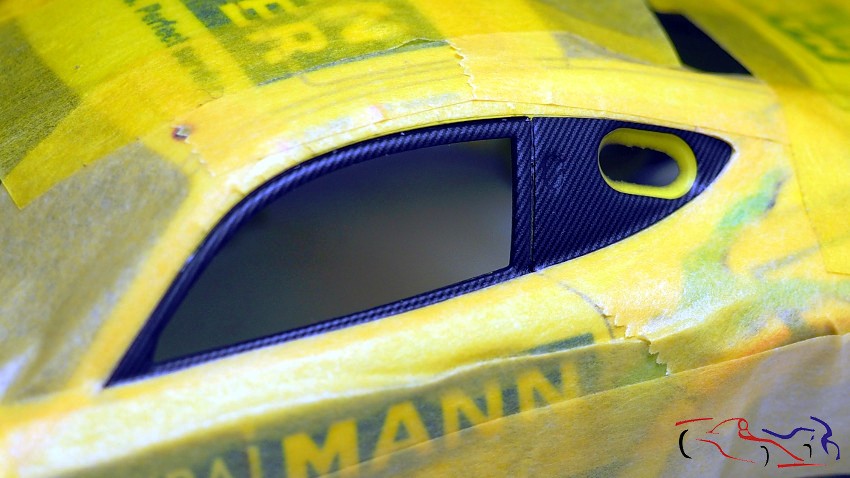
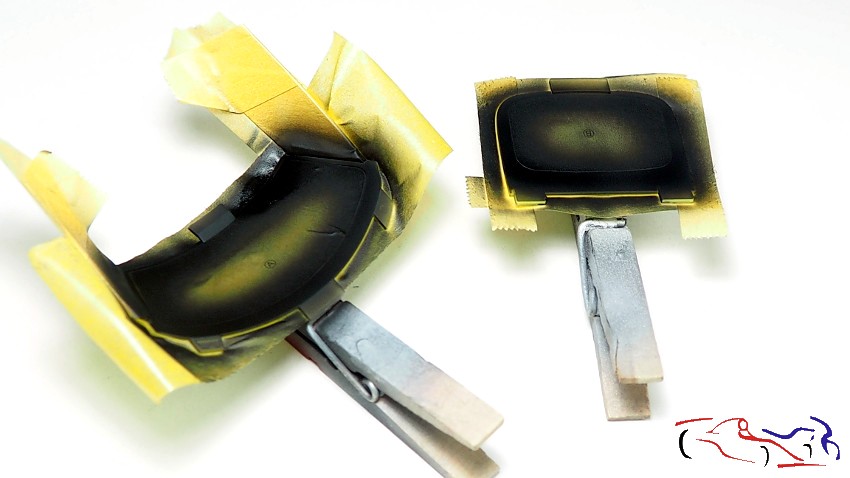
Pero aun no hemos terminado con la carrocería. Enmascaramos casi todo para pintar con negro semi mate LP-5 de Tamiya, como la entrada de aire frontal y las localizadas encima de las ruedas delanteras, los marcos de los cristales laterales o los bajos traseros:
But we’re not done with the bodywork yet. We masked off almost everything before painting it with Tamiya LP-5 semi-matte black, including the front air intake and those located above the front wheels, the side window frames, and the rear underbody:
….para pasar a mostrar como queda pintado con las máscaras…
…to go on to show how it looks painted with the masks…
…y sin máscaras:
…and without masks:
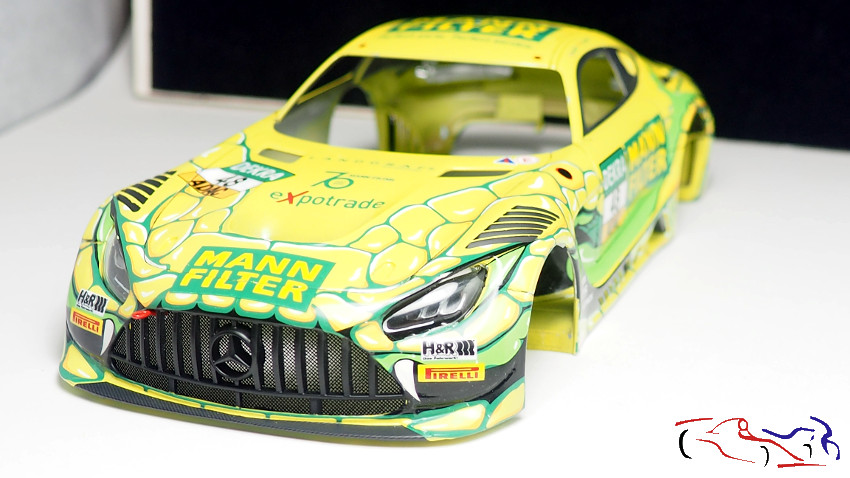
Y fotos de la carroceria entera:
And photos of the entire body:
Y una vez la carrocería en este estado, el paso siguiente y antes de empezar a ponerle detalles, es hacer el panelado de las lineas. Yo lo hago con el Panel Liner negro de Tamiya, y después, cuando está un poco seco, le paso un bastoncillo para eliminar los restos de tinta que están fuera de la linea:
And once the body is in this state, the next step, before starting to add details, is to add paneling to the lines. I do this with Tamiya’s black Panel Liner, and then, when it’s a little dry, I wipe it with a cotton swab to remove any remaining ink that’s outside the lines:
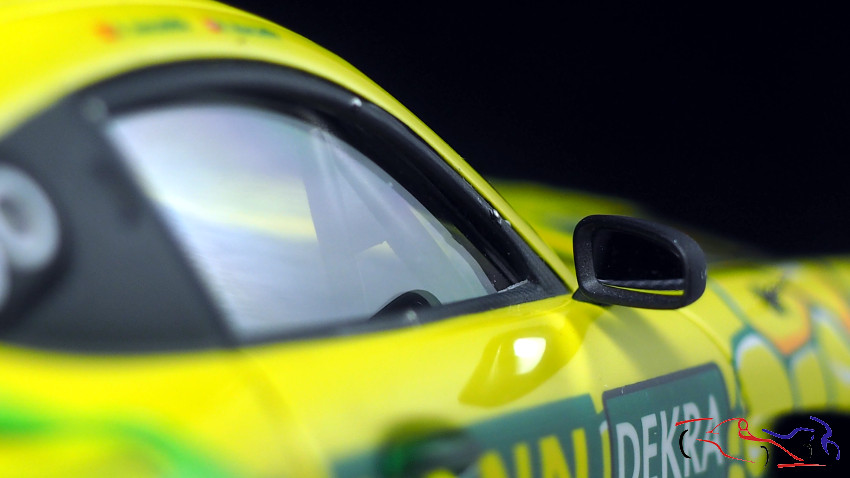
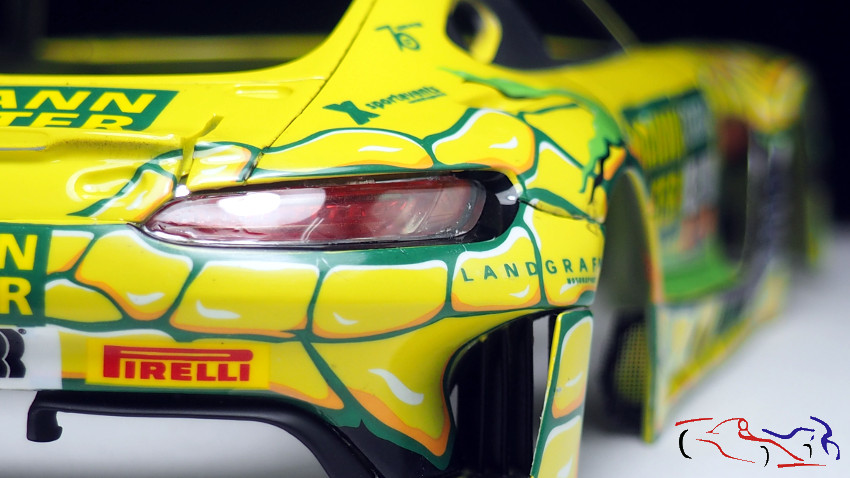
Y algunas cosas más que he hecho: pintar los faros delanteros, pulir los laterales del aleron trasero, y terminar el cristal delantero con las calcas, los limpiaparabrisas y el interrumpor rojo del extintor:
And a few more things I’ve done: painting the headlights, polishing the sides of the rear spoiler, and finishing the front window with the decals, windshield wipers, and the red fire extinguisher switch:
Desde luego que se ve el final del proyecto, montando todo en su sitio. Gracias por ver y comentar!!
The project is definitely in full swing, with everything in place. Thanks for watching and commenting!
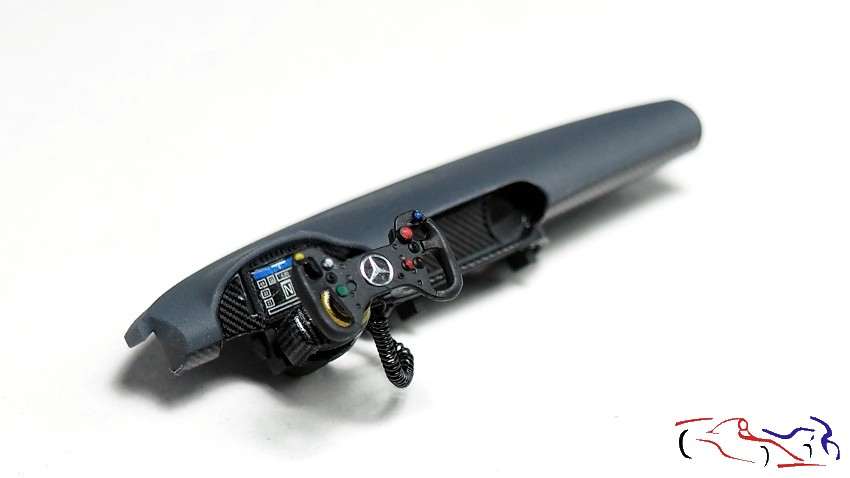
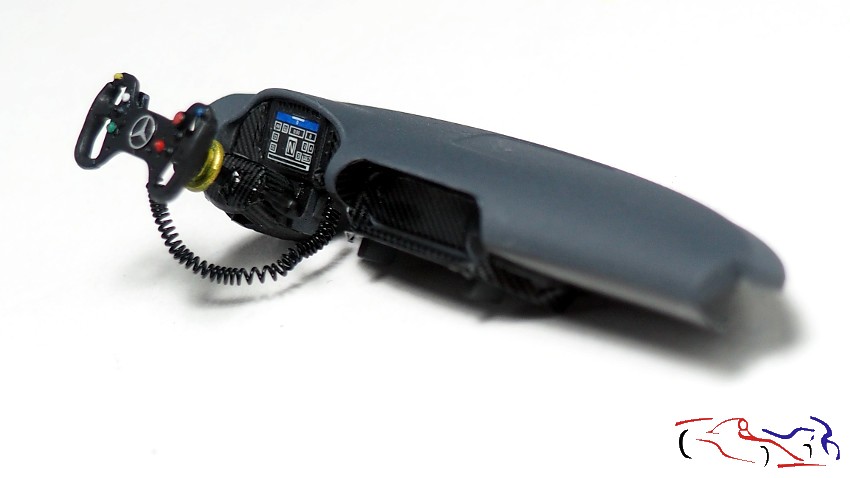
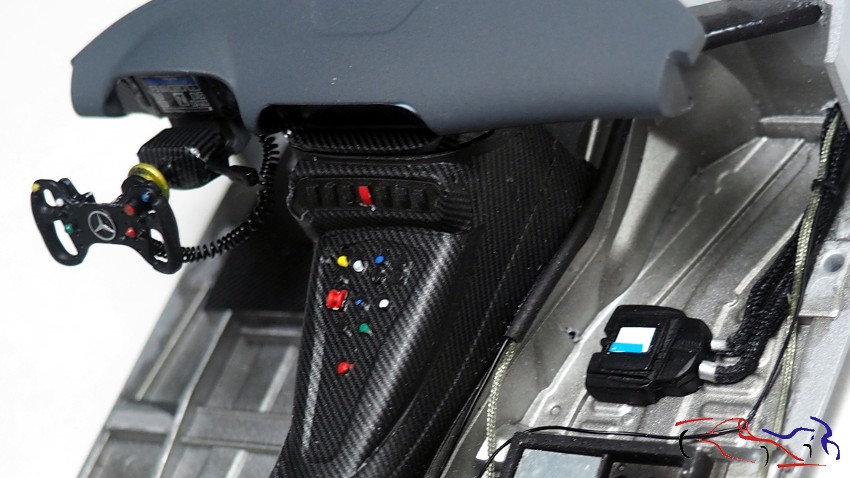
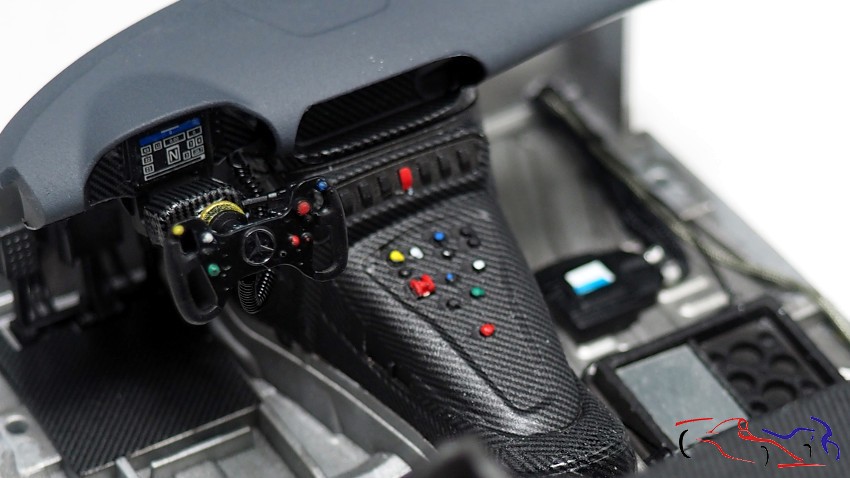
Más novedades en el proceso de contrucción del Mercedes AMG GT3 EVO. Y ya tenemos el salpicadero casi listo, con las calcas de fibra, el volante y el cable que lo une para cuando se separa:
More news on the construction process of the Mercedes AMG GT3 EVO. And we already have the dashboard almost ready, with the fiber decals, the steering wheel and the cable that connects it for when it is separated:
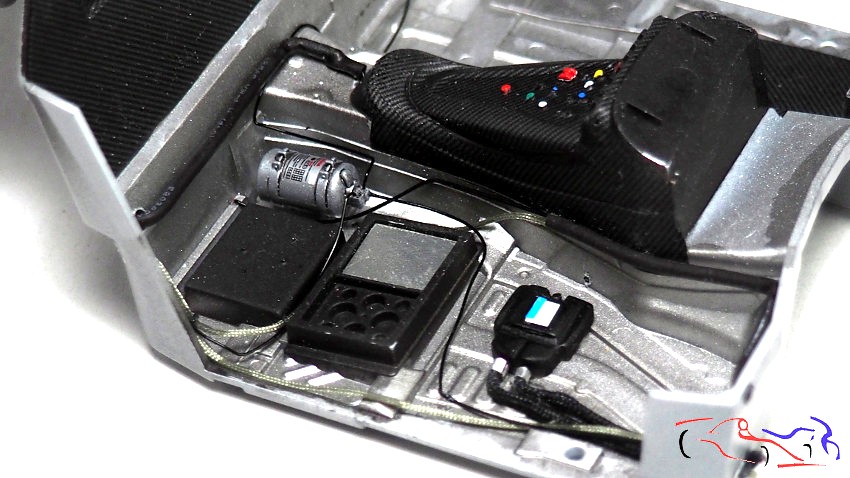
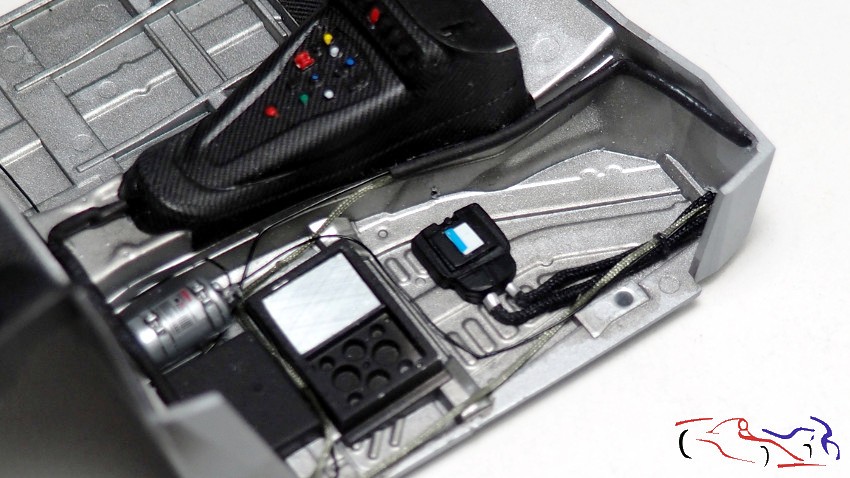
Y si continuamos con el cockpit, he añadido algunos cables junto con la centralita y el extintor. Tampoco quier poner mucho detalle pues se va a ver poco. En las dos ultimas fotos, he colocado el salpicadero para ver como resulta el conjunto:
And if we continue with the cockpit, I have added some cables along with the control unit and the fire extinguisher. I don’t want to put too much detail because it won’t be very visible. In the last two photos, I have placed the dashboard to see how the whole thing turns out:
Aquí véis es extintos, al que le he añadido tres cables de 0,3mm, colocados en 3 agujeros realizados con boca.
Here you see the extinct ones, to which I have added three 0.3mm cables, placed in 3 holes made with a drill bit.
Más procesos del cockpit, del asiento en este caso: le he puesto los cinturones de algun fotograbado y tela que tenía, además de las barreras laterales de seguridad. Éstas se ponen en los laterales del asiento y se enganchan en el salpicadero y las barras antivuelco. Las he hecho con restos de cinturones pegados con ciano:
More cockpit work, in this case the seat: I put the seat belts from some photo-etched parts and fabric I had, as well as the side safety barriers. These are placed on the sides of the seat and are hooked onto the dashboard and the roll bars. I made them with leftover seat belts glued with cyano:
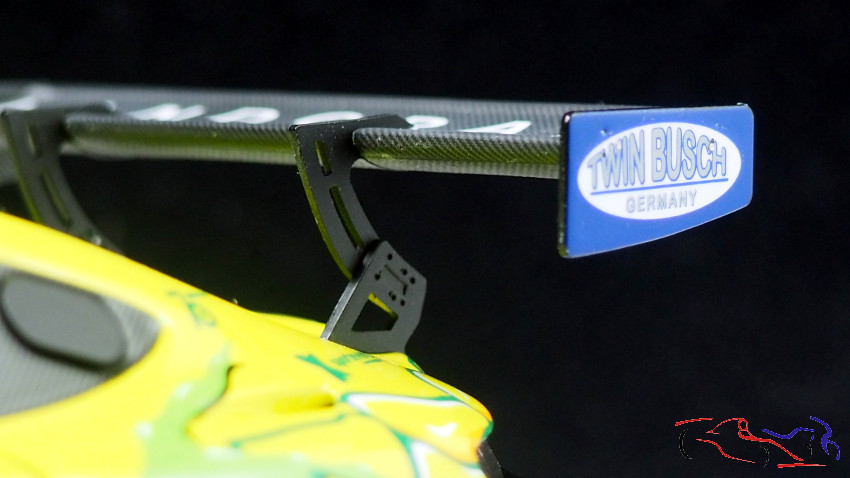
Del aleron trasero, pinté las derivas con azul de Tamiya, y añadi la calca cuando estuvo seco. El alerón lo cubriré con laca brillante, para enmascaran dichas derivas y pulverizar con semimate sus caras superior e inferior.
For the rear wing, I painted the tailpipes with Tamiya blue, and added the decal when it was dry. I will cover the wing with gloss lacquer to mask the tailpipes and spray its upper and lower surfaces with semi-matte.
Y terminamos también los tubos de escape. El paso final ha sido pulverizar muy suavemente la parte extrema con Metal quemado de Alclad, para pasar otro ligero panelado con el Panel Liner negro de Tamiya:
And we also finished the exhaust pipes. The final step was to very lightly spray the end with Alclad Burnt Metal, followed by another light panelling with Tamiya Black Panel Liner:
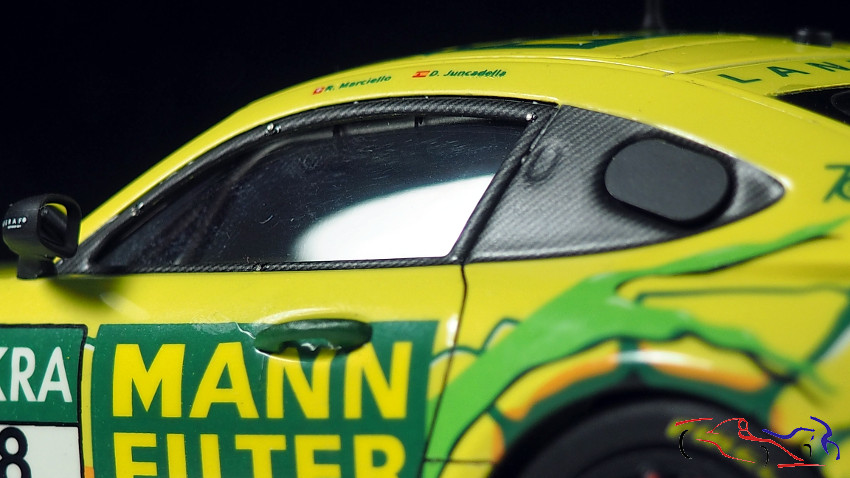
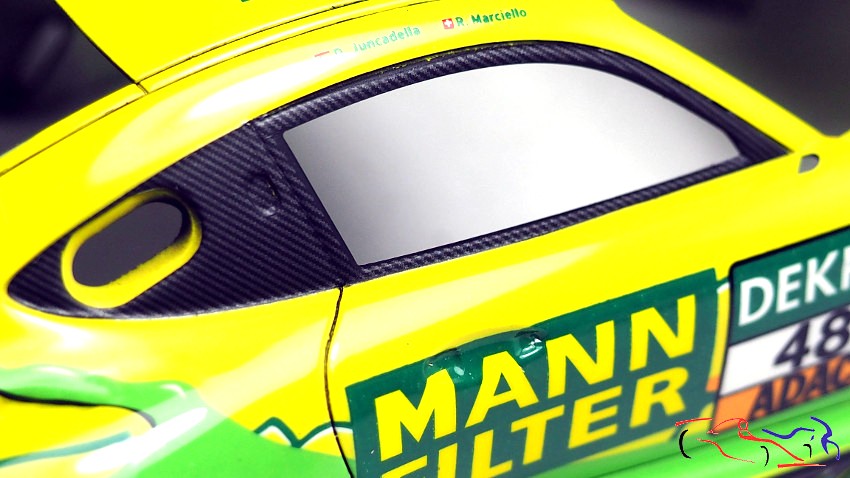
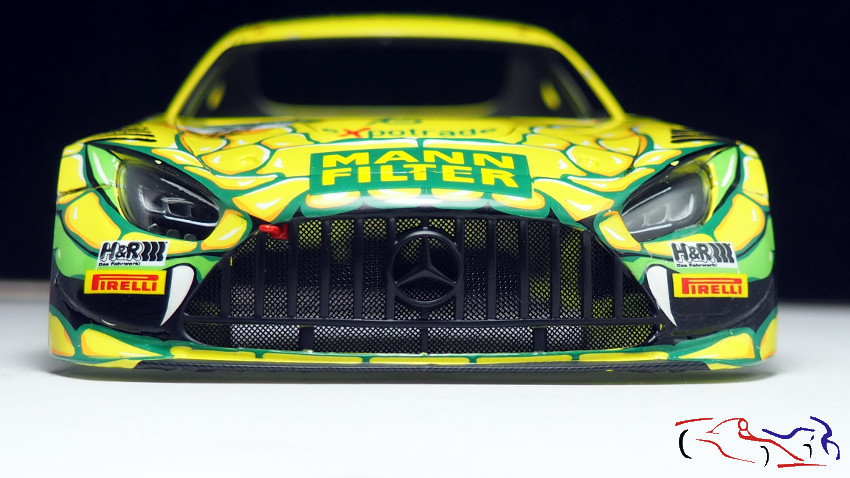
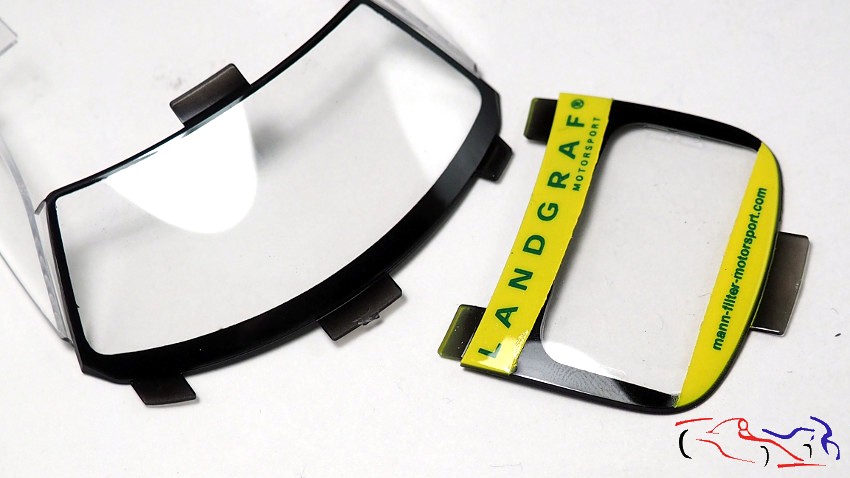
Con los cristales, enmascaramos y los pintamos con el negro semi mate LP de Tamiya. En el caso del trasero, podéis ver que una vez quitadas las máscaras, veis las dos franjas amarillas que fueron pintadas, y que después de poner las calcas, fueron lacadas. El resultado es excelente:
With the windows, we masked and painted them with Tamiya LP semi-matte black. In the case of the rear, you can see that once the masks were removed, you can see the two yellow stripes that were painted, and that after applying the decals, were lacquered. The result is excellent:
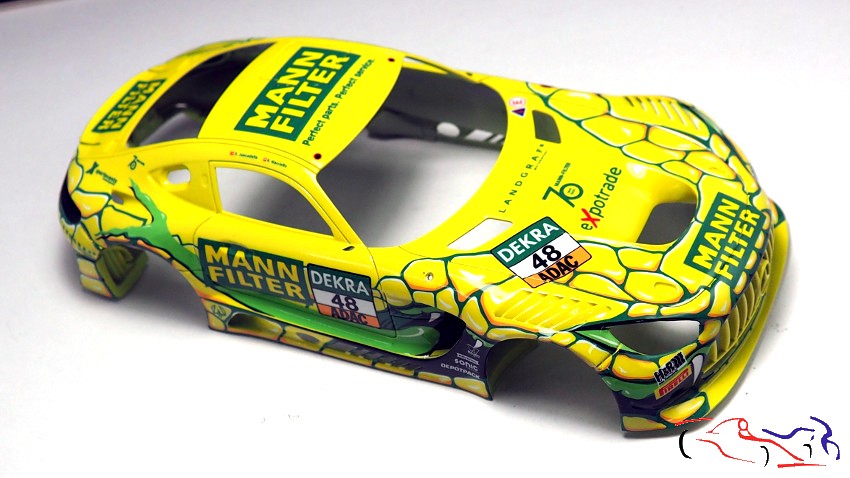
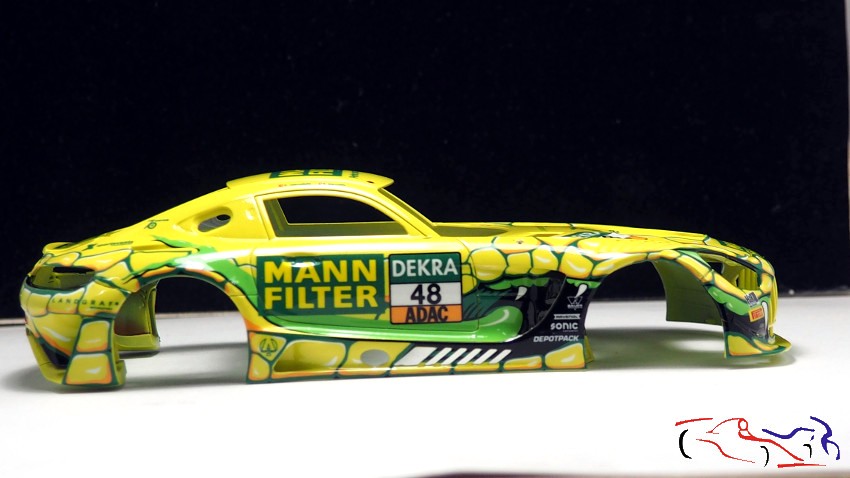
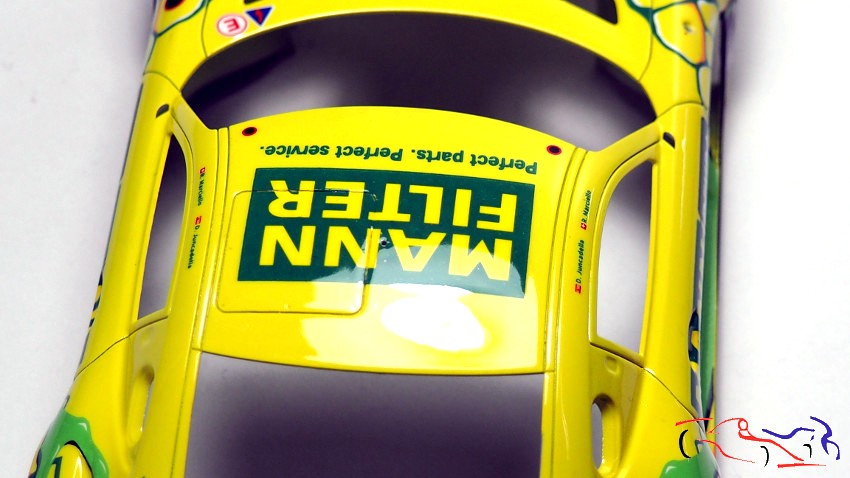
Y para termionar este post, os muestro la carrocería una vez lacada con laca Number5. Su resultado es fantástico como podréis comprobar en las siguientes fotos. Yo le di dos manos suaves, donde no se veia el brillo, y una posterior humeda donde ya se vió el brillo:
And to finish this post, I show you the bodywork once it has been lacquered with Number5 lacquer. The result is fantastic as you can see in the following photos. I gave it two soft coats, where the shine was not visible, and a subsequent wet coat where the shine was visible:
Ahora toca dejar secar bien y pulir la carrocería con lijas al agua. Gracias por ver y comentar.
Now it’s time to let it dry well and polish the body with wet sandpaper. Thanks for watching and commenting.