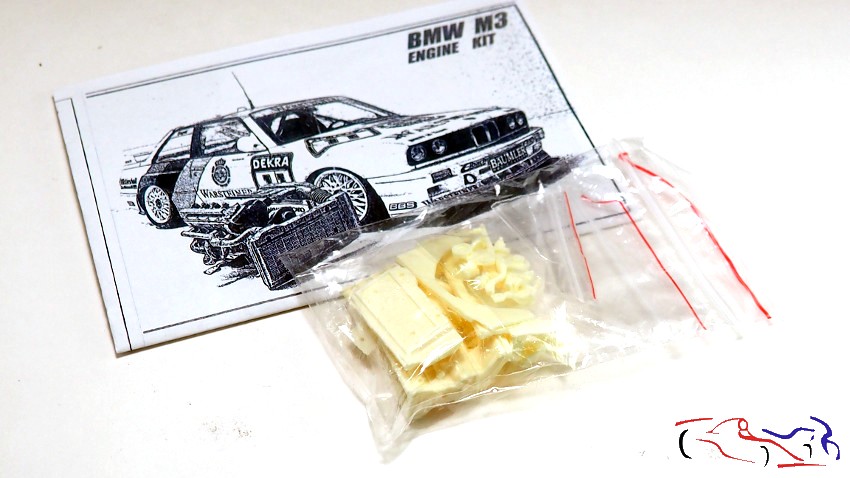
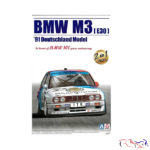
Empezamos un nuevo proyecto, que como últimamente, no me quedo quieto y tengo que hacerle algo más!! EN este caso, voy a realizar el BMW M3 E30 patrocinado por Marlboro, en manos de Luis Perez Sala y Olivier Groulliard, en las 4 horas del Jarama de 1987, valedero para el campeonato Mundial de Turismos, y que tuve la suerte de preseciar en vivo. De hecho, la foto que utiliza Decalcas para las calcas, la hice yo ese dia. Ya demás de las calcas, utilizaré los fotograbados de Beemax, las llantas BBS de Scale Production, las mascaras de los cristales de Decalcas, el motor de Scalwe Production, y el libro de Komakai. Decir, que también tengo la ayuda de los paso a paso que está haciendo mi amigo Borja al construir su M3, pero, no voy a llegar a su altura de detalles, que aun, tengo que mejorar mucho mucho para estar a su nivel!!
We started a new project, which like lately, I can’t sit still and I have to do something else!! IN this case, I am going to make the BMW M3 E30 sponsored by Marlboro, in the hands of Luis Perez Sala and Olivier Groulliard, in the 1987 Jarama 4 Hours, valid for the World Touring Car Championship, and which I was lucky enough to witness in alive. In fact, the photo that Decalcas uses for the decals was taken by me that day. In addition to the decals, I will use the photo-etched parts from Beemax, the BBS wheels from Scale Production, the glass masks from Decalcas, the engine from Scalwe Production, and the book from Komakai. To say, I also have the help of the step by step that my friend Borja is doing when building his M3, but I am not going to reach his height of details, I still have to improve a lot to be at his level!!
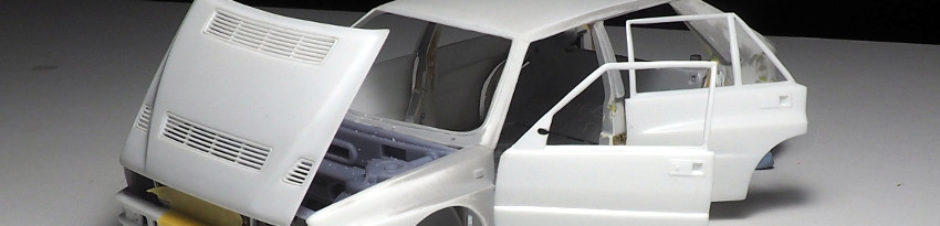
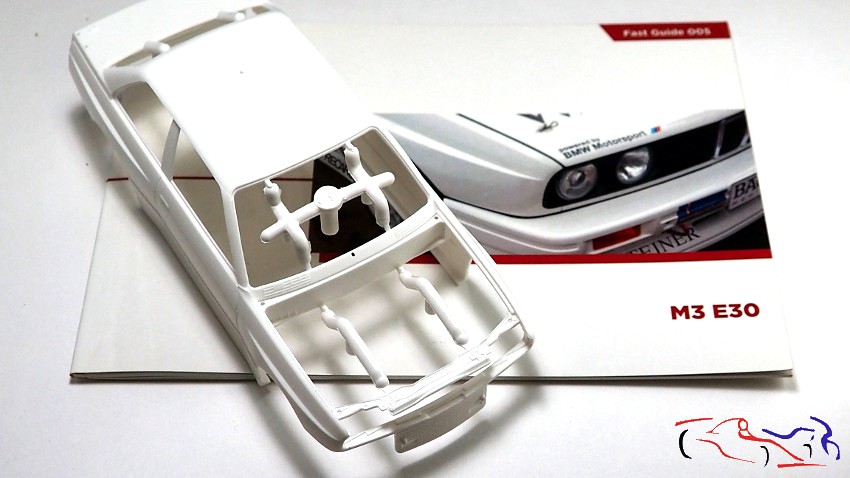
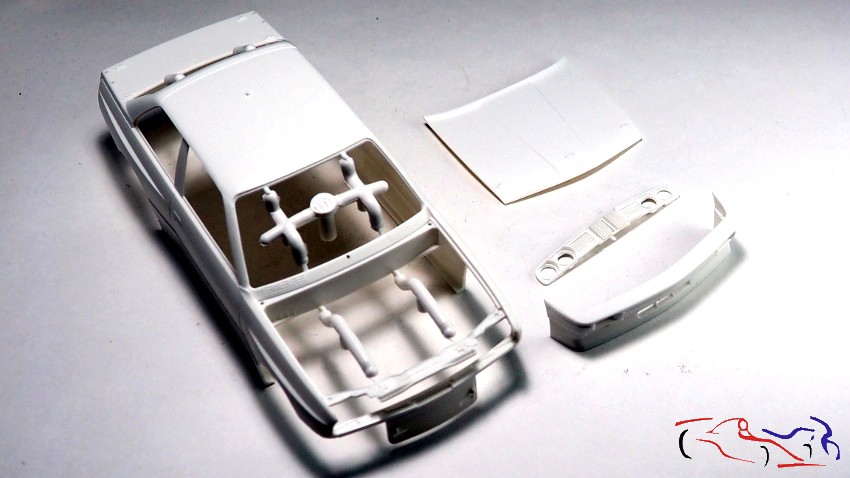
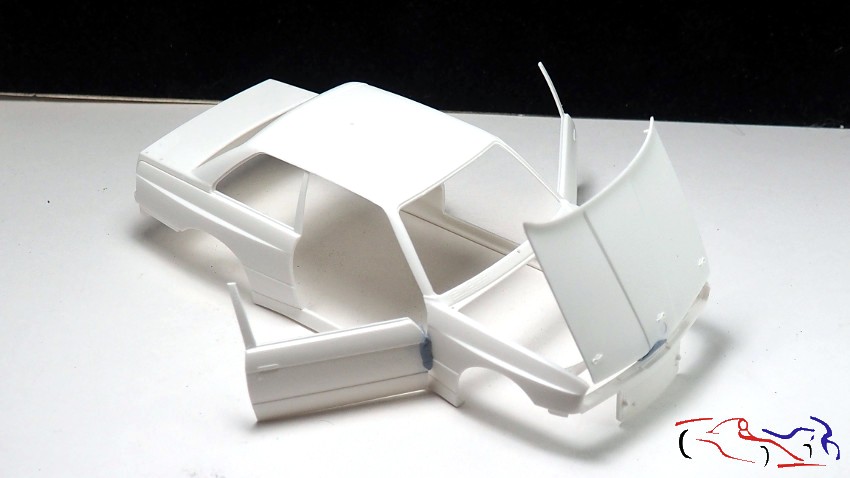
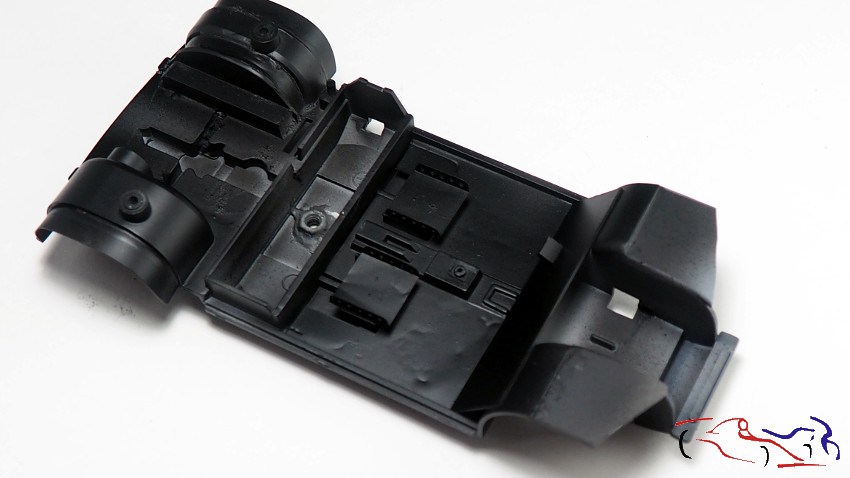
Y esta es la carrocería, con el capó delantero abierto de serie:
And this is the body, with the front hood open as standard:
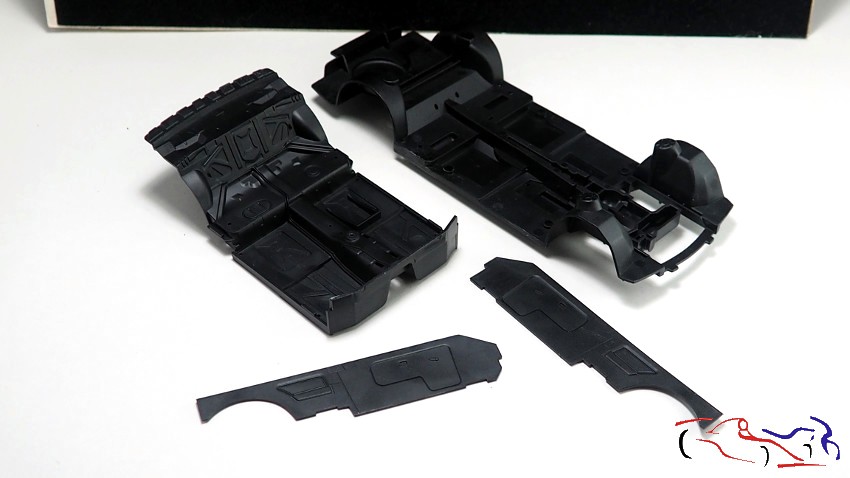
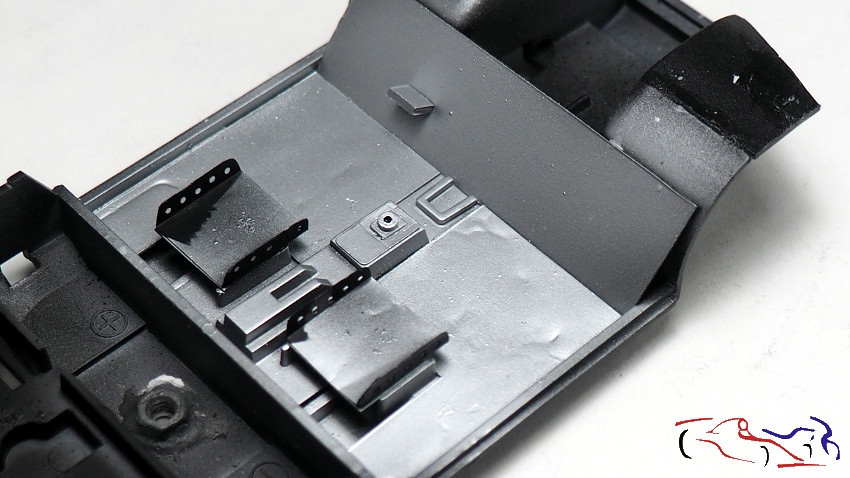
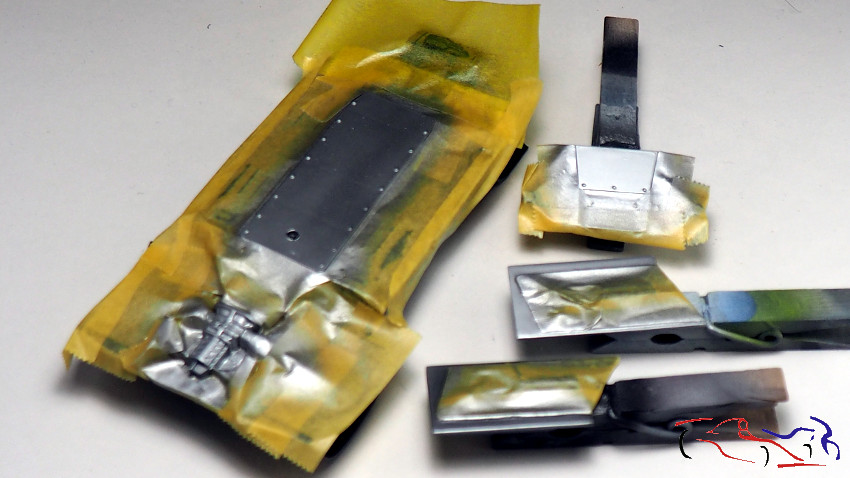
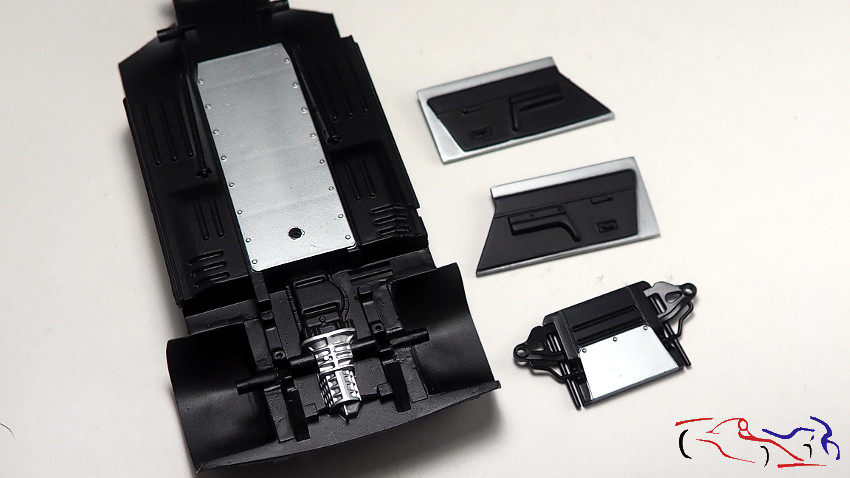
Un poco más del despiece del kit:
A little more about the kit breakdown:
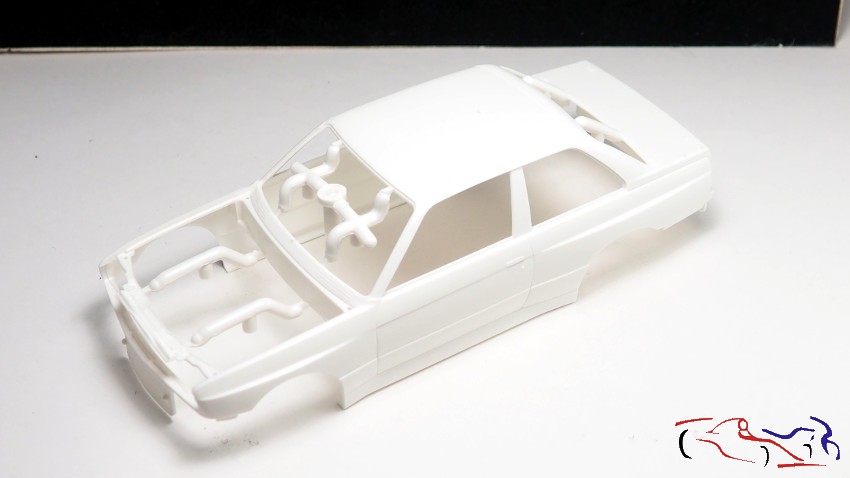
Y empezamos mostrando los paneles laterales del capó, que vienen con el motor. Y al mismo tiempo, voy eliminando lo que sobra del chasis para adaptar el motor.
And we start by showing the side panels of the hood, which come with the engine. And at the same time, I am eliminating what is left over from the chassis to adapt the engine.
Hacemos los test de los ejes trasero y delantero:
We do the tests of the rear and front axles:
También, eliminamos el cortafuegos superior que va unido a la carrocería. Este lo haré fijado en el chasis, para colocar toda la piecería que tiene éste:
Also, we eliminated the upper firewall that is attached to the body. I will fix this on the chassis, to place all the hardware that this one has:
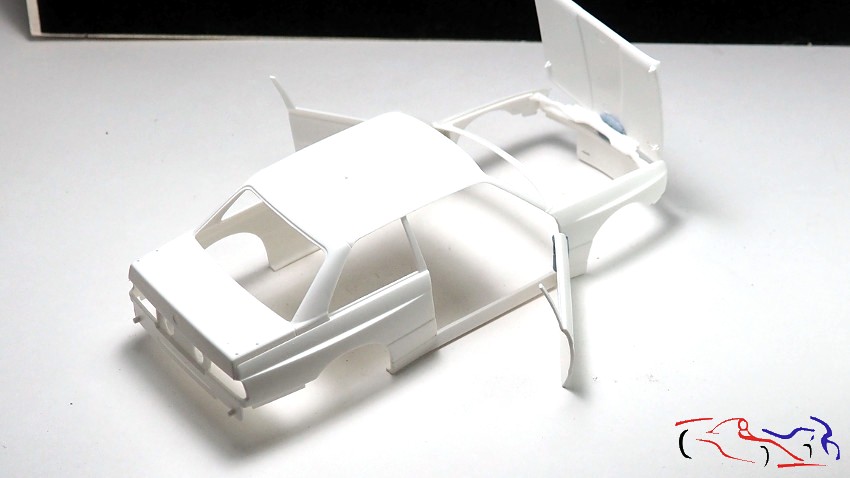
Y como dije que no me quedo quieto, ahí tengo las máuinas para abrir partes del plástico: las puertas!!
And as I said, I can’t sit still, I have the machines there to open parts of the plastic: the doors!!
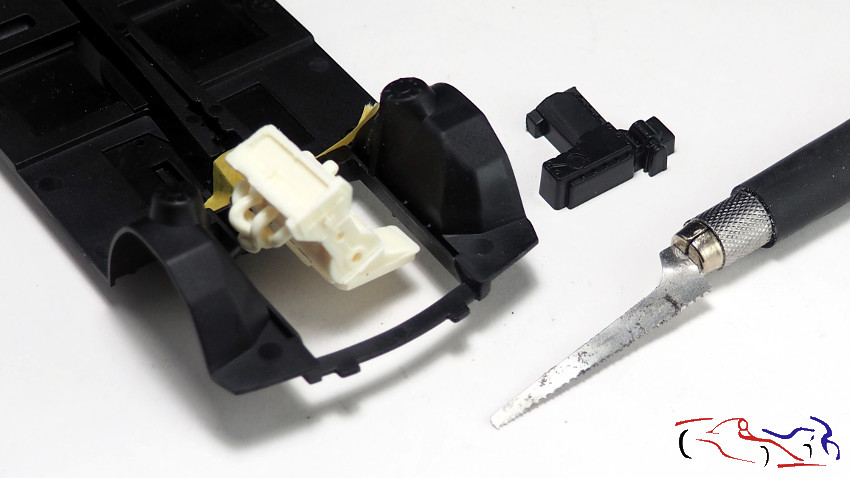
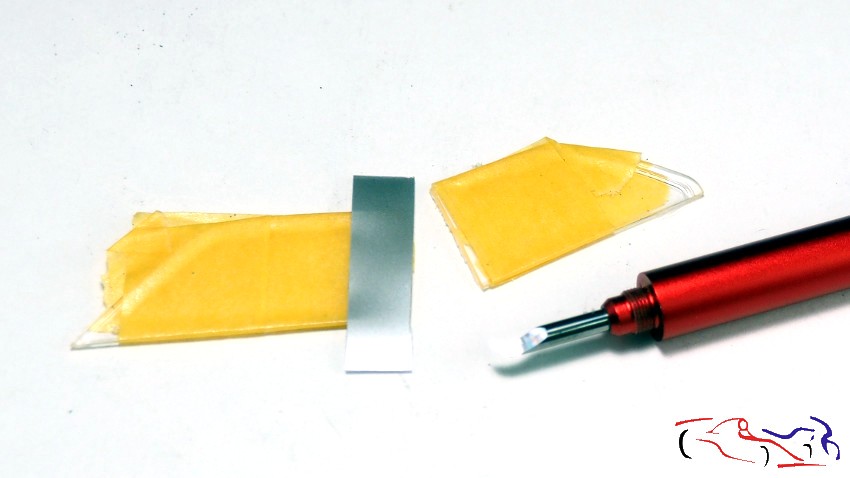
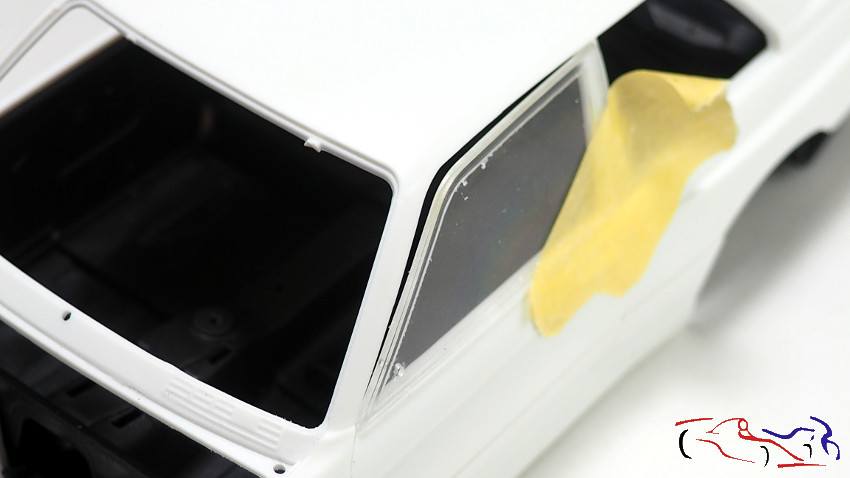
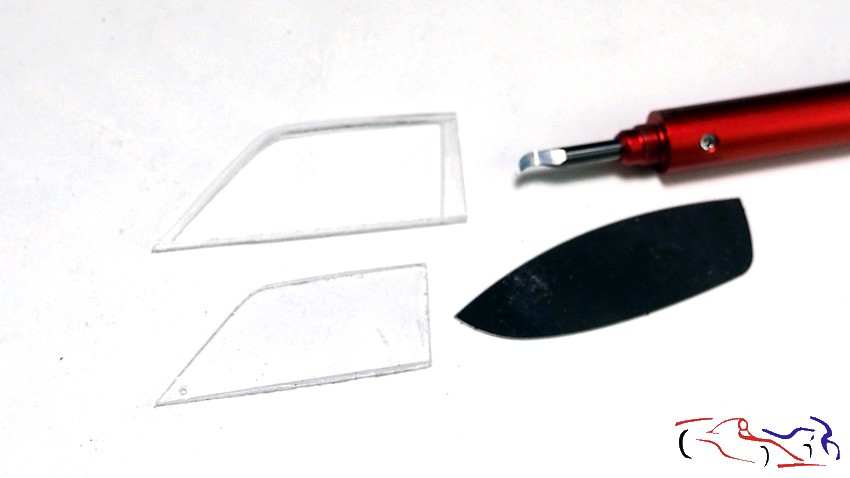
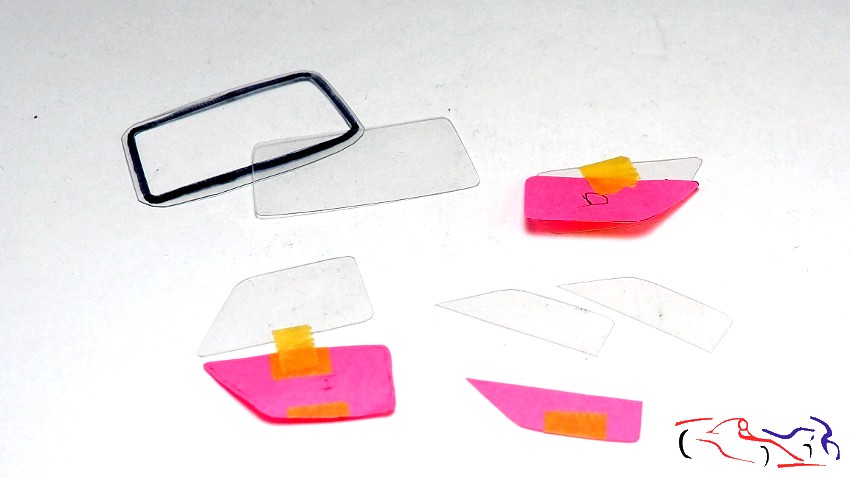
Y lógicamente, también tengo que dividir los cristales, y al ver como queda, aquí tenemos el primer inconveniente: el cristal se abre por el pilar delantero, por lo que decido eliminar el cristal propiamiente dicho del marco, para fijar el marco a la puerta, y hacer el cristal más adelante de acetato:
And logically, I also have to divide the glass, and seeing how it looks, here we have the first problem: the glass opens through the front pillar, so I decide to eliminate the glass itself from the frame, to fix the frame to the door , and make the glass later from acetate:
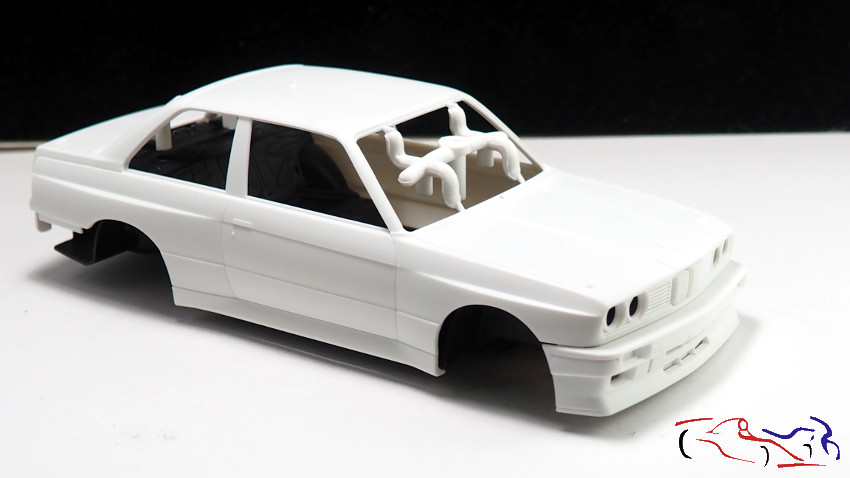
Y este es el objetivo!!
And this is the goal!!
Espero que todo vaya bien!! Gracias por ver y comentar!!
Hope everything goes well!! Thanks for viewing and commenting!!
Y llegamos al final! Después de 11 años con paradas grandes donde tomar decisiones o buscar materiales, este proyecto llega a su fin!! Y como siempre, mi valoración:
And we reach the end! After 11 years with big stops to make decisions or look for materials, this project comes to an end!! And as always, my assessment:
Empecemos por el kit. El kit en si es muy báscio con pocas piezas. Si bien es un kit preparado para ponerle motor, a nivel de chasis deja mucho que desear en cuanto a conjuntos de suspensión, triángulos, ya que el eje trasero es un redondo de metal con una corona para acoplar un motor eléctrico, y en el delantero, tiene lo básico para que las ruedas giren y se muevan a derecha e izquierda. De la carrocería, diré que está bien de formas y los detalles que le hacen ser más real los eliminé, como son los intermitentes, luces de posición, antinieblas y matrícula delantera, que iban integrados para ser pintados, yo hice una copia de los originales con Oyumaru, para eliminarlos y rehacerlos en plástico transparente.
Let’s start with the kit. The kit itself is very basic with few pieces. Although it is a kit prepared to put an engine, at the chassis level it leaves a lot to be desired in terms of suspension sets, triangles, since the rear axle is a round metal one with a crown to attach an electric motor, and on the front , has the basics for the wheels to turn and move right and left. Regarding the bodywork, I will say that it is well shaped and I eliminated the details that make it more real, such as the turn signals, position lights, fog lights and front license plate, which were integrated to be painted, I made a copy of the originals with Oyumaru, to remove them and remake them in transparent plastic.
De los extras, utilicé las hojas de fotograbado del Studio27 para este coche y el del Alpine Gr2, eliminando las rejillas de las entradas de aire para sustituirlas por las de los fotograbados. Los faros de largo alcance y cuneteros de DAB Models le van muy bien, habiendo creado las fjaciones, que son muy específicas paar este coche. Y las ruedas, con unas llantas Braid que no son fáciles de conseguir y que un modelista de las Islas Canarias me proporcionó. SIn ellas, no hubiera podido crear este coche. Los asientos también son distintos, proporcionados por la marca Renaissance.
Of the extras, I used the Studio27 photo-etched sheets for this car and the Alpine Gr2, eliminating the air intake grilles to replace them with those from the photo-etched parts. The DAB Models long-range and side-direction headlights fit very well, having created the fixings, which are very specific for this car. And the wheels, with Braid rims that are not easy to find and that a modeler from the Canary Islands provided me. WITHOUT them, I would not have been able to create this car. The seats are also different, provided by the Renaissance brand.
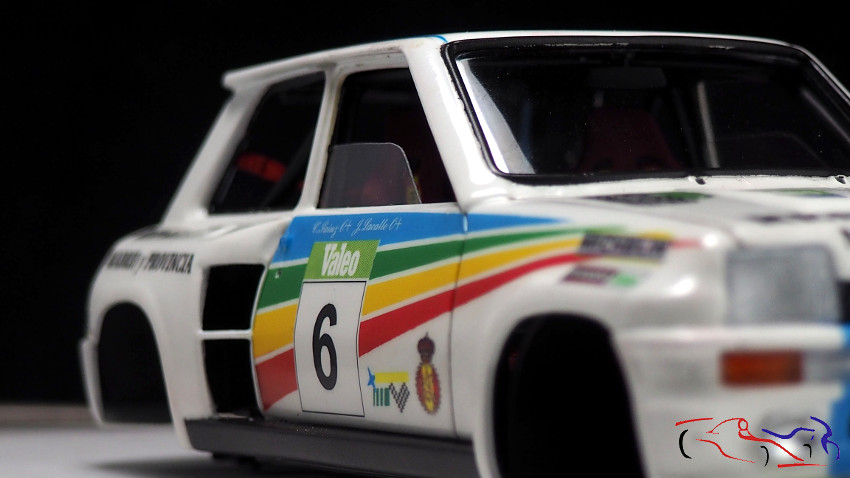
Las Calcas. SI bien partí de una hoja de calcas realizada por KitCar43 en España, decidí pintar las frnajas de colores ya que las calcas no eran muy buenas. Y respecto a los logos algunos me valían y otros no, porque las calcas originales pertenecían a un rally distinto del que yo quería hacer, por lo cual, las encargué a un modelista, que lamentablemente, ya no trabaja. Pintura, laca y pulido, se aplicaron sin mayor problema.
The Calcas. Although I started from a sheet of decals made by KitCar43 in Spain, I decided to paint the stripes in colors since the decals were not very good. And regarding the logos, some worked for me and others didn’t, because the original decals belonged to a rally different from the one I wanted to do, so I ordered them from a modeller, who unfortunately no longer works. Paint, lacquer and polish were applied without any problems.
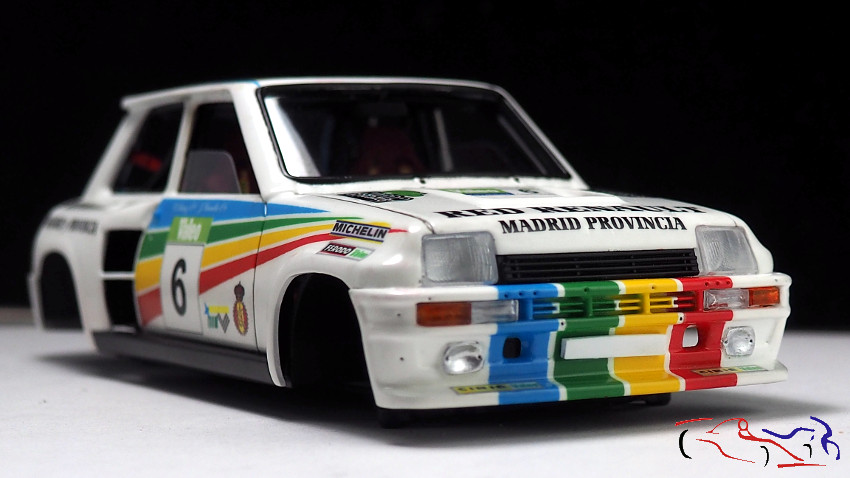
Con esto, doy por terminada la valoración, y paso a mostraros las fotos. Empezamos por las vistas delanteras:
With this, I conclude the evaluation, and move on to show you the photos. We start with the front views:
Vista trasera:
Back views:
Vista lateral:
Side view:
Vista elevada:
Elevated view:
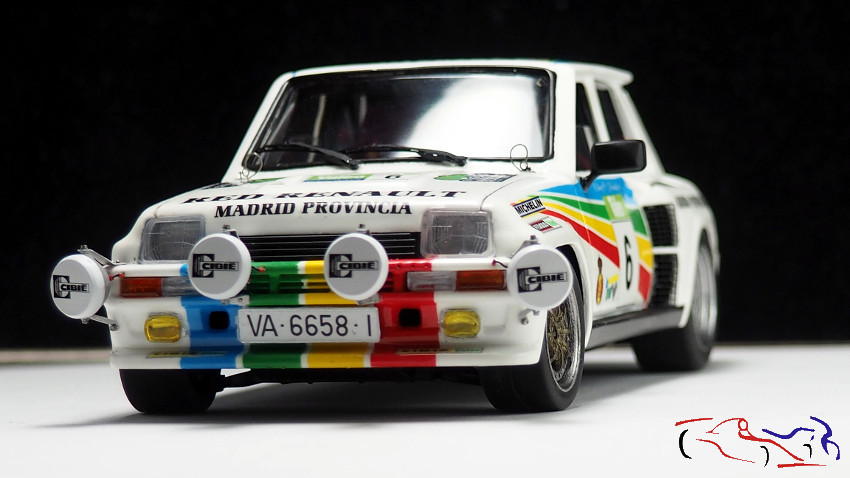
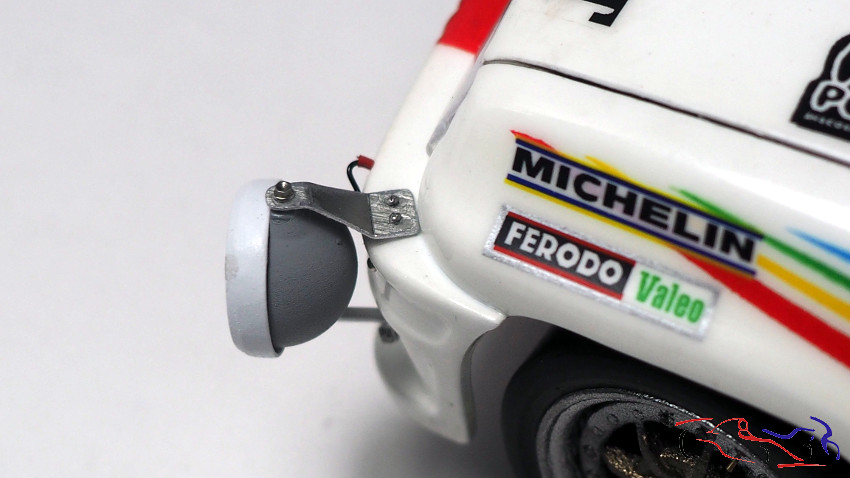
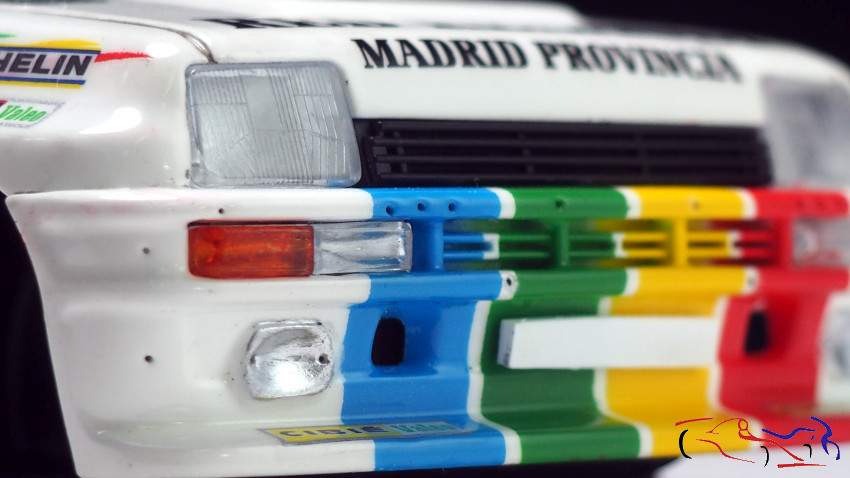
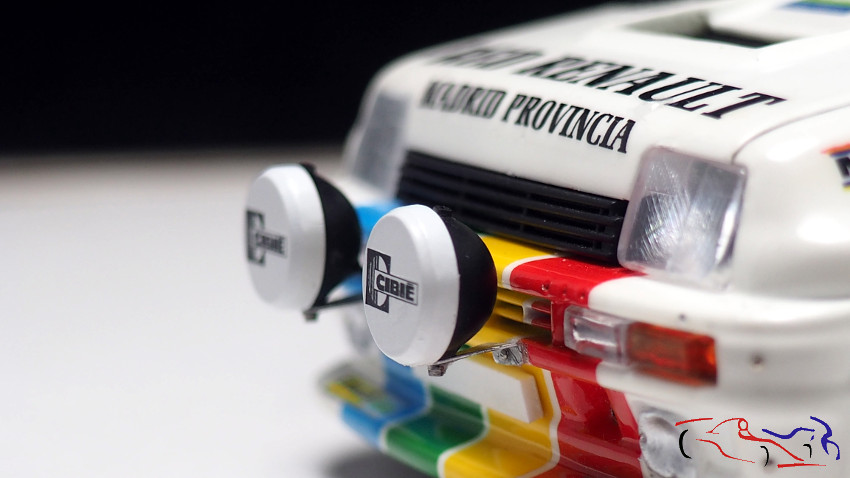
Detalles de los faros extra de DAB Models:
Details of DAB Models extra headlights:
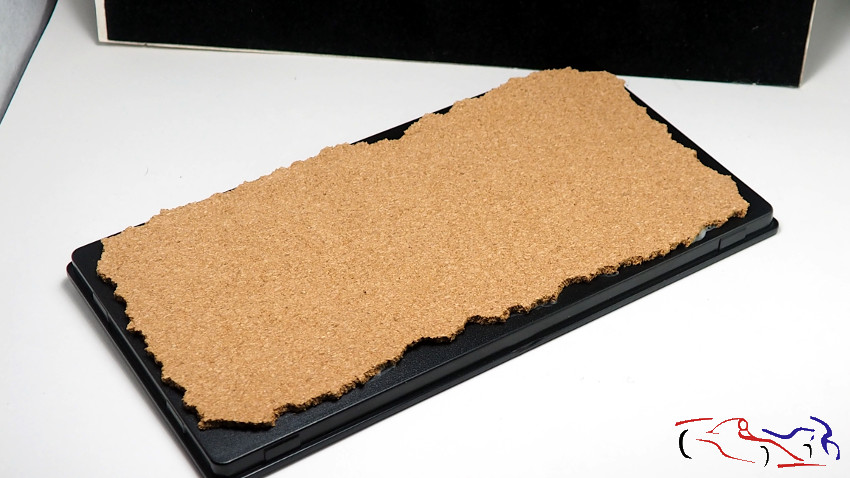
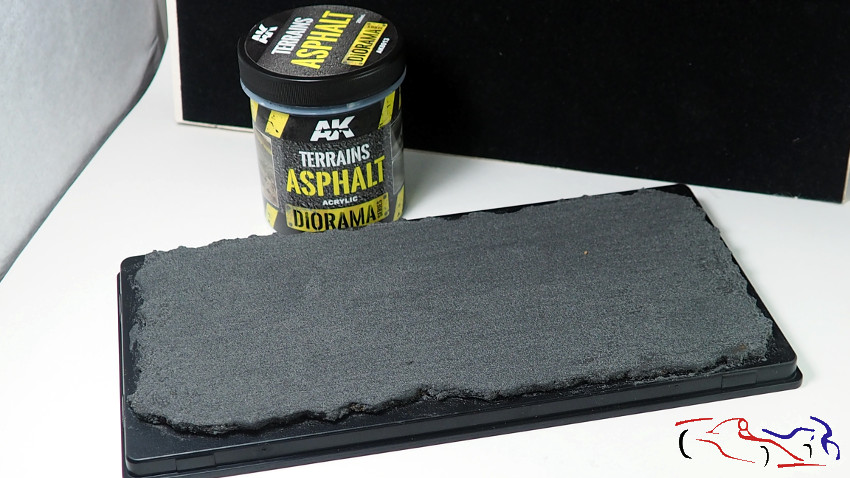
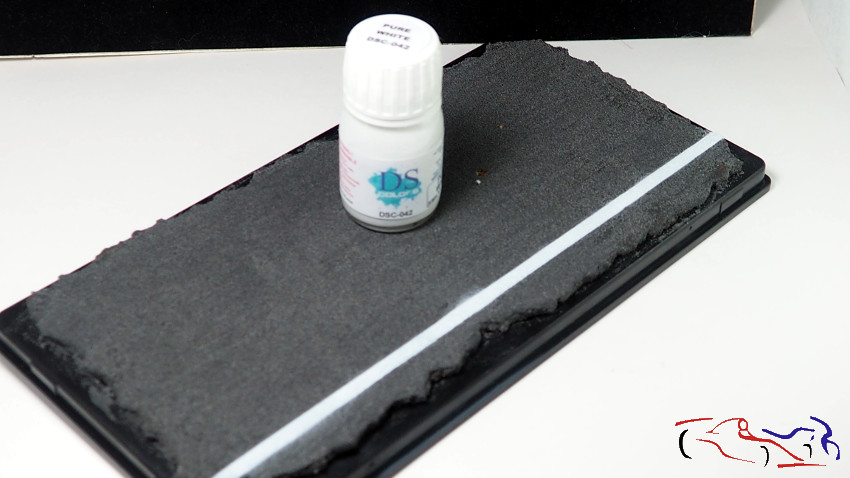
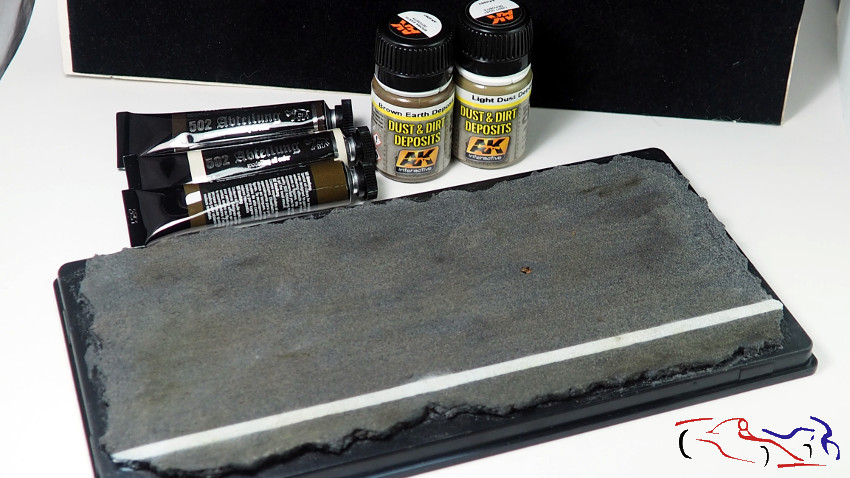
Y ahora, la esplicación de como ice la base de la urna: Primero puse corcho pegado con cola blanca. Le añadí “Asfalto” de AK, aplicado con una brocha. Una vez seco, enmascaro y pinto la linea blanca lateral de la carretera, para terminar con oleos y lavados de AK, que voy dando muy diluidos por toda la base, para ensuciarla:
And now, the explanation of how I iced the base of the urn: First I put cork glued with white glue. I added AK’s “Asphalt”, applied with a brush. Once dry, I mask and paint the white line on the side of the road, to finish with oils and AK washes, which I apply very diluted throughout the base, to get it dirty:
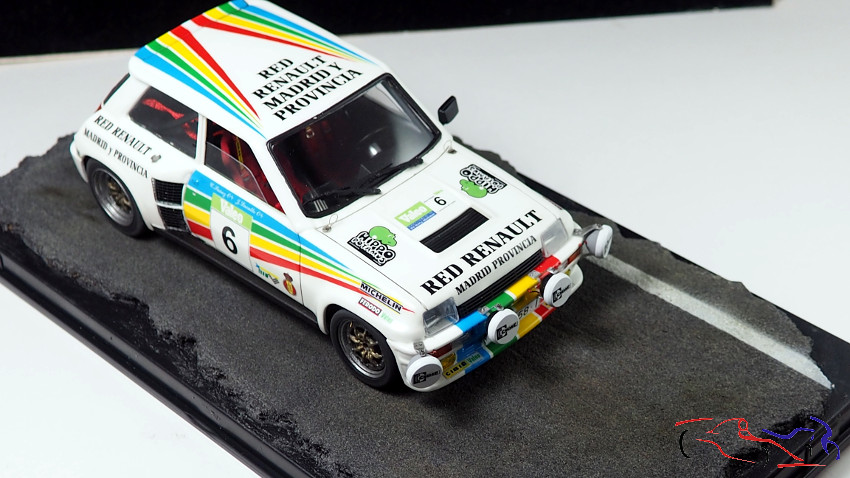
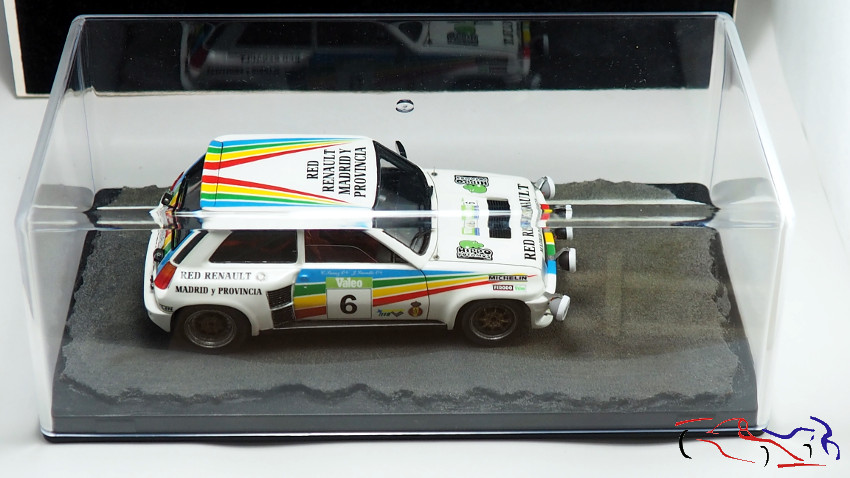
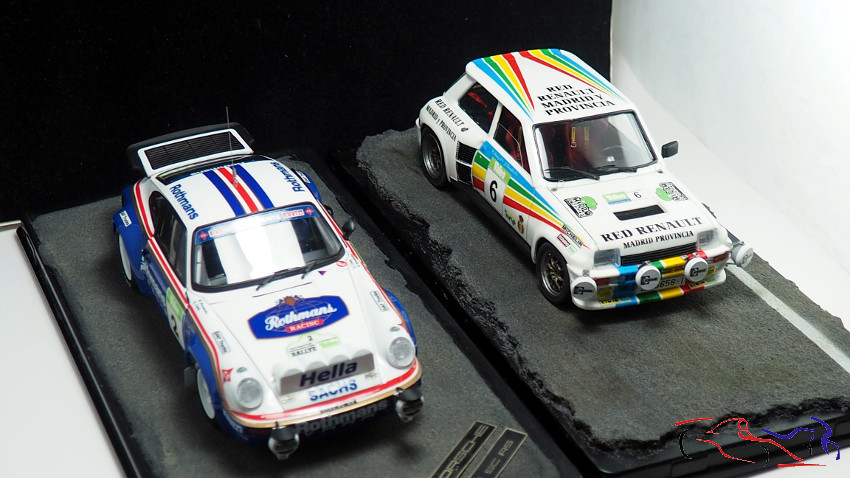
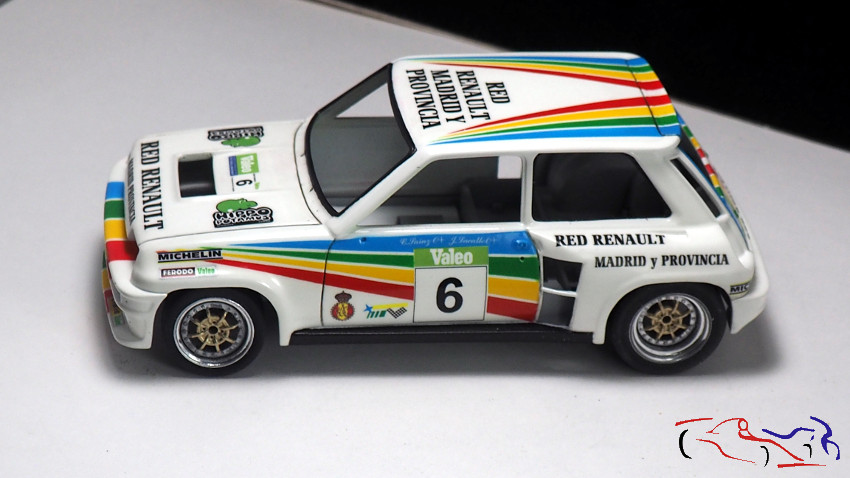
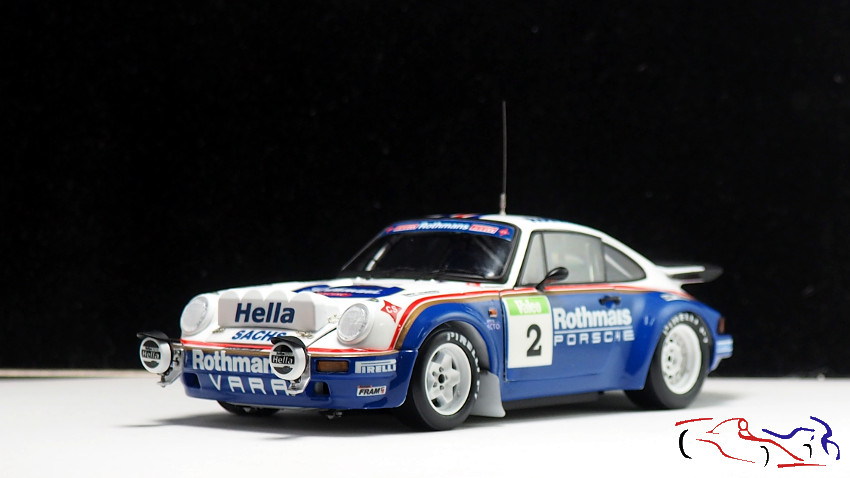
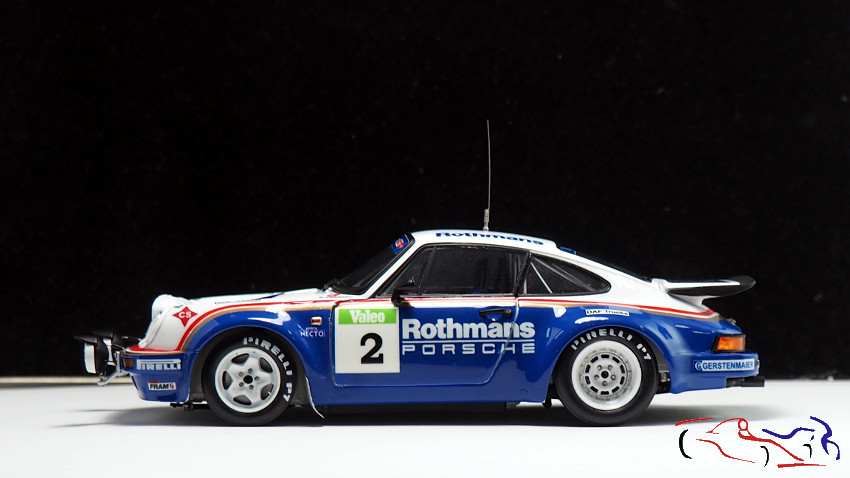
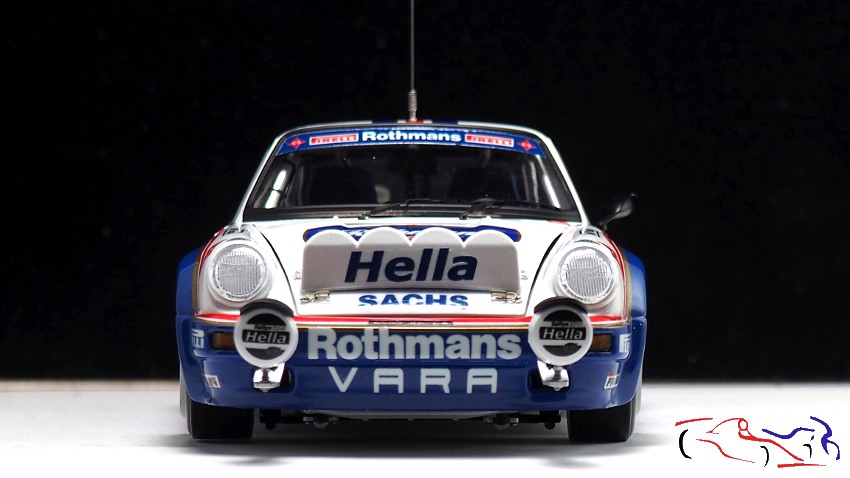
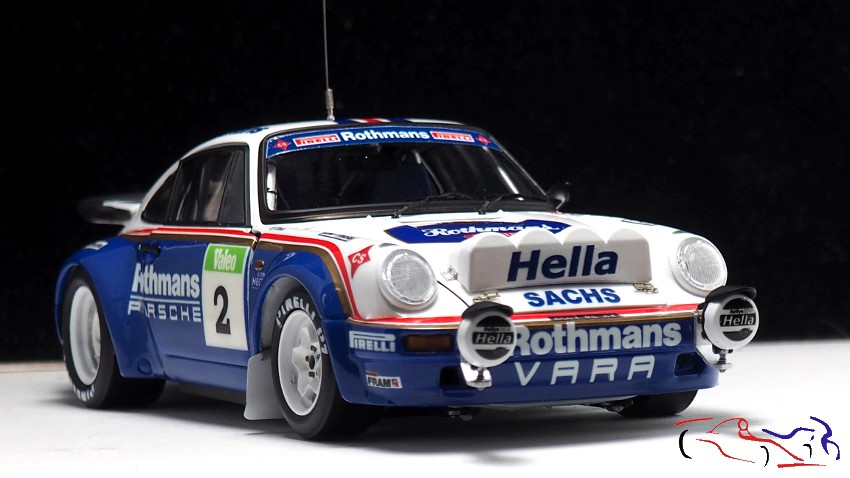
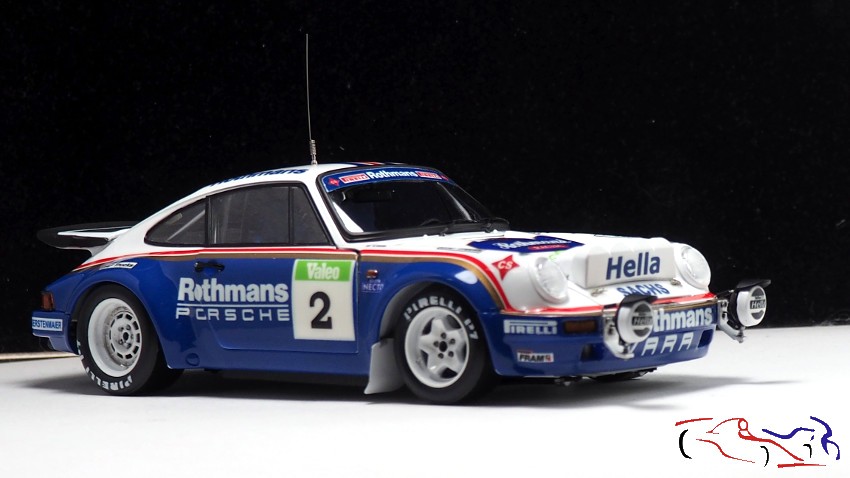
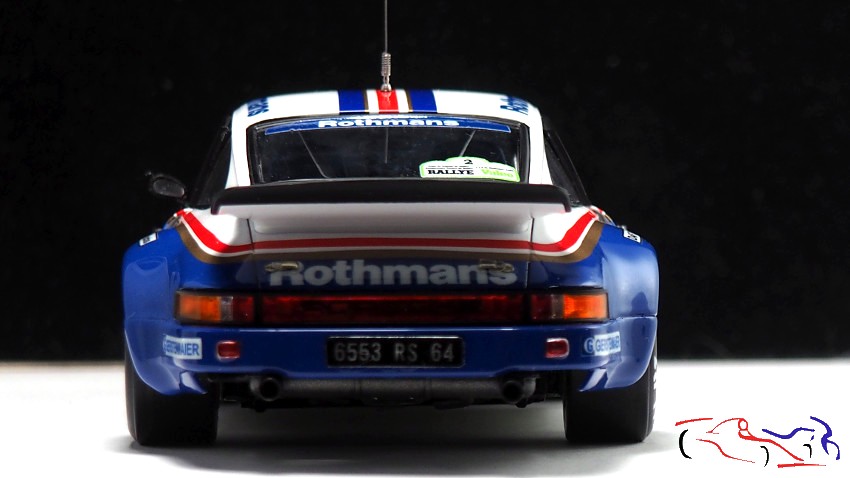
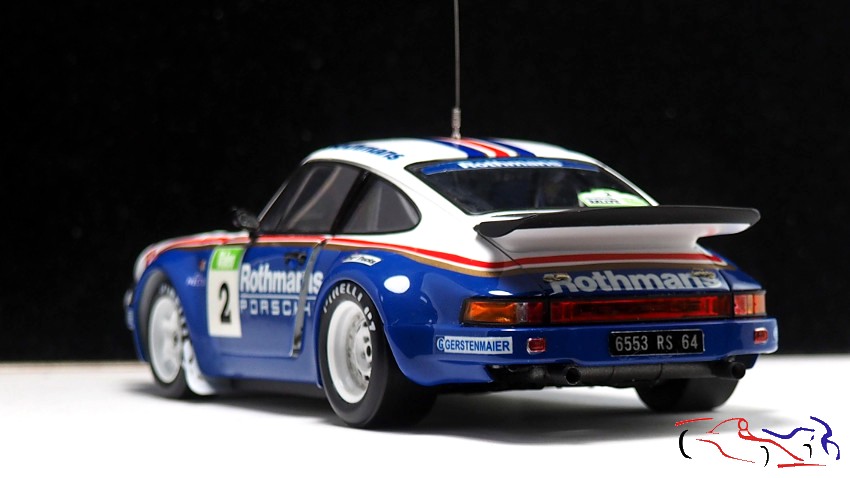
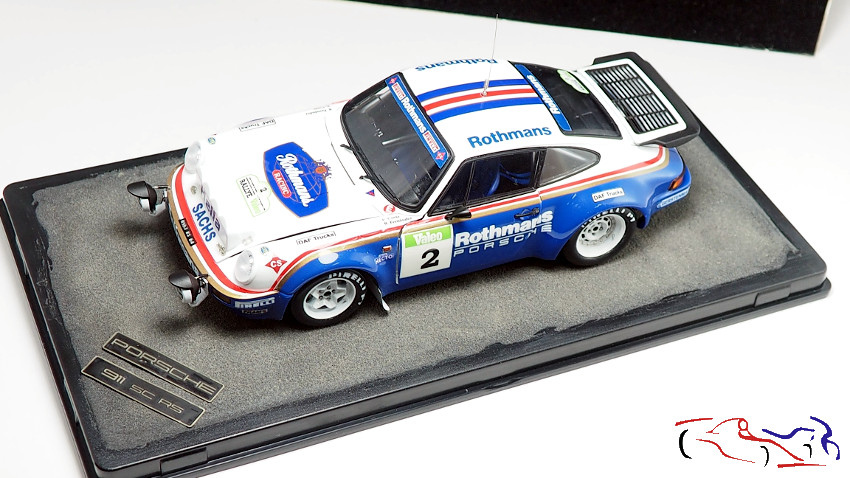
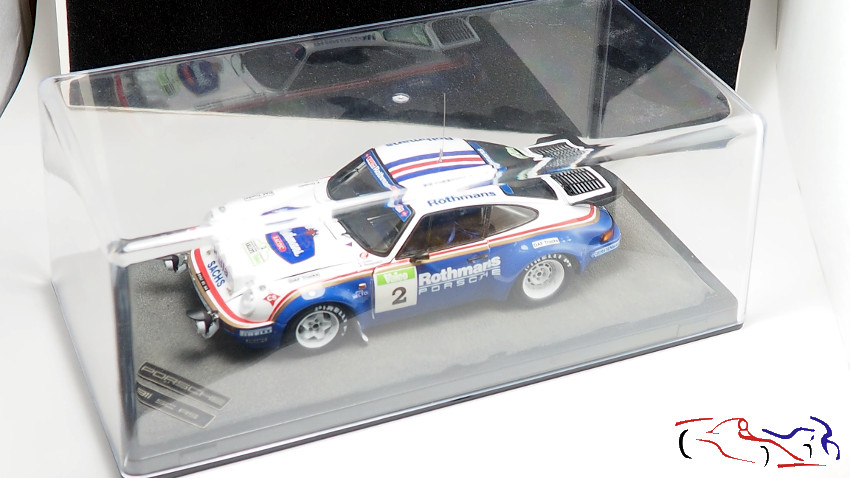
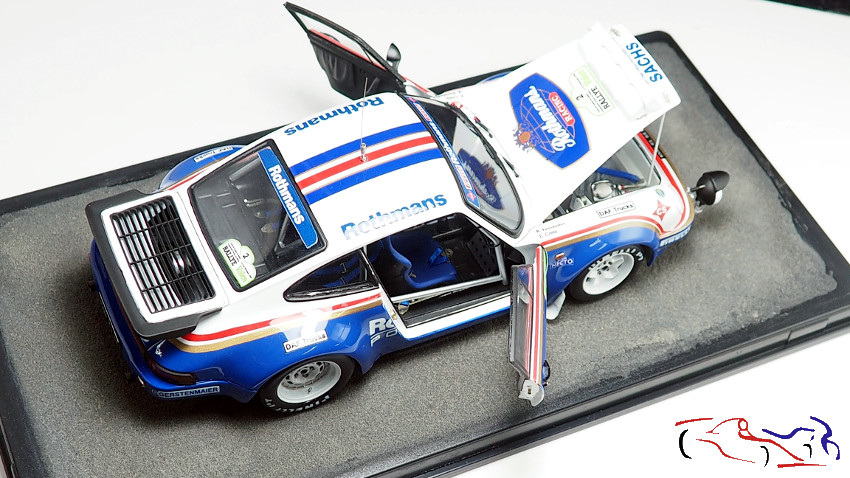
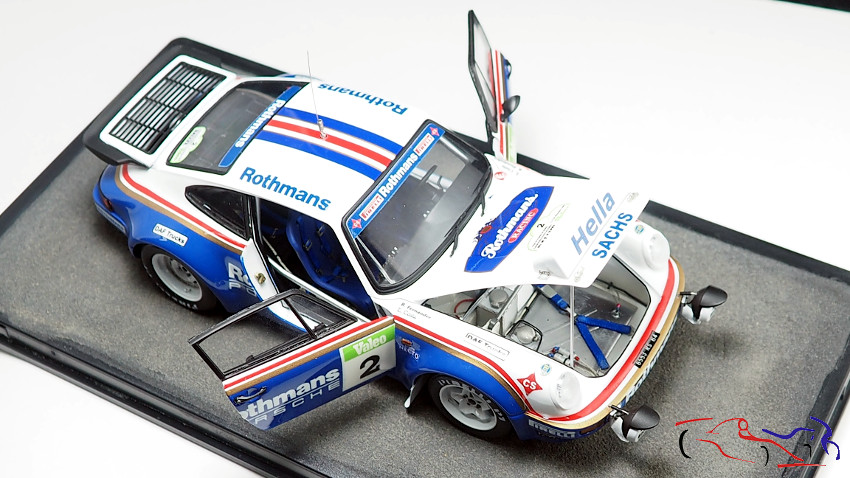
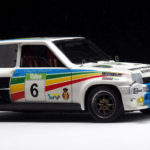
Y aquí las fotos finales en la base, dentro de la urna, y con el Porsche 911 Rothmans, coche con el que compitieron el mismo año 1984 en el rally Valeo, aunque el R5Turbo lo llevara Antonio Sainz, hermano de Carlos Sainz. Deciros, que Carlos Sainz fichó por entonces con Renault España, y que condujo el R5 Tour de Corse en ese rally, siendo el vencedor absoluto (ese R5T TdC también le tengo pendiente de hacer).
And here are the final photos at the base, inside the urn, and with the Porsche 911 Rothmans, a car with which they competed in the same year 1984 in the Valeo rally, although the R5Turbo was driven by Antonio Sainz, brother of Carlos Sainz. Let me tell you that Carlos Sainz signed with Renault Spain at that time, and that he drove the R5 Tour de Corse in that rally, being the absolute winner (I also have yet to do that R5T TdC).
Espero que os haya gustado!! Gracias por ver y comentar.
I hope you liked it!! Thanks for viewing and commenting.
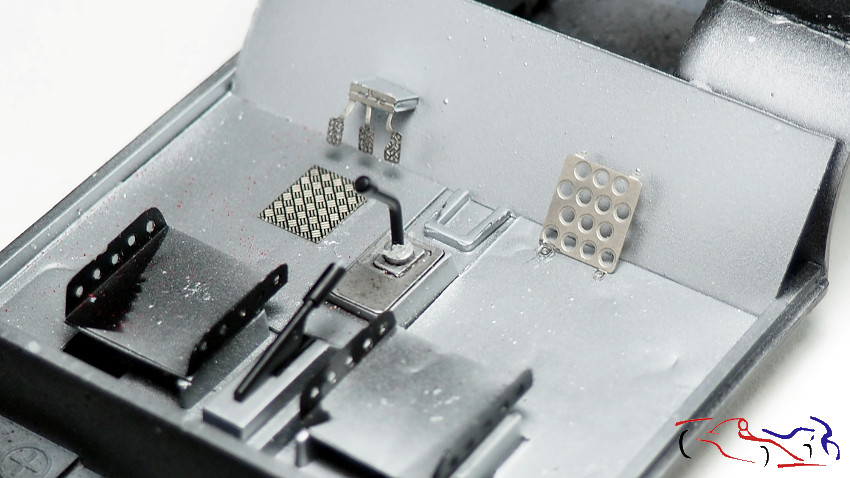
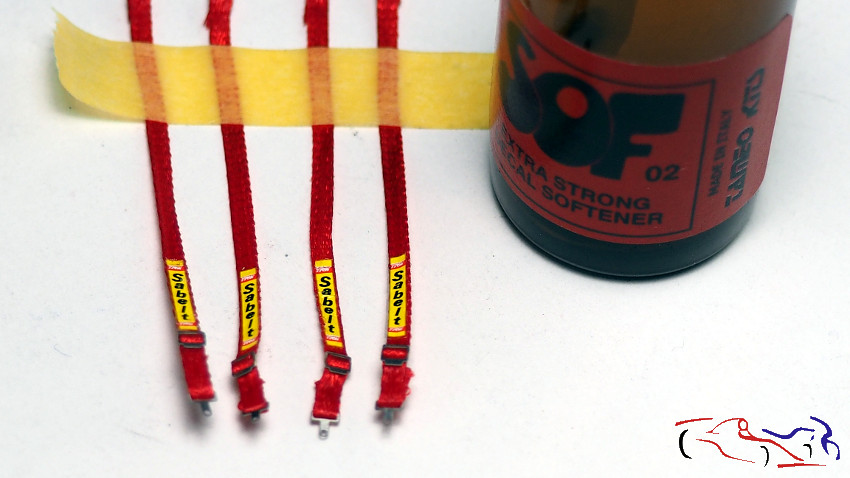
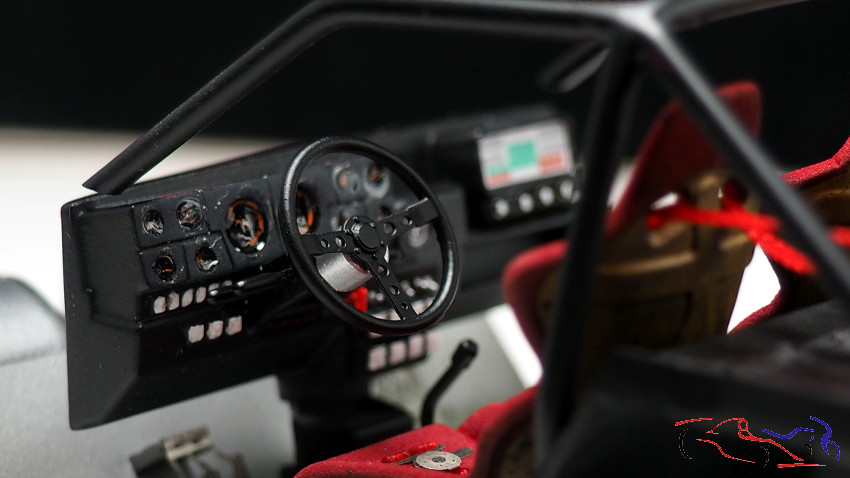
Continuamos con los pasos finales de este proyecto siendo este post el ultimo antes de las fotos finales. Empecemos con el cockpit, ya que lo primero que hay que haces es poner el chasis en la carrocería. Incluimos los fotograbdos para dar un poco de contenido al mismo, incluyendo el extintor, que lo colocamos de acuerdo al la situación del asiento. Y respecto a los asientos, cortamos los cinturones, colocaos los fotograbados y les colocamos las calcas con ayuda del líquido extra fuerte de Tameo, que deja las calcas con la trama del cinturón. Cuidado si lo usáis, que no debéis tocar la calca después de aplicarlo porque se deshace si no está seca.
We continue with the final steps of this project, this post being the last one before the final photos. Let’s start with the cockpit, since the first thing you have to do is put the chassis on the body. We include the photogravures to give a little content to it, including the fire extinguisher, which we place according to the situation of the seat. And regarding the seats, we cut the belts, place the photo-etched parts and place the decals on them with the help of Tameo’s extra strong liquid, which leaves the decals with the pattern of the belt. Be careful if you use it, you should not touch the decal after applying it because it will fall apart if it is not dry.
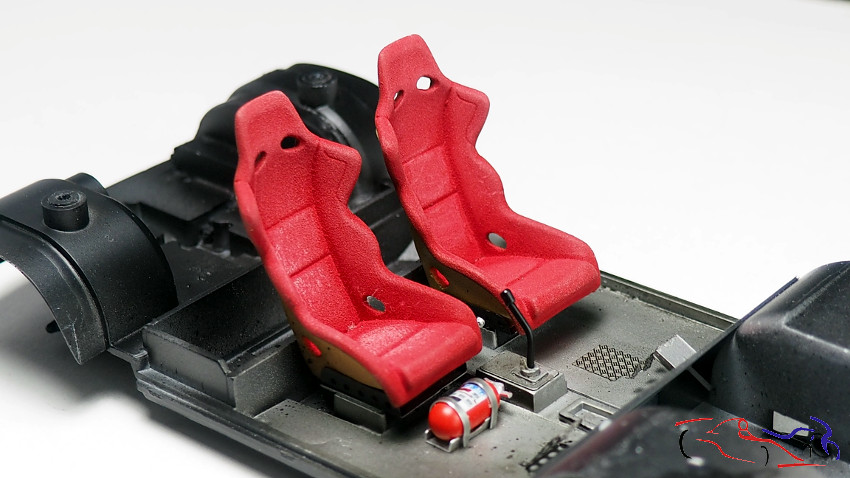
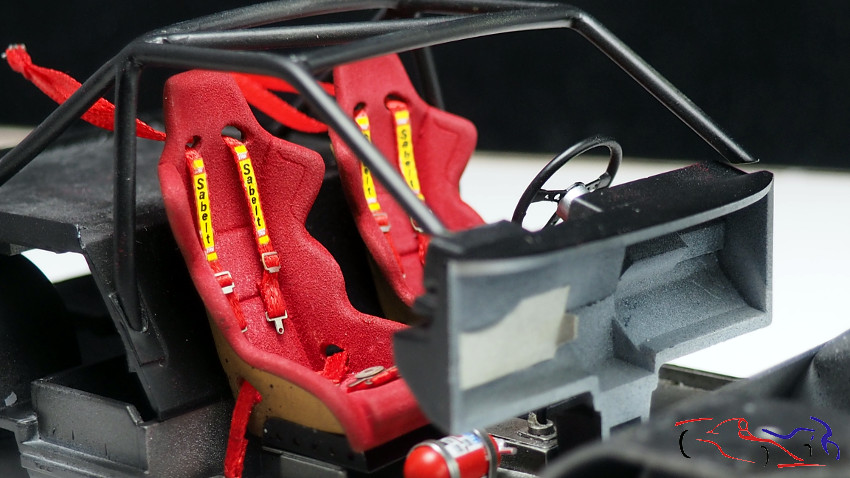
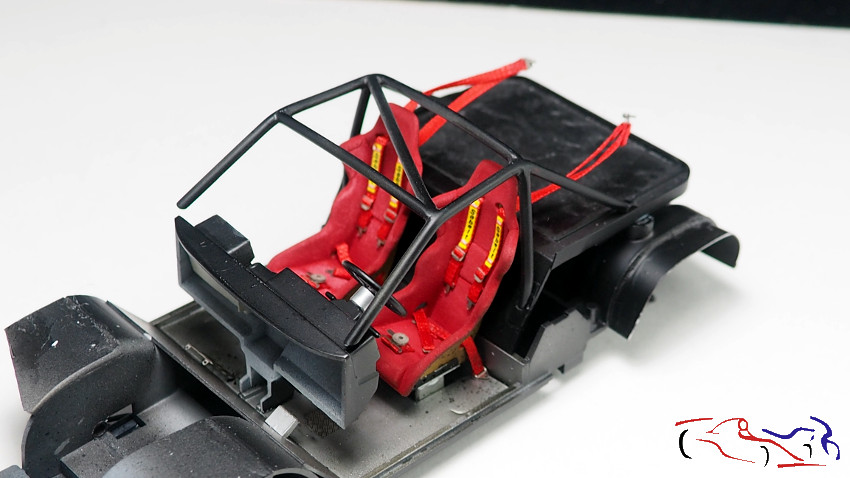
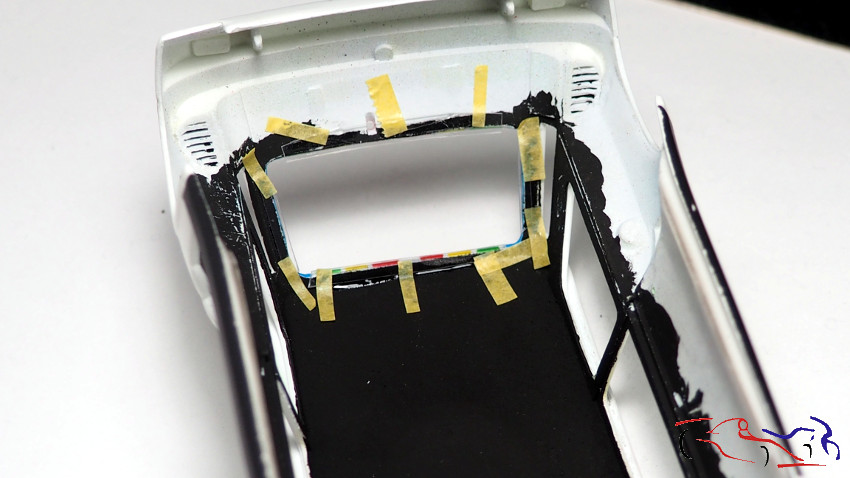
Y una vez puestos, lo pegamos todo en el cockpit; asientos, salpicadero y la parte trasera con la jaula incluida. Si os fijáis, la fijación posterior de los cinturones está en el aire. Eso es debido porque van fijados en los pilares traseros. Por eso, recorté el cristal trasero y los laterales, para hacerlos nuevos de acetato y pegarlos después.
And once they are installed, we glued everything to the cockpit; seats, dashboard and the rear with the cage included. If you notice, the rear attachment of the belts is up in the air. This is because they are fixed to the rear pillars. Therefore, I cut out the rear glass and the sides, to make them new acetate and glue them later.
Cristales. Protegemos el delantero para separarlo de los laterales. Ponemos unas guias con cinta de dymo. Una vez separado, afinamos los cortes laterales.
Crystals. We protect the front to separate it from the sides. We put some guides with Dymo tape. Once separated, we refine the side cuts.
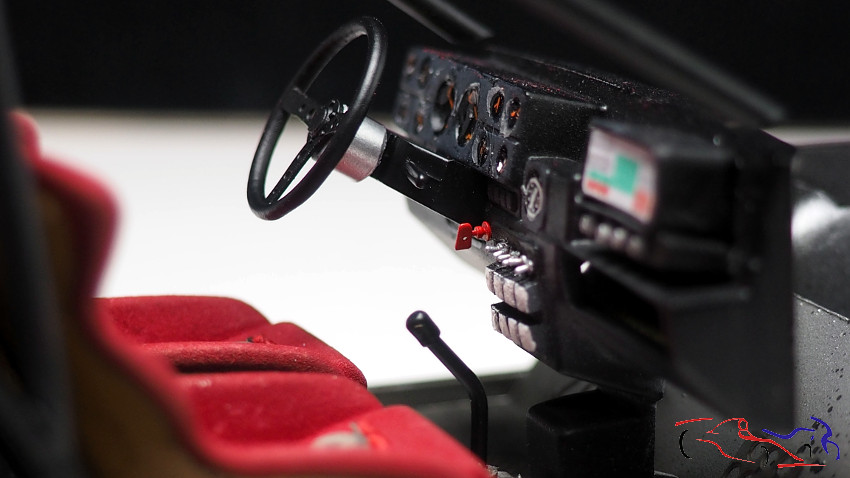
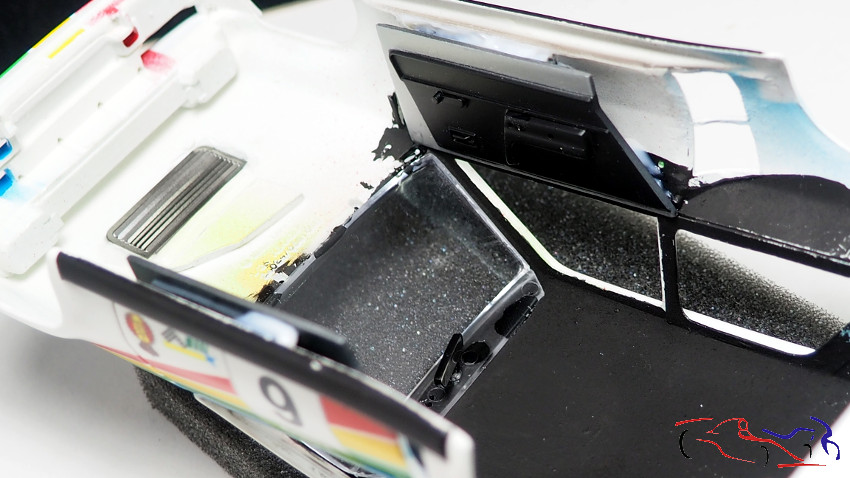
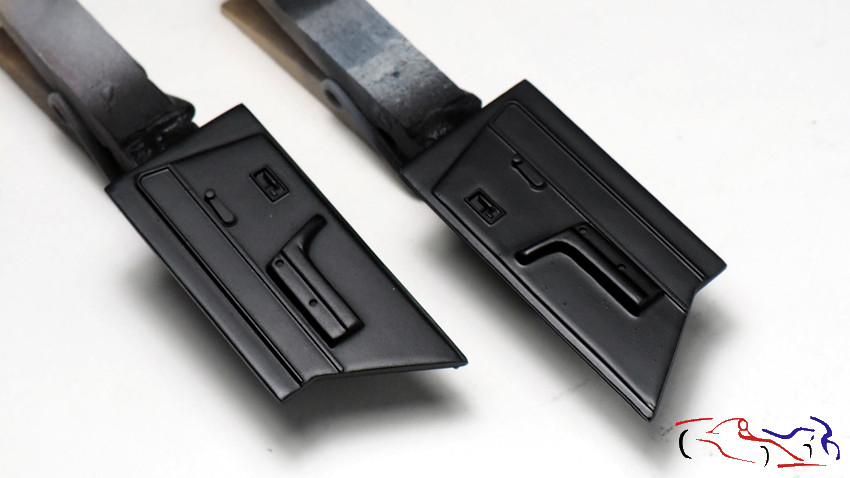
En la siguiente foto del interior d ela carrocería, vemos el cristal delantero colocado, el fotograbado de la entrada de aire del capo delantero y los laterales d elas puesrtas. Deciros que el cristal delantero y el fotograbado están pegados con resina UV. Y el interior está todo pintado de negro de Vallejo a pincel. En al segunda foto, vemos el cristal y el fotograbado ya pegados.
In the following photo of the interior of the body, we see the front glass in place, the photo-etched air intake of the front hood and the sides of the doors. Tell you that the front glass and the photo-etched part are glued with UV resin. And the interior is all painted Vallejo black with a brush. In the second photo, we see the glass and the photo-etched part already glued.
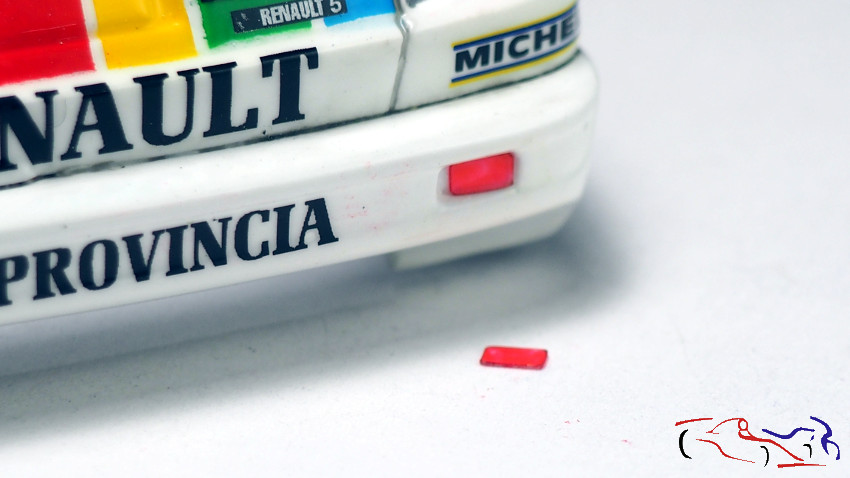
La carrocería tiene dos huecos en el faldon trsero para los reflectantes rojos. Para hacerlos, corto acetato en su medida, los pinto de rojo con rotulador permanente Edding 3000, y los pego con resina UV. En al segunda foto, se ven ya colocados con las luces traseras, igualmente pegadas con resina UV.
The body has two holes in the rear apron for the red reflectors. To make them, I cut acetate to size, paint them red with Edding 3000 permanent marker, and glue them with UV resin. In the second photo, they are already installed with the rear lights, also glued with UV resin.
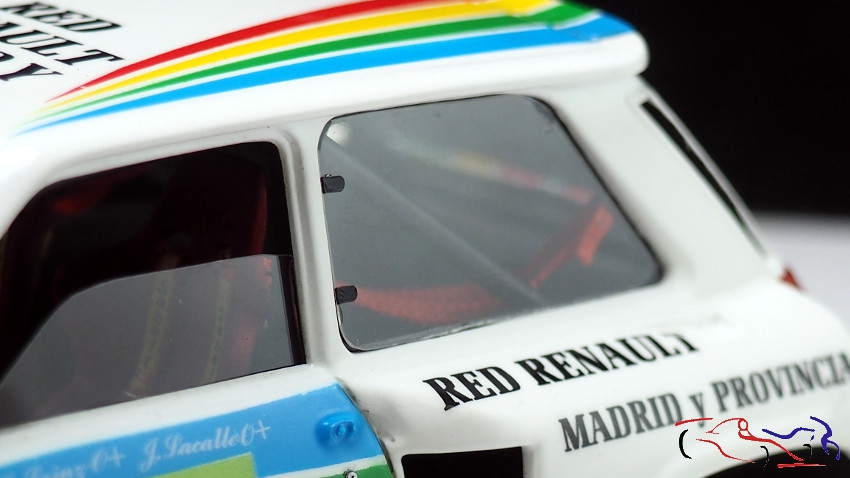
Ya podemos poner el chasis en la carrocería, y colocar los cinturones en los pilares traseros por los huecos d elas ventanas. Y pasamos a los cristales traseros. Primero, hacemos unas plantillas de papel, poniéndolas por dentro d ela carrocería y pasando un lapiz por desde el exterior a lo largo del hueco del cristal. Lo recortamos, lo pasamos al acetato recortándolo y afinándolo. Los laterales delanteros iran pegados sobre los paneles interiores ya colocados. Los laterales traseros, irán pegados sobre el borde que ya creamos en capítulos anteriores. Y el cristal trasero, hay que hacerle las fijaciones donde apoyará. Para ello, corto unas tiras de acetato transparente, lo suficientemente anchas como para que se fijen en la carroceria y salgan de la misma unos 5 mm. Los fijamos con cinta de enmascarar, y con resina UV. Una vez seca, retita¡ramos las cintas. En al ultima foto, vemos como el cristal posterior se puede apoyar en dichas tiras.
We can now put the chassis on the body, and place the belts on the rear pillars through the gaps in the windows. And we move on to the rear windows. First, we make some paper templates, placing them inside the body and running a pencil from the outside along the gap in the glass. We cut it out, transfer it to the acetate, trimming it and fine-tuning it. The front sides will be glued on the interior panels already placed. The rear sides will be glued on the edge that we already created in previous chapters. And the rear glass, you have to make the fixings where it will rest. To do this, I cut some strips of transparent acetate, wide enough to be fixed to the body and protrude about 5 mm from it. We fix them with masking tape, and with UV resin. Once dry, we will remove the tapes. In the last photo, we see how the rear glass can rest on these strips.
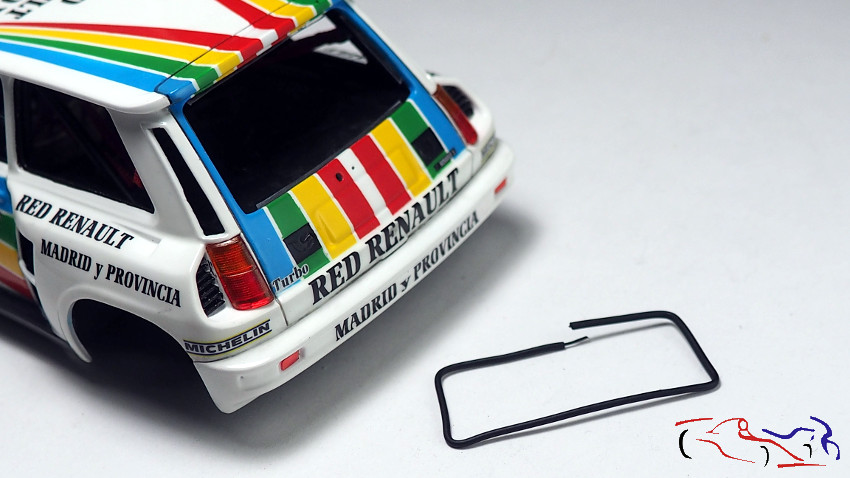
Ahora vamos con el borde del cristal. Con tubo de goma, le metemos un cable regido, que damos la forma del hueco del cristal. Finalmente, ponemos el cristal con resina UV, y encima en el borde, el marco pegado con Glue de MIG.
Now let’s go to the edge of the glass. Using a rubber tube, we insert a rigid cable, which we shape into the hole in the glass. Finally, we put the glass with UV resin, and on top of it, on the edge, the frame glued with MIG Glue.
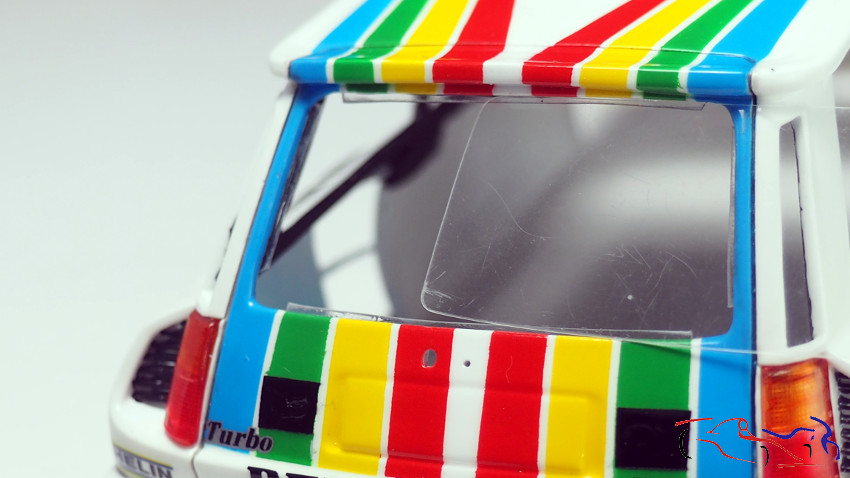
Fotos declos cristales ya pegados. En la primera foto, vemos el cristal trasero con las fijaciones en la parte delantera (trocitos d emetal redondeados y pinatdos de negro semimate). EN al segunda foto, el cristal delantero derecho, que lo he dejado medio abierto para que se vea el interior.
Photos of the already glued crystals. In the first photo, we see the rear glass with the fixings on the front (rounded pieces of metal painted semi-matte black). IN the second photo, the right front glass, which I have left half open so you can see the inside.
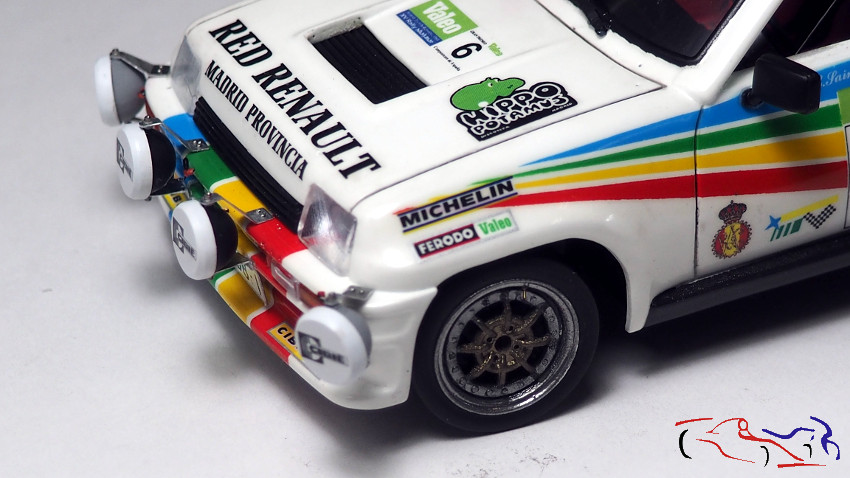
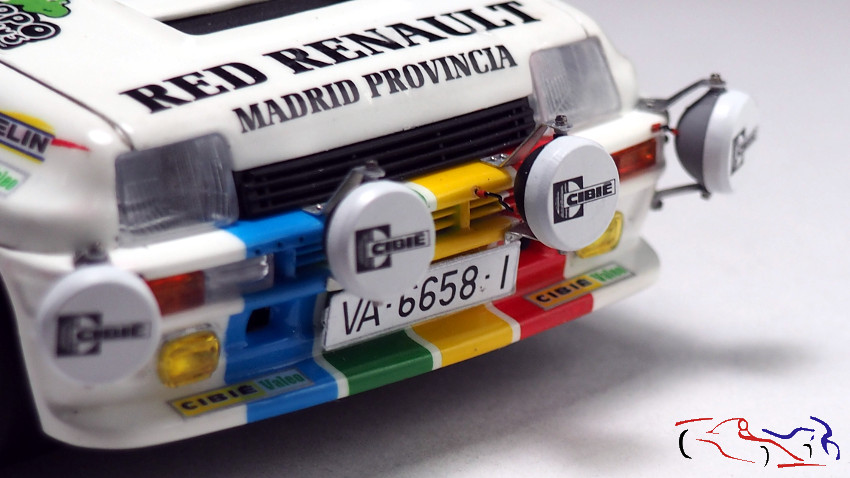
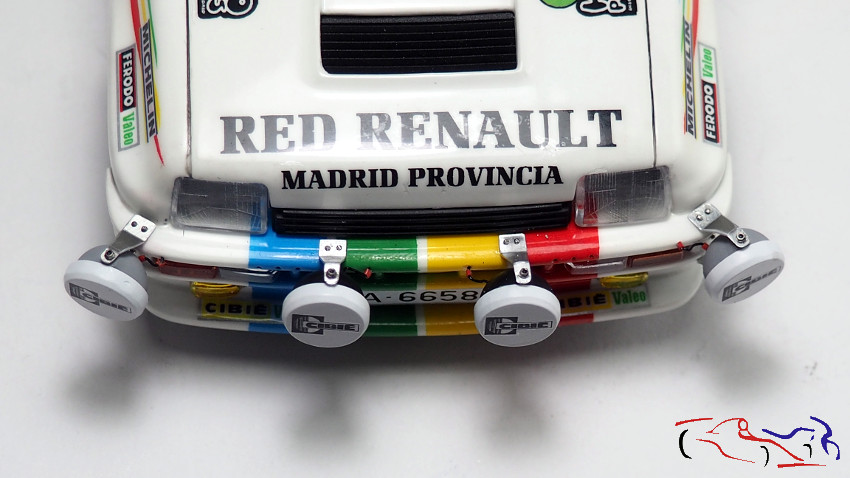
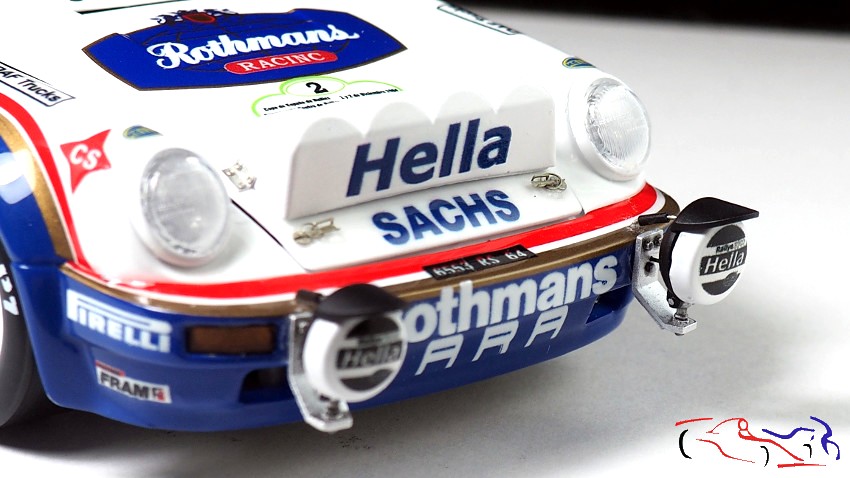
Pasamos al faldon delantero. Pintados los antiniebla de abajo con rotulador cromo de Tamiya, tenemos los intermitentes y los de posición, que hice anteriormente con resina acrílica a partir de un molde hecho con Oyumaru. Después de afinar con la lija, pinté el naranja con rotulador permanente, y pegado con resina UV. En la segunda foto, vemos el coche en su conjunto. Podemos ver, la base donde irá pegada la matrícula.
We move on to the front apron. Having painted the lower fog lights with a Tamiya chrome marker, we have the turn signals and position indicators, which I previously made with acrylic resin from a mold made with Oyumaru. After fine-tuning with sandpaper, I painted the orange with a permanent marker, and glued it with UV resin. In the second photo, we see the car as a whole. We can see the base where the license plate will be attached.
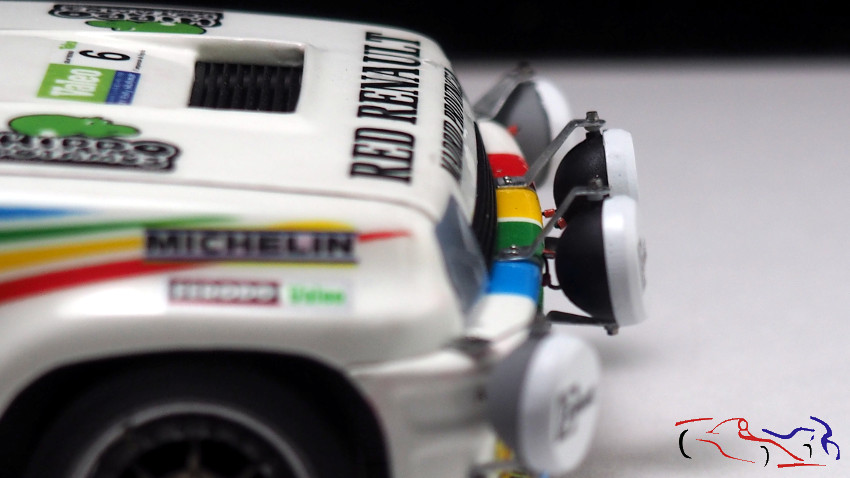
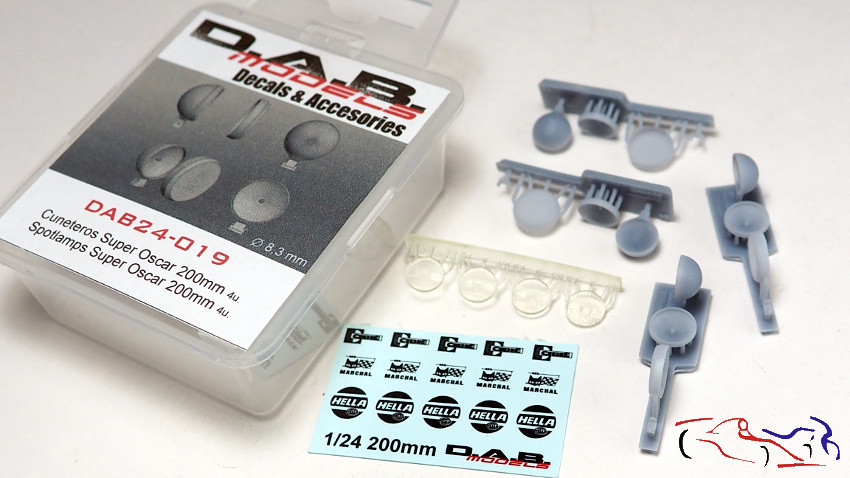
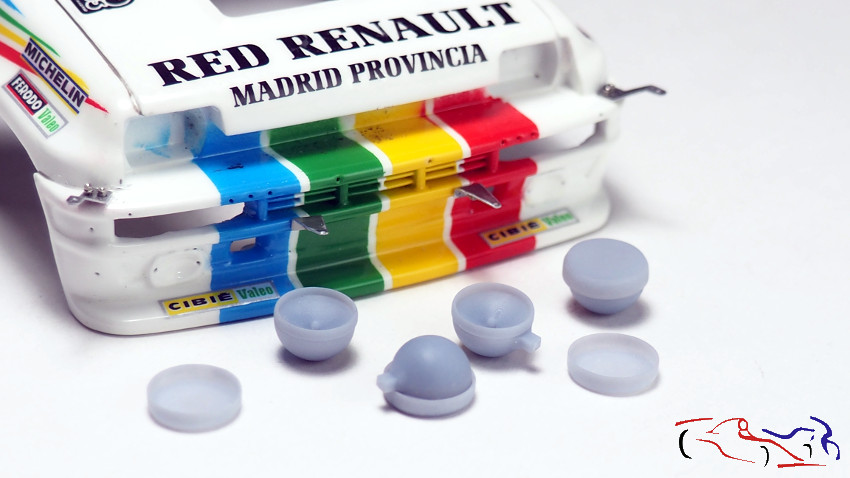
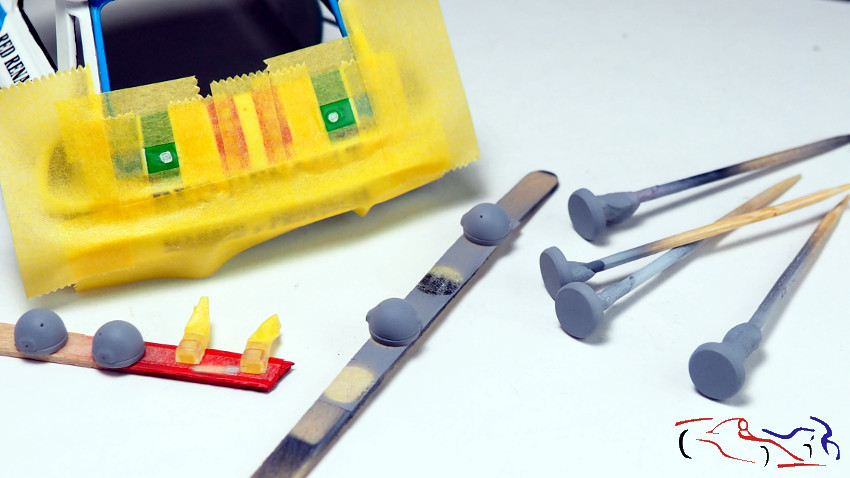
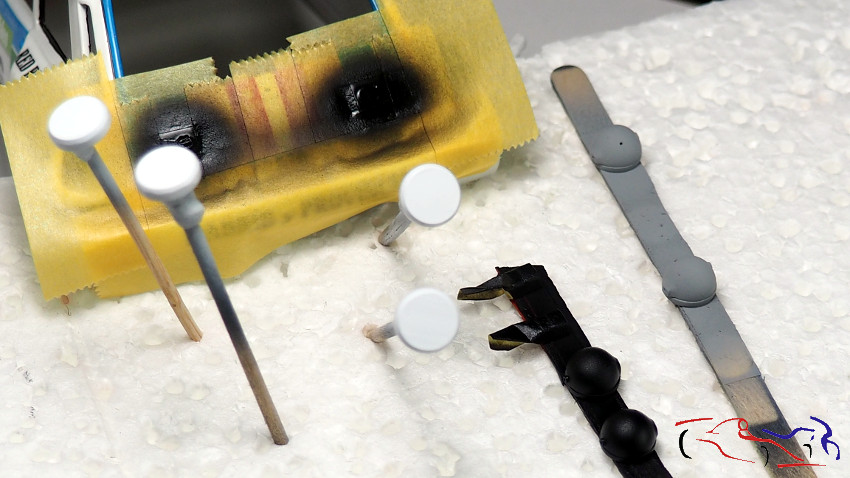
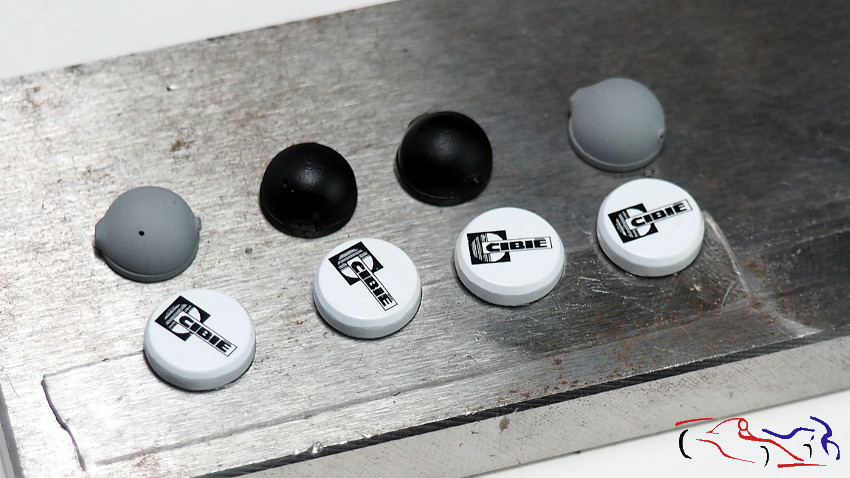
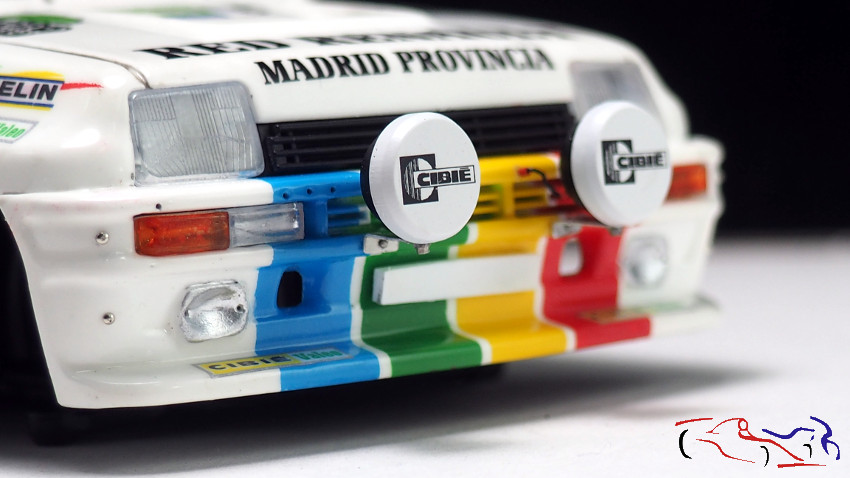
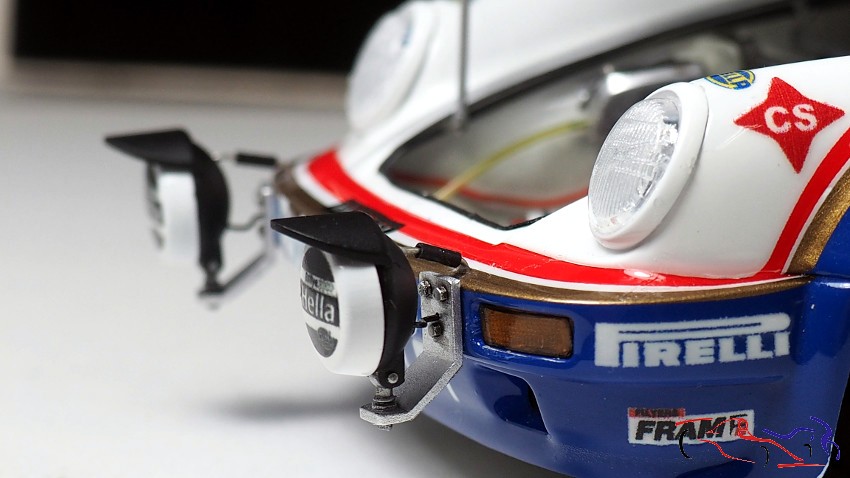
Es ahora el turno d elas loces auxiliares, que usaré las de DAB models. Os muestro al composición de las luces, pudiendo elegir entre faros tapados o descubiertos, siendo los primeros los que yo he elegido. Pero hay que hacerle las fijacionescorrectas. Para eso utilizo lámina de metal que recorto, agujereo y doblo en la forma conveniente. Luego los pinto de negro para los de dentro y gris para los de afuera, siendo las tapas blancas. Coloco las calcas de las tapas, y….
It is now the turn of the auxiliary speakers, which I will use those from DAB models. I show you the composition of the lights, being able to choose between covered or uncovered headlights, the first being the ones I have chosen. But you have to make the correct fixations. For that I use metal sheet that I cut, hole and bend in the appropriate shape. Then I paint them black for the inside and gray for the outside, with the tops being white. I put the decals on the covers, and…
…me preparo a colocarlos. Estos dos son los primeros…luego vendrán los “cuneteros”…
…I’m getting ready to place them. These two are the first…then the “cuneteros” will come…
Esto es todo por hoy. La proxima entrada será la final. Espero que os guste y gracias por ver y comentar!!
That is all for today. The next entry will be the final. I hope you like it and thanks for watching and commenting!!
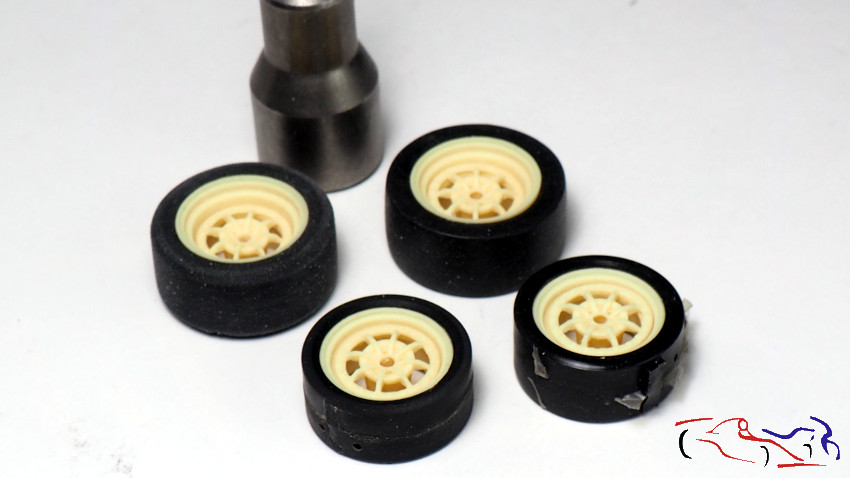
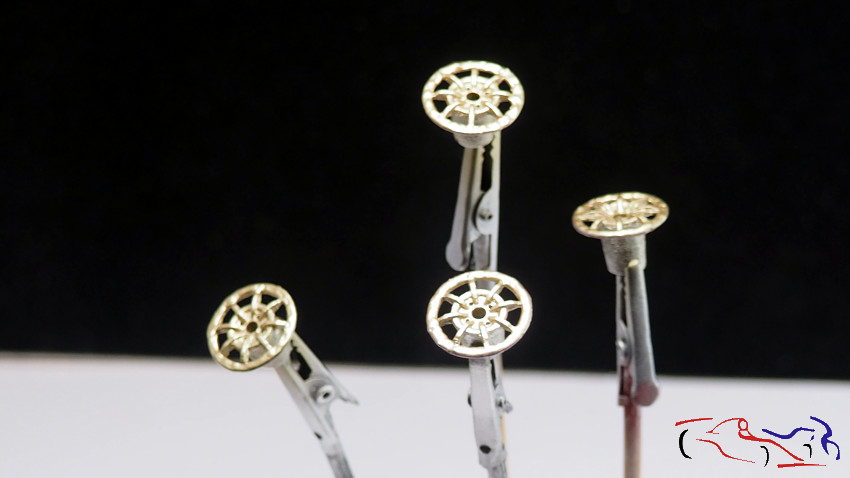
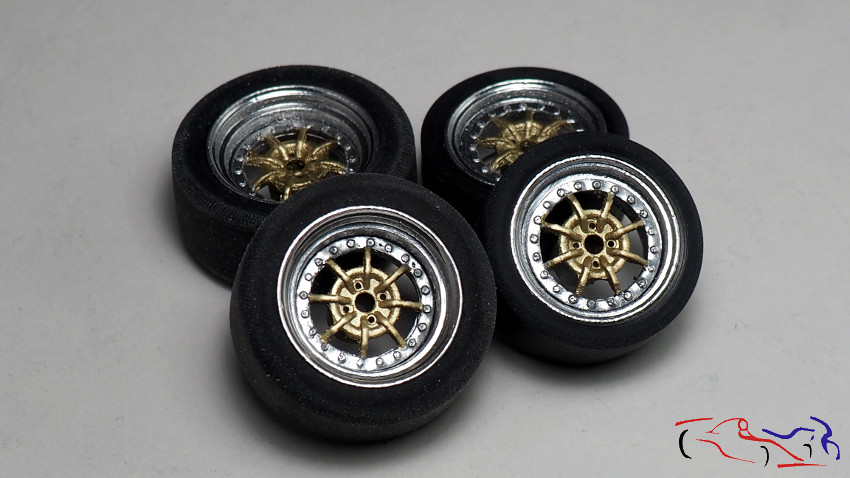
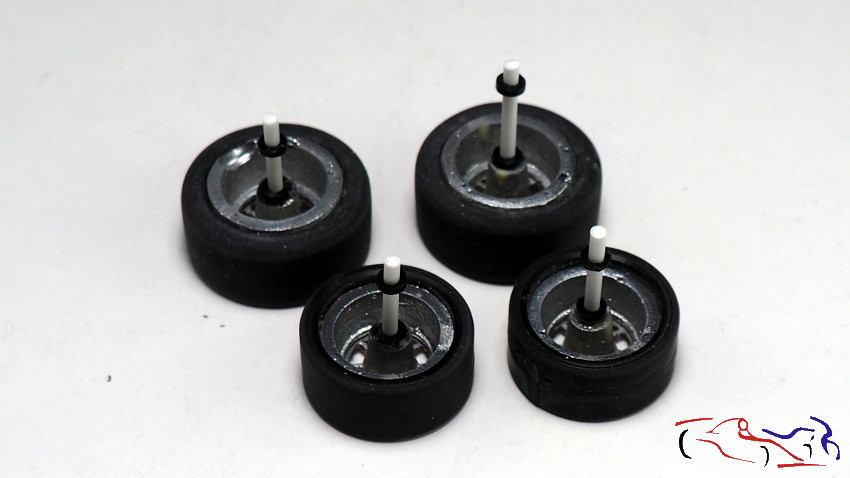
Desde febrero de 2018, no escribía nada de este proyecto, auqnue empecé con él mucho antes, en Mayo de 2013, hace 11 años!! Los retrasos habidos desde entonces, se debieron a problemas con las calcas originales, que eliminé y pinté posteriormente, y a que no tenía claro las llantas que iba a usar, pero ahora ya lo tengo decidido. Estas llantas las compré a un modelista canario, las cuales se adaptan muy bien a la carrocería. En cuanto a los neumáticos, uso los de Renaissance, pero los rebajo con el taladro y una lima. El proceso lo podéis ver en las fotos:
1ª -. Podéis ver que las gomas de la izquierda ya están rebajados con el util.
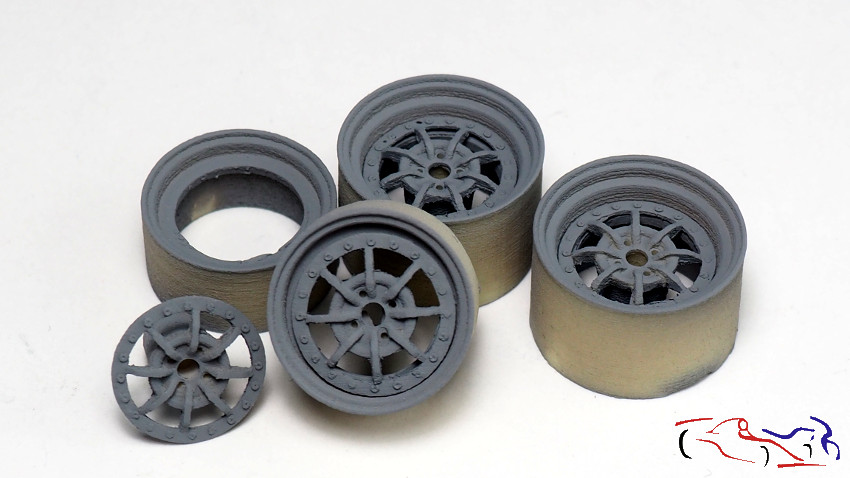
2ª -. Después, imprimamos las llantas
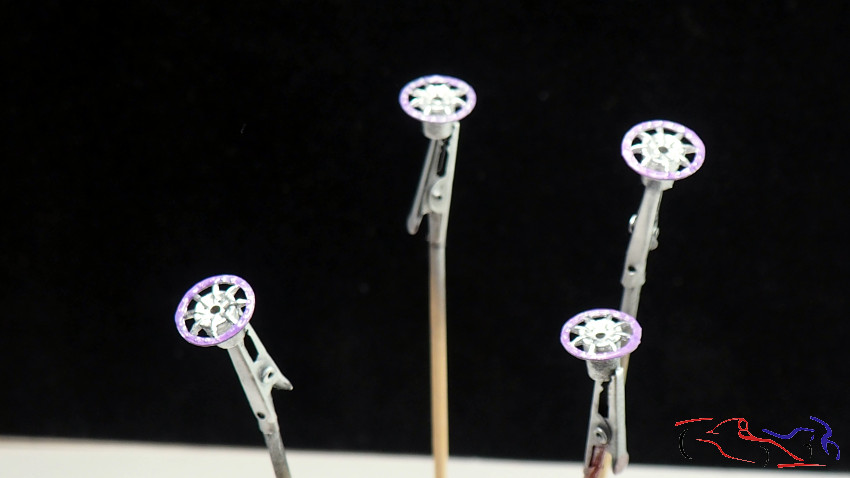
3ª -. Pintamos el nucleo y el aro de cromo de Zero, y enmascaramos el aro exterior del nucleo.
4ª -. Pintamos todo el núcleo de dorado
5ª -. Quitamos la máscara y las colocamos con em neumático ara ver como queda.
Since February 2018, I have not written anything about this project, although I started with it much earlier, in May 2013, 11 years ago!! The delays that have occurred since then were due to problems with the original decals, which I removed and painted later, and because I was not clear about the wheels I was going to use, but now I have decided it. I bought these wheels from a Canarian modeller, which adapt very well to the body. As for tires, I use Renaissance ones, but I lower them with the drill and a file. You can see the process in the photos:
1st -. You can see that the tires on the left taht are already reduced with the tool.
2nd -. Next, let’s print the wheels
3rd -. We painted the core and the Zero chrome ring, and masked the outer ring of the core.
4th -. We paint the entire core gold
5th -. We remove the mask and place them with the tire to see how it looks.
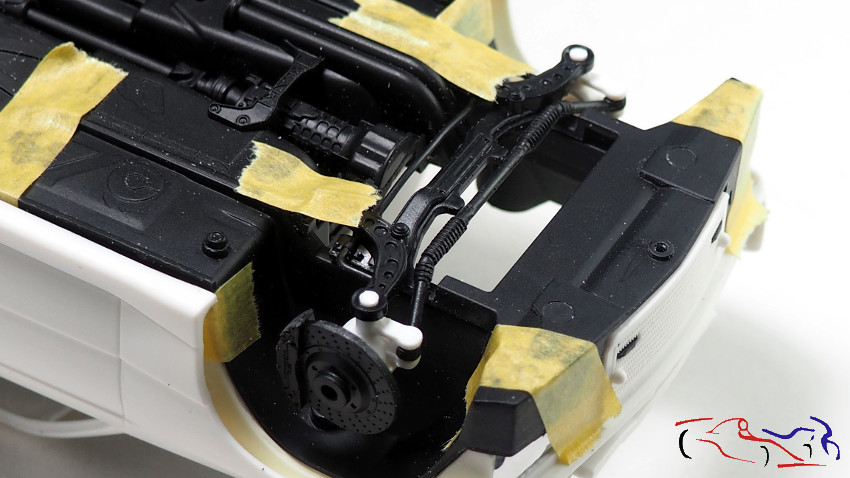
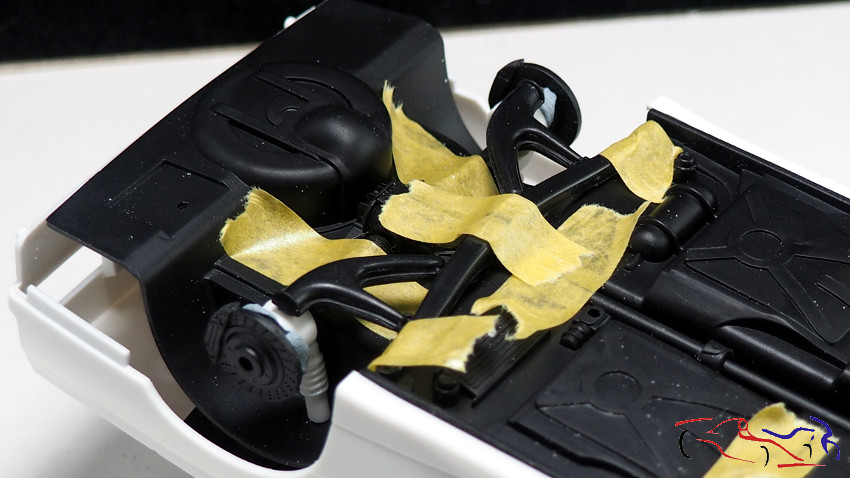
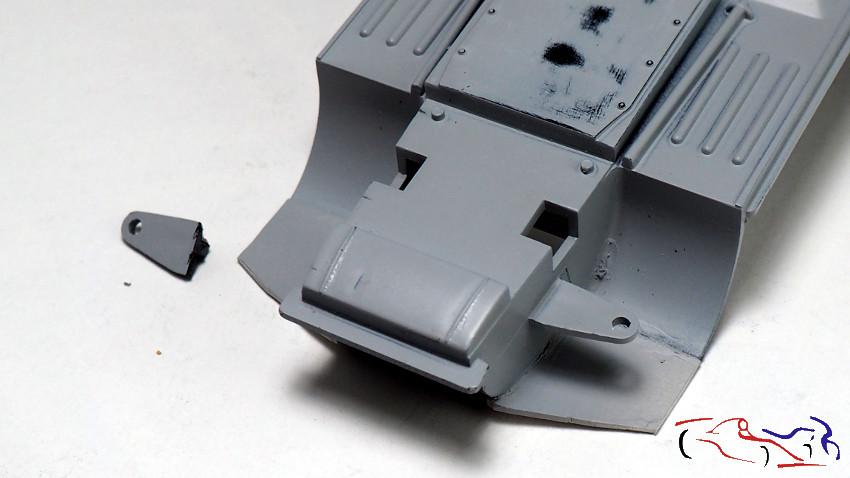
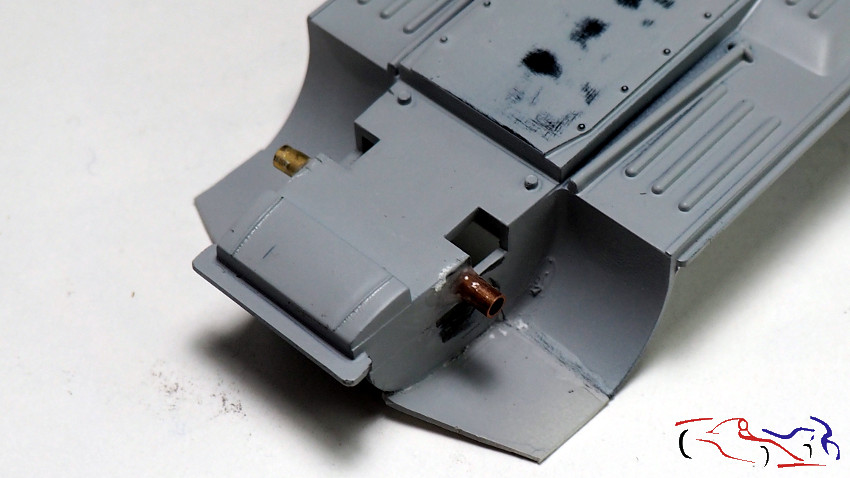
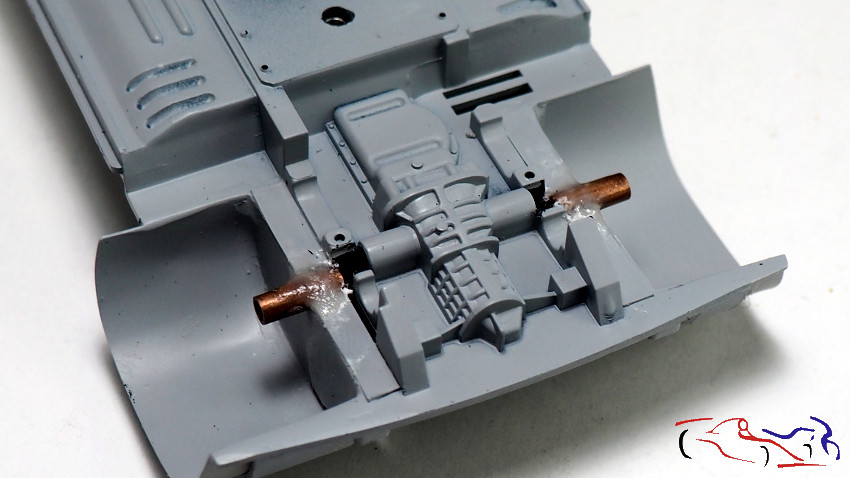
Ahora vamos a adaptar esas llantas al chasis. Para ello eliminamos las piezas donde clocar los bujes delanteros, y hacemos un agujero para poner un tubo de latón. Este proceso lo hacemos también en el eje trasero. Fianlmente, adaptamos unas varillas en las llantas, con unos topes, para introducir en los tubos colocados en el chasis.
Now we are going to adapt those wheels to the chassis. To do this, we eliminate the pieces where the front hubs are located, and we make a hole to put a brass tube. We also do this process on the rear axle. Finally, we adapted some rods to the rims, with stops, to insert into the tubes placed on the chassis.
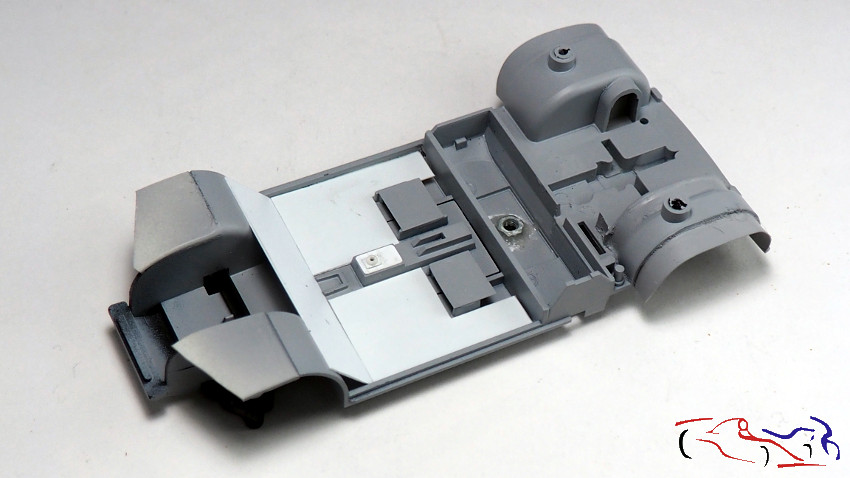
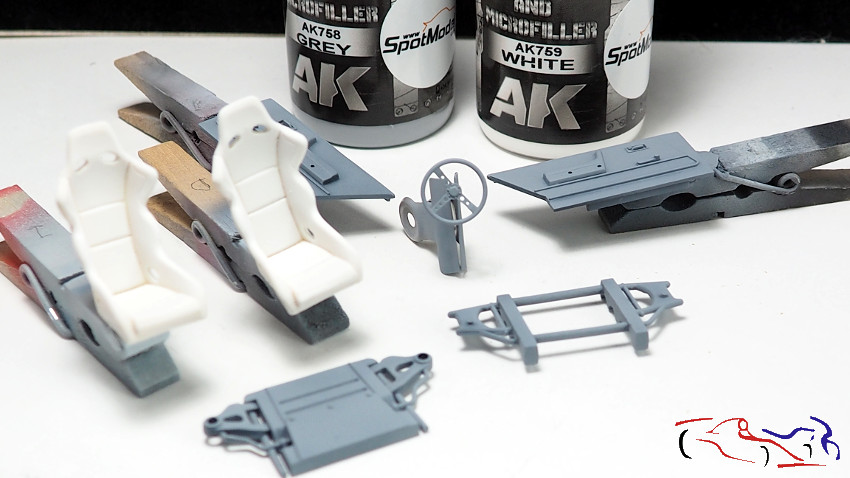
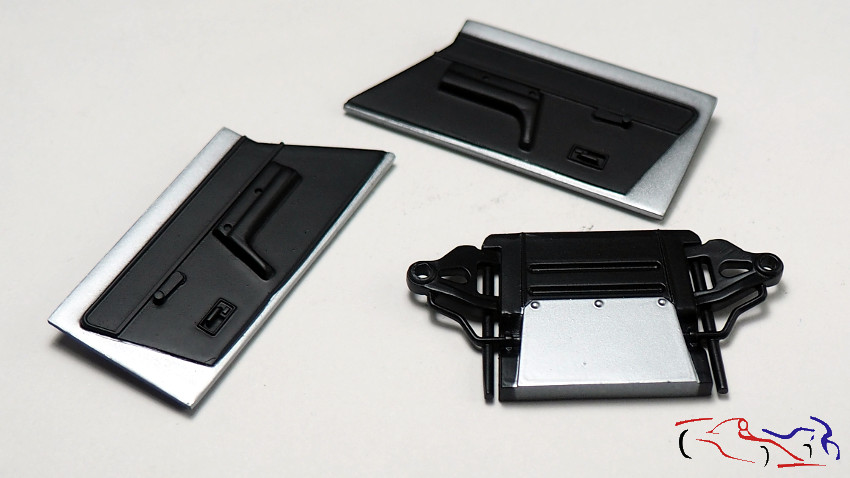
En el chasis, tenemos incluida la base del habitáculo. Unificamos la base e incluimos un fondo de pies con unas planchas de plástico. Añadimos las bases de los asientos realizadas con lata de refresco e imprimamos. Después pintamos de negro satinado, aunque al final, pintamos de plateado de Gravity.
In the chassis, we have the base of the cabin included. We unify the base and include a base of feet with some plastic plates. We added the seat bases made from a soda can and primed. Then we painted satin black, although in the end, we painted Gravity silver.
Proceso de pintira del chasis. Una vez pintado el chasis con negro satinado, enmascaramos para pintar de plateado de Gravity. Aprovecho para pinar también los interiores de las puertas.
Chassis painting process. Once the chassis was painted with satin black, we masked for Gravity silver paint. I also take the opportunity to paint the interior of the doors.
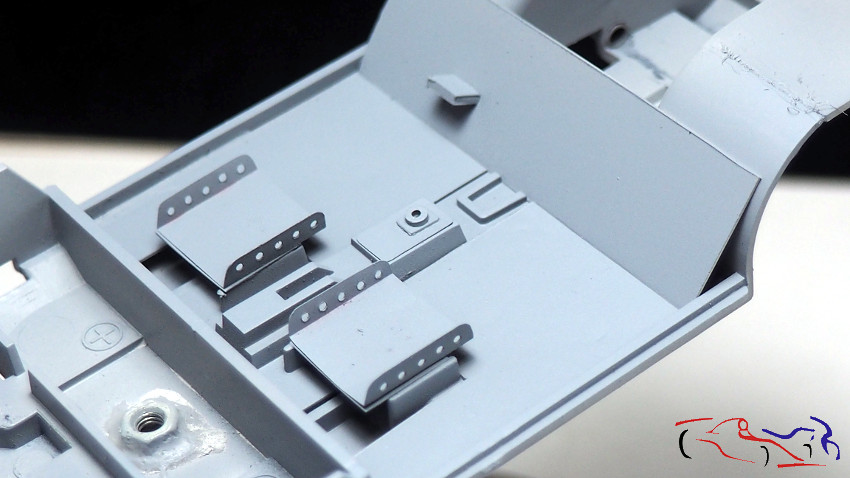
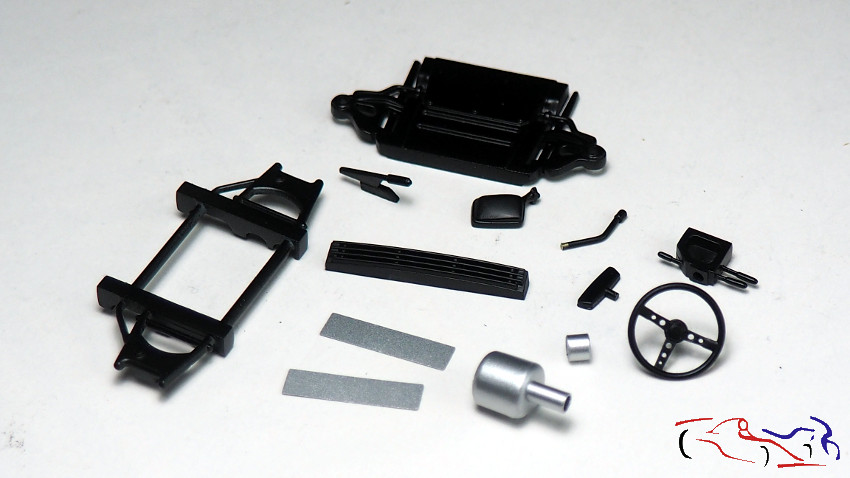
Imprimamos con AK, blanco y gris, más piezas, terminándolas con negro semimate de Tamiya LP, y plateado de Gravity.
Let’s print with AK, white and gray, more parts, finishing them with semi-matte black from Tamiya LP, and silver from Gravity.
Más fotos de los interiores de las puertas:
More photos of the interiors of the doors:
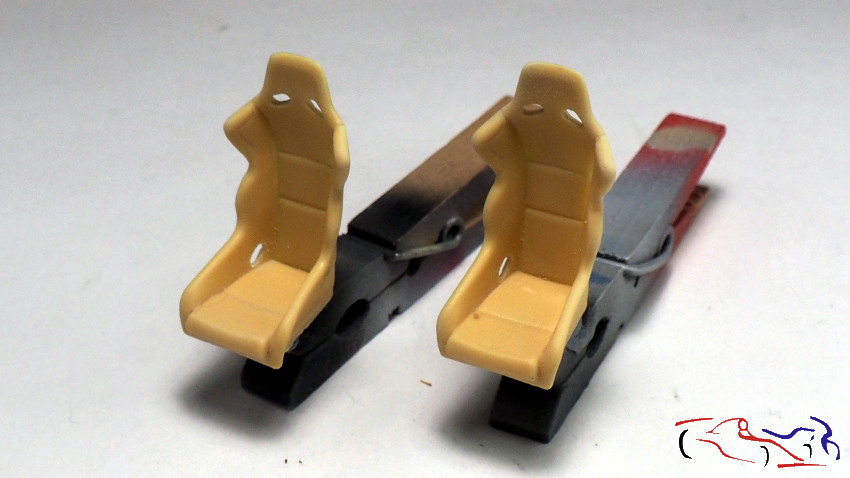
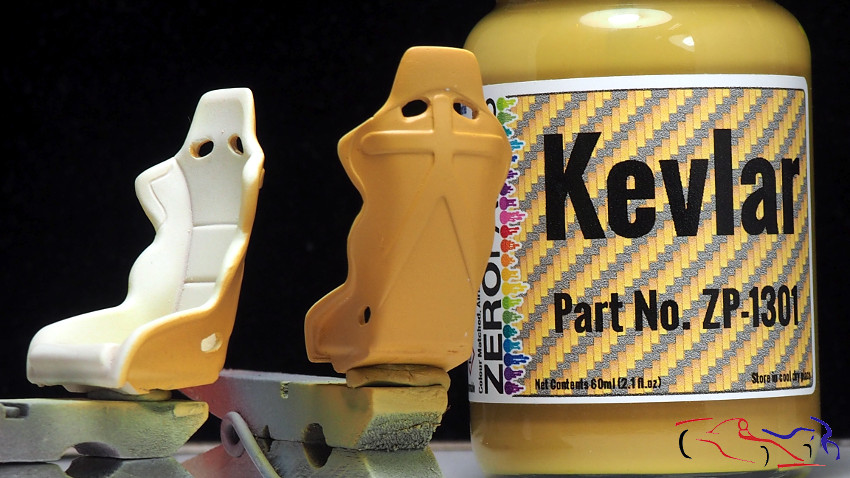
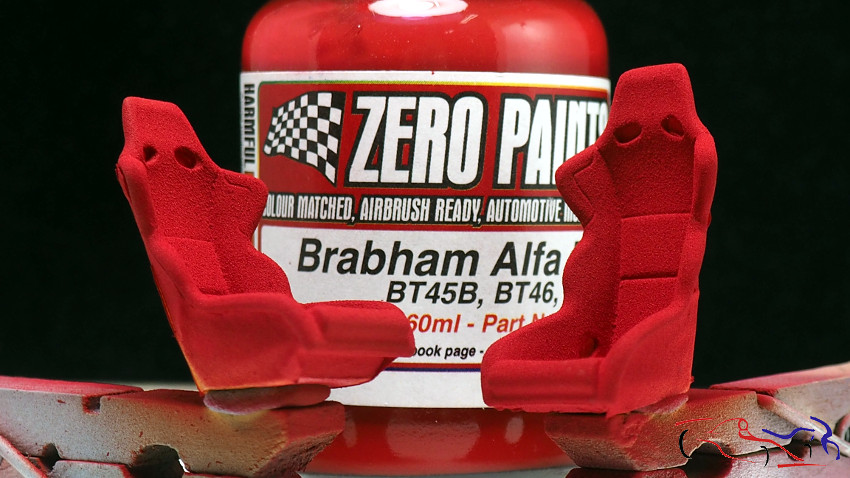
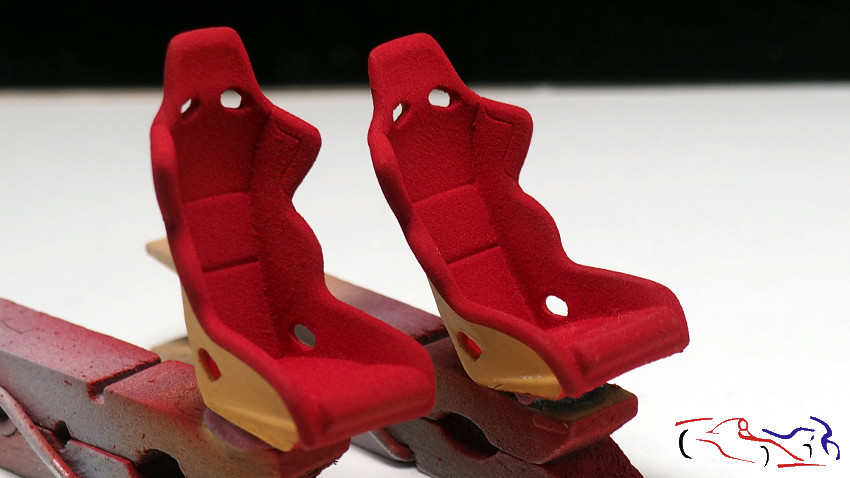
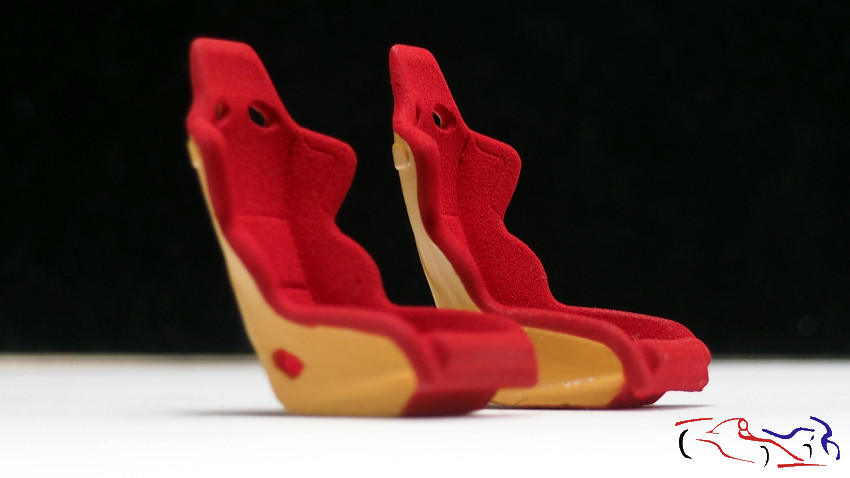
Pasamos a los backets. Utilizamos unos de Scale Production, que imprimo con blanco de AK. Posteriormente, pinto la parte de detrás con Kevlar de Zero, y una vez seca, la enmascaro con cinta Tamiya, para pintar la parte delantera. Para ello, utilizo el color rojo de Zero para el Brabham BT45, que es un poco más oscuro, tal y como van esos asientos. Pero le añado polvos de talco para dar esa textura clasica de los asientos de competición. La aplico, y ahí véis ese resultado tan bueno!!
We move on to the backets. We used some from Scale Production, which I printed with AK white. Later, I painted the back with Zero’s Kevlar, and once dry, I masked it with Tamiya tape to paint the front. To do this, I use the Zero red color for the Brabham BT45, which is a little darker, just like those seats. But I add talcum powder to give that classic texture of racing seats. I apply it, and there you see that good result!!
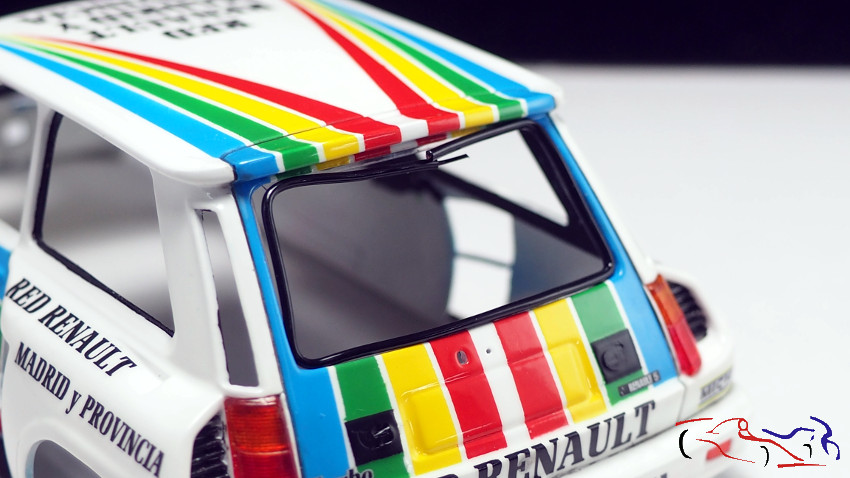
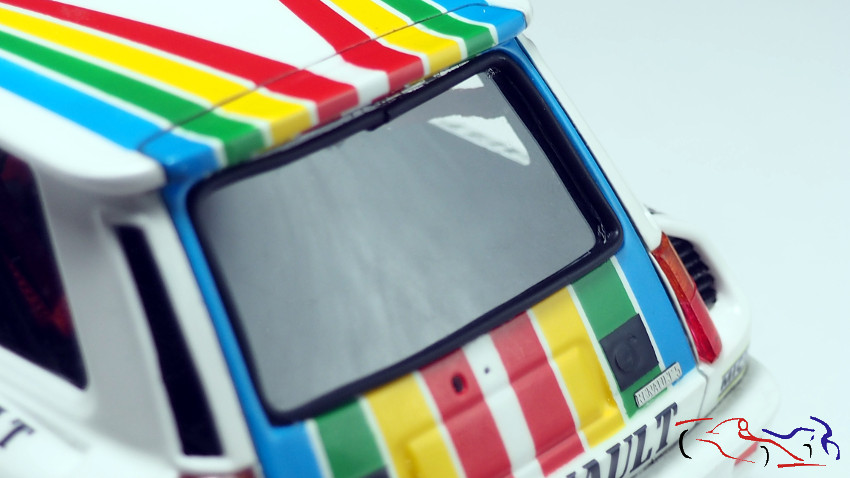
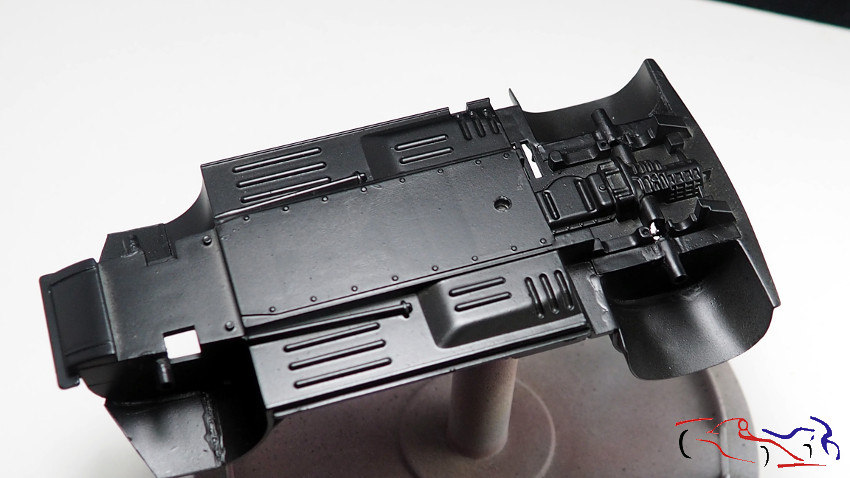
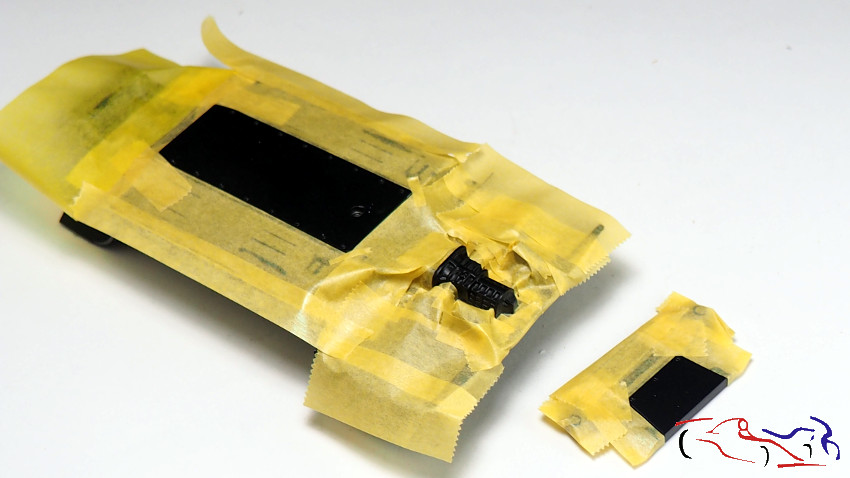
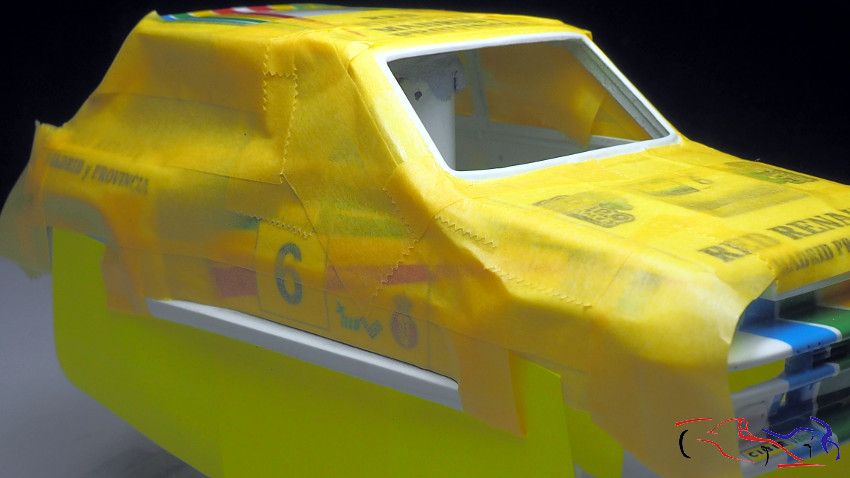
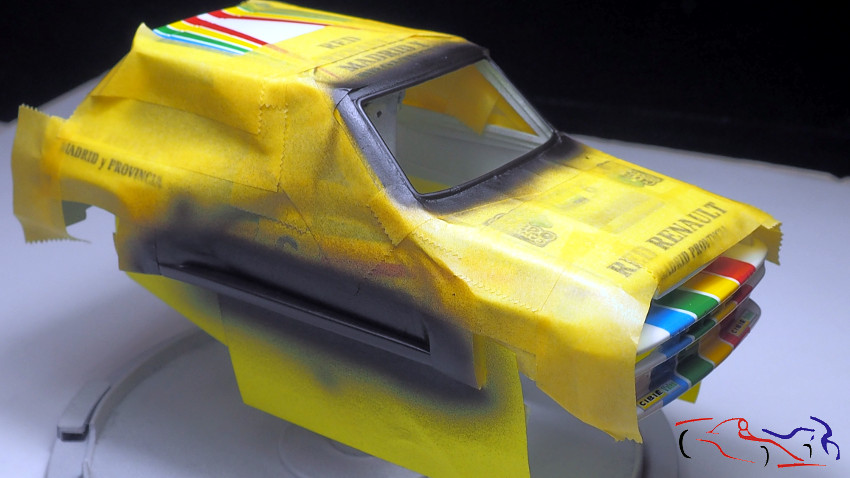
Vamos con la carrocería. En mi anterior post hace 6 años, dejé la carrocería lacada y pulida. También trabajé las partes negras, pero no puse ninguna actualización, que publico ahora. Lo que hice fue enmascarár las taloneras laterales y la goma del parabrisas, que pinté con negro semimate:
Let’s go with the bodywork. In my previous post 6 years ago, I left the bodywork lacquered and polished. I also worked on the black parts, but didn’t post any updates, which I’m posting now. What I did was mask the side sills and the windshield rubber, which I painted with semi-matte black:
Y para terminar por hoy, os dejo un par de fotos de la carrocería y el chasis con las ruedas:
And to finish for today, I leave you a couple of photos of the body and chassis with the wheels:
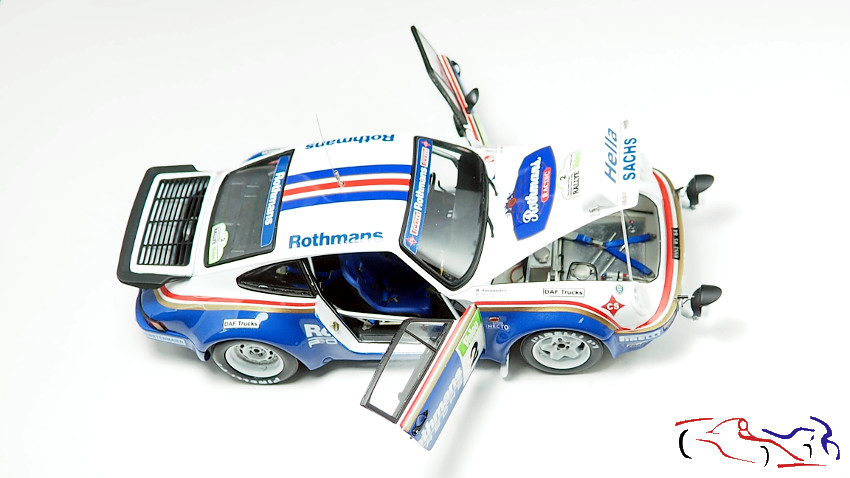
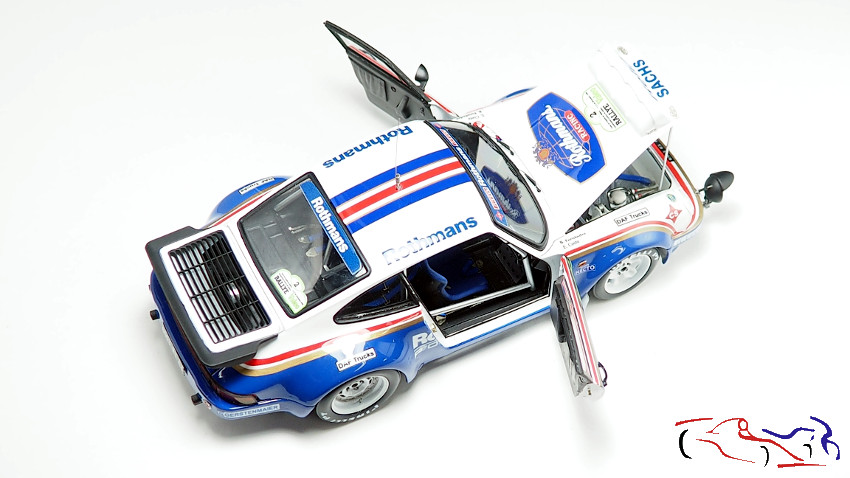
Y llegamos al final del proyecto. Muchas cosas aprendidas, sobre todo, más experiencia a meterme en el modelismo donde nadie me llama, pero donde si quiero entrar!! Pero empecemos por mi valoración: empiezo por el kit, y después paso a comentar los cambios que queria hacer y los componentes extras incluidos. Y lo explicaré a lo largo del post.
El KIT – El kit de Nunu es simplemente un kit básico que al ser tan añorado, le cojes cariño. En general, las formas están bien y el plástico es bueno excepto el negro, que es de lo peor que he usado, y le pasa a todos los kits de esta marca: lijas y salen bolas, y lo tiene sque dejar muy fino para dejarlo bien. Los cristales están bien pero para dejarlo cerrado, sin abrir las puertas como he hecho yo, porque son muy gordos y forman parte de los pilares d ela carrocería. Las calcas están bien sin los logos de la tabaquera, aunque si se adquiere el TK de la propia Nunu, ya los consigues. Hay que decir, que las bandas roja y dorada que rodean todo el coche, son para la decoración que tuvieron los coches en Europa, ensanchándose en la parte trasera, siendo rectos en la versión española. Y para ello, tuve que afinarlas como explico en su correspondiente post. Pasamos a ver las fotos del coche con todo cerrado. Verías que las puertas no encajan del todo….
And we arrive at the end of the project. Many things learned, above all, more experience to get into modeling where no one calls me, but where I do want to get in!! But let’s start with my assessment: I start with the kit, and then I go on to comment on the changes I wanted to make and the extra components included. And I will explain it throughout the post.
The KIT – The Nunu kit is simply a basic kit that, being so missed, makes you love it. In general, the shapes are good and the plastic is good except the black one, which is the worst I have used, and it happens to all the kits of this brand: little balls come out in sanding, and you have to leave it very fine to leave it good. The windows are fine but leave them closed, without opening the doors as I have done, because they are very thick and are part of the body pillars. The decals are fine without the tobacco company logos, although if you purchase the TK from Nunu herself, you will already get them. It must be said that the red and gold bands that surround the entire car are for the decoration that the cars had in Europe, widening at the rear, being straight in the Spanish version. And to do this, I had to tune them as I explain in the corresponding post. We went on to see the photos of the car with everything closed. You would see that the doors don’t fit at all….
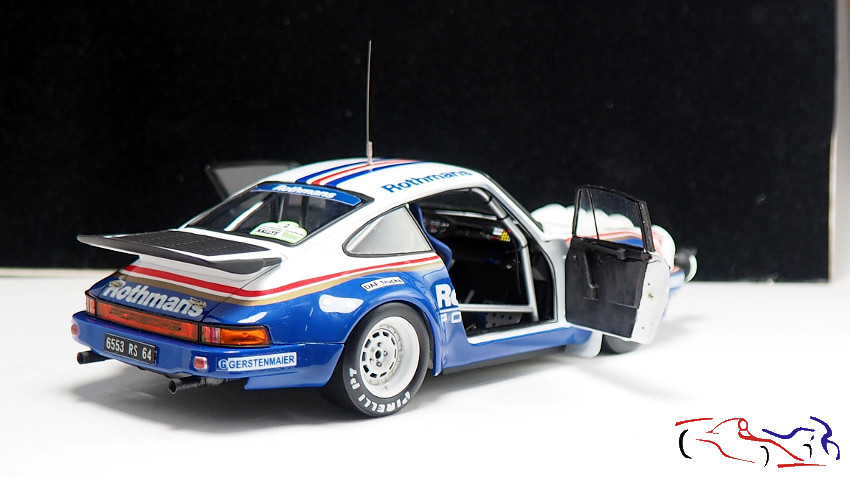
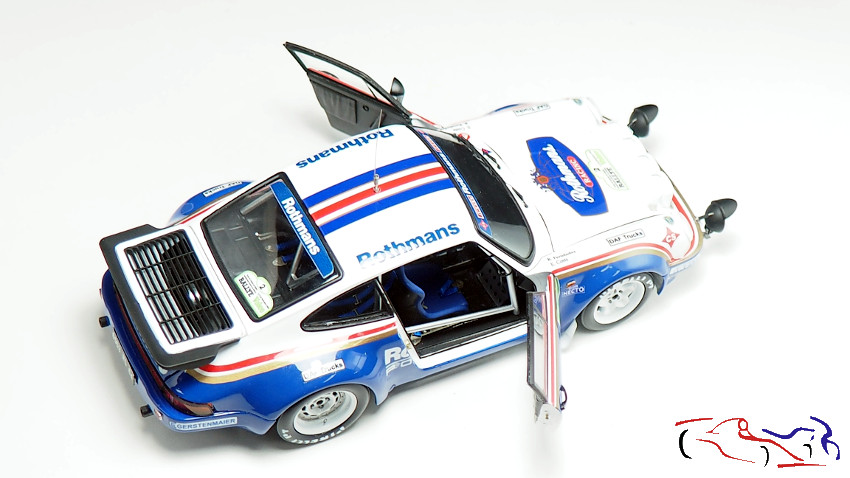
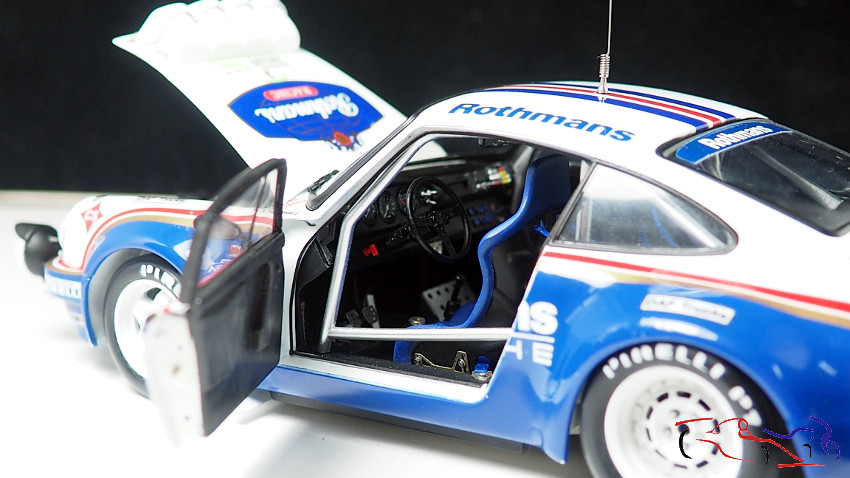
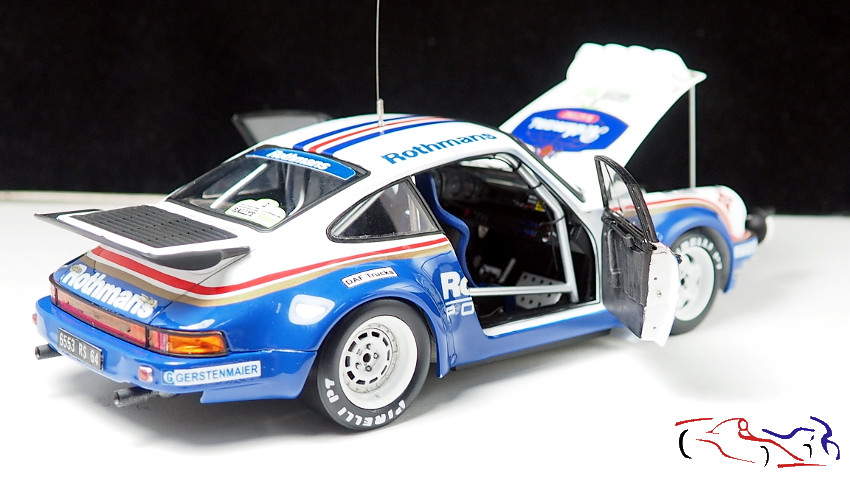
CAMBIOS REALIZADOS: Mi primera idea era abrir el capó, pero iba a quedar muy simple, con lo que abriéndo las puertas ganaría en espectacularidad. Y eso hice. Para ambos trabajos, debía recrear todo el capó, asi com la parte de abajo del mismo capó. Y en las puertas, todo lo que deja ver una puerta abierta además del guarnecido interior de las mismas. Ni qué decir tiene que quería que esas partes fueran funcionales con bisagras!!! Y así lo hice!!. Aquí os paso las fotos con capó y puertas abiertas:
CHANGES MADE: My first idea was to open the hood, but it was going to be very simple, so opening the doors would gain more spectacularity. And that’s what I did. For both jobs, I had to recreate the entire hood, as well as the underside of the hood itself. And in the doors, everything that an open door reveals in addition to their interior trim. Needless to say, I wanted those parts to be functional with hinges!!! So I did it!!. Here are the photos with the hood and doors open:
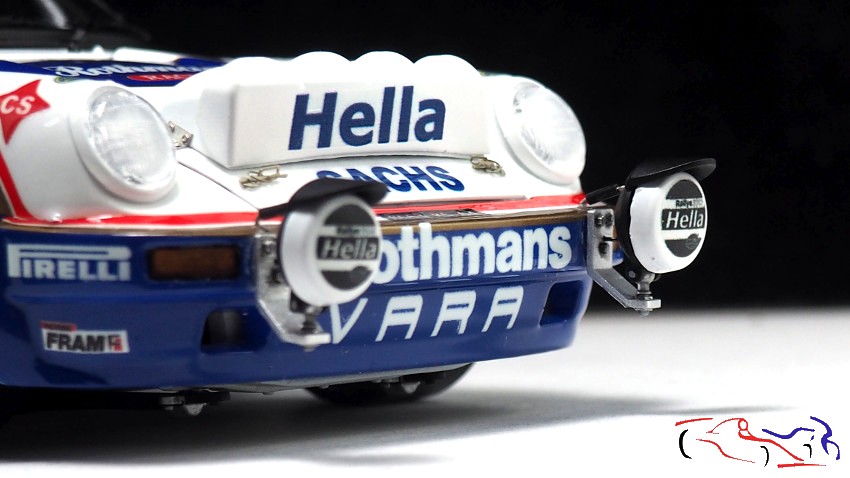
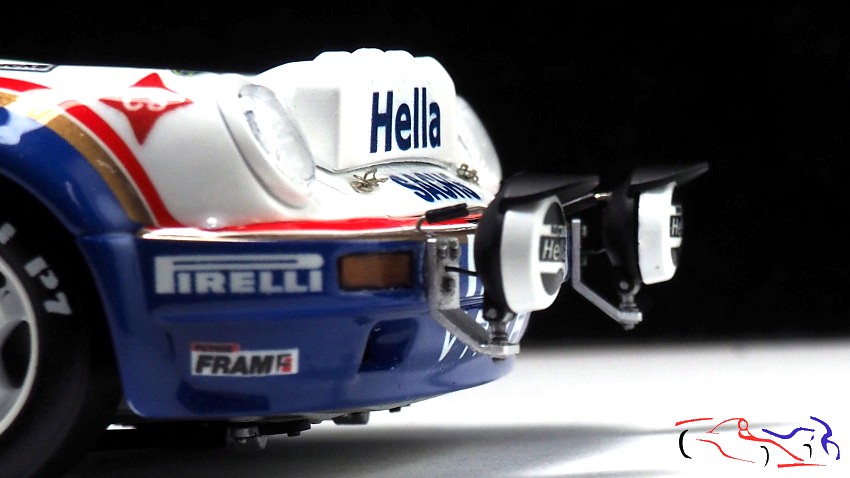
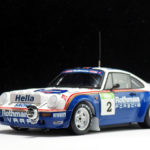
ACCESORIOS AÑADIDOS. Varios componentes fueron añadidos para crear una copia del coche real que corrió en el Rally Valeo de 1984:
Scalelab24. Me proporcionó un TK con fotograbados (Gracias!!) muy bien realizados que se pueden incluir fácilmente.
DAB Models. El volante es simplemente magnífico!! (Gracias Pablo!!)
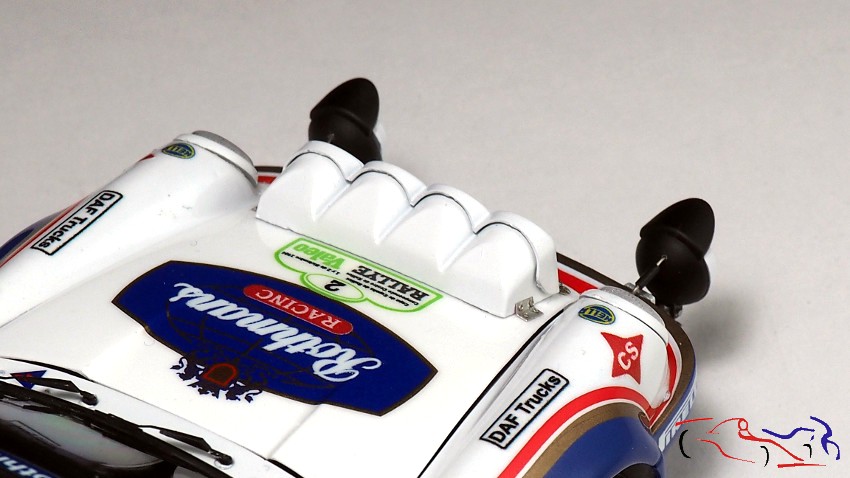
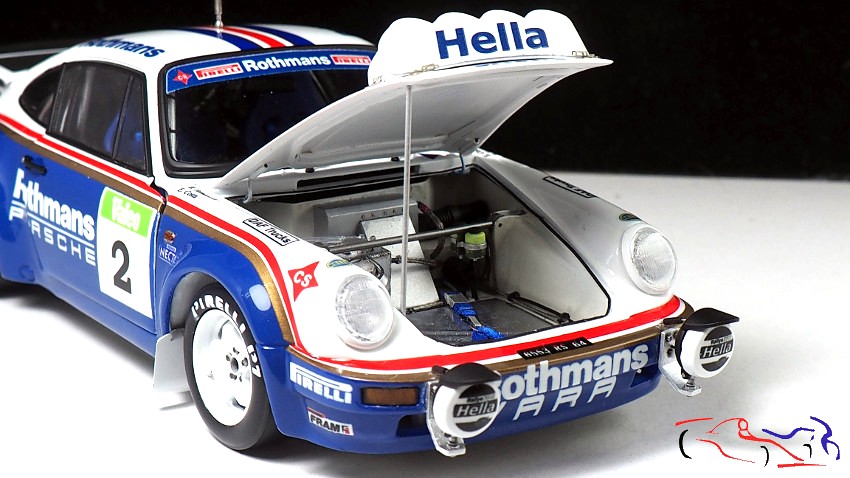
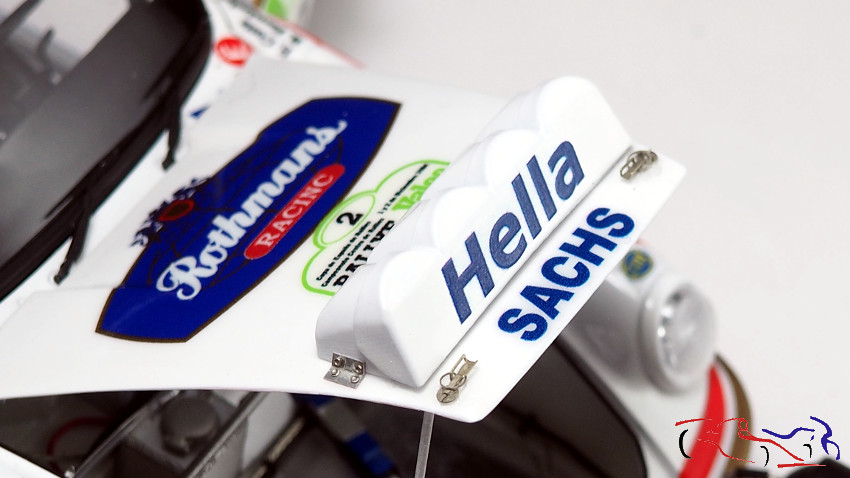
JAM Scale Design. Su TK de los faros del capó y auxiliares, rehalzan mucho la estética del coche. (Gracias Ignacio Bas!!)
KMP. Las llantas y los neumáticos son increibles y muy reales. Lástima que tuve que acortar la pieza del kit para ajustar las ruedas traseras porque sobresalían mucho. (Gracias Andrea!!)
Printlab de Spotmodel. Gracias a Mario Vallina que diseñó las calcas del coche español e incluyó las del rally Valeo. También me proporcionó las máscaras Pirelli de las ruedas.
Number5. El color de la pintura es todo un acierto de esta marca!!
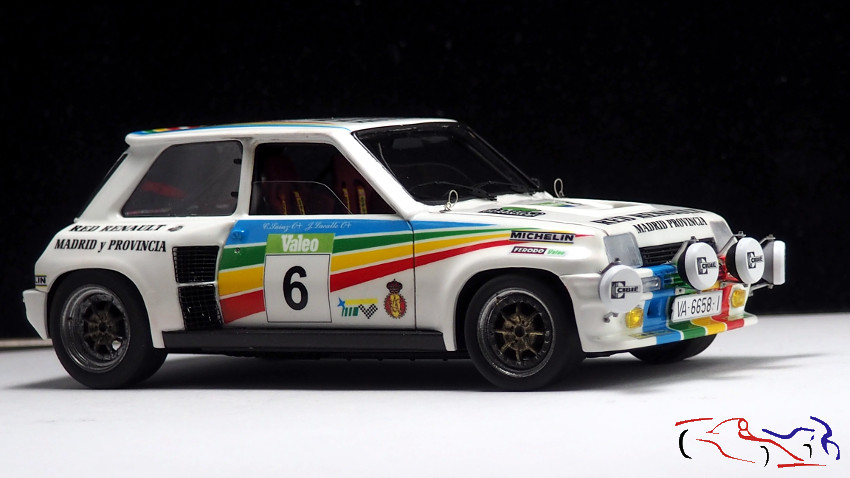
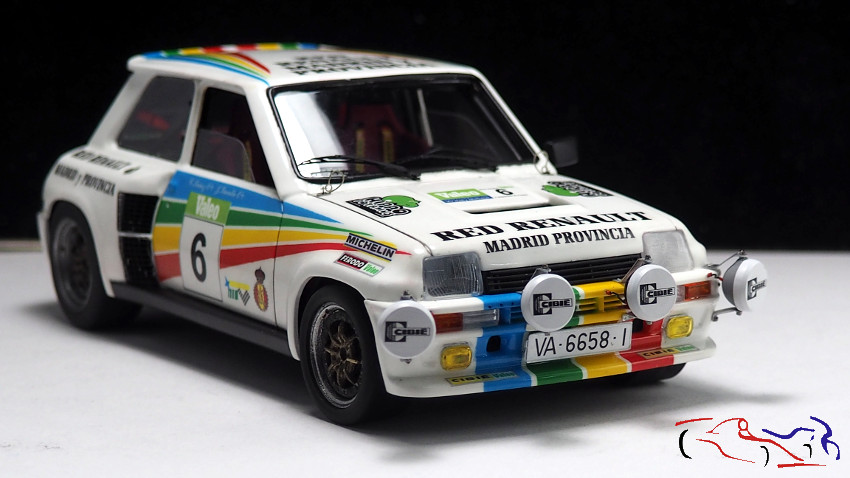
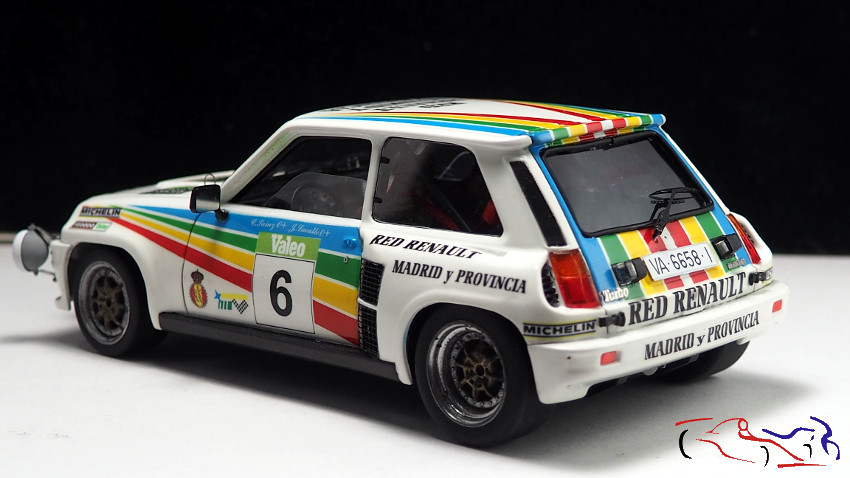
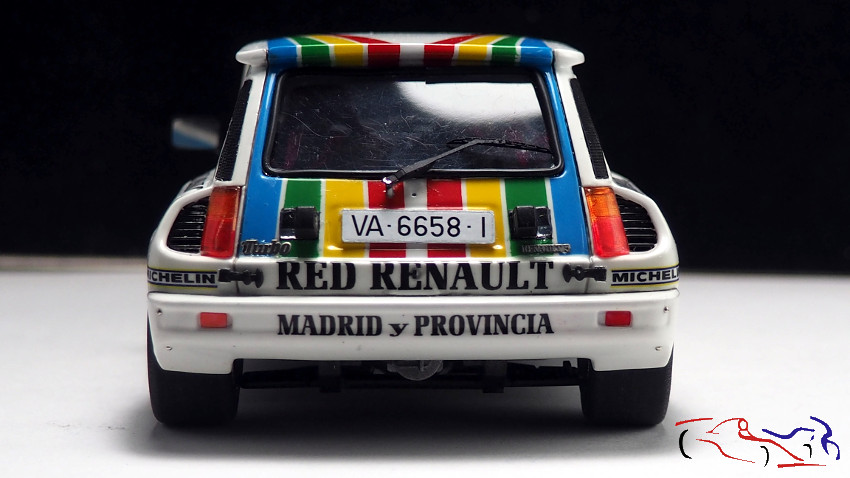
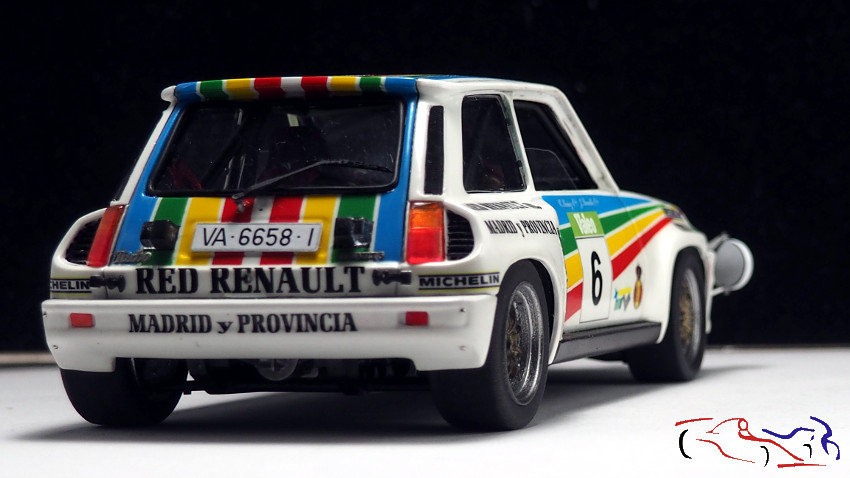
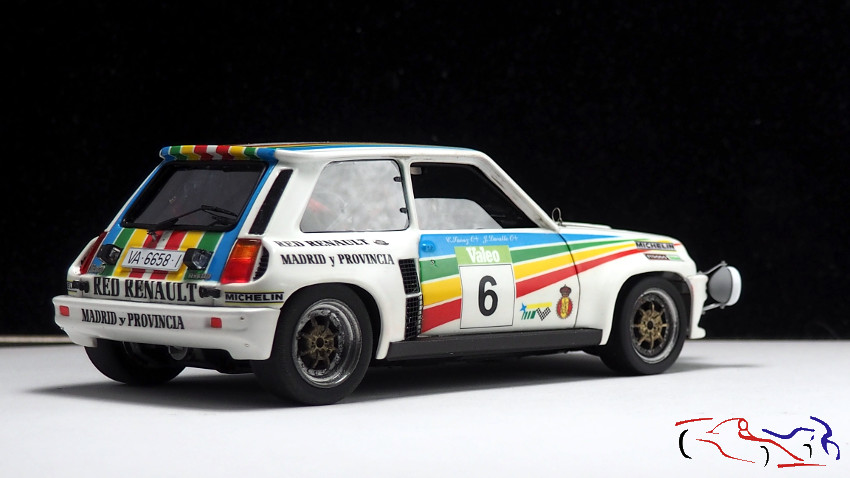
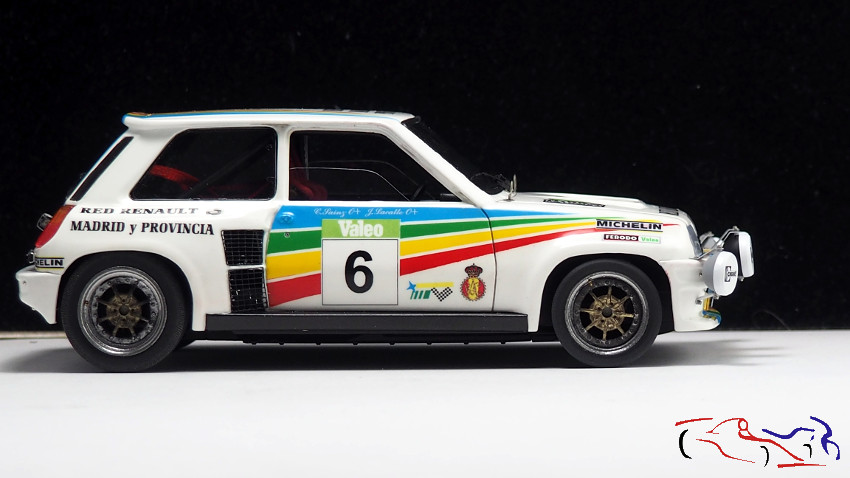
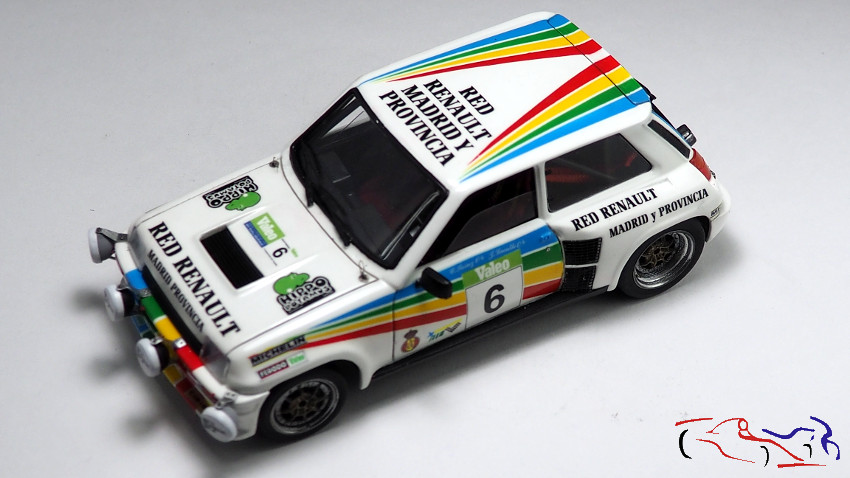
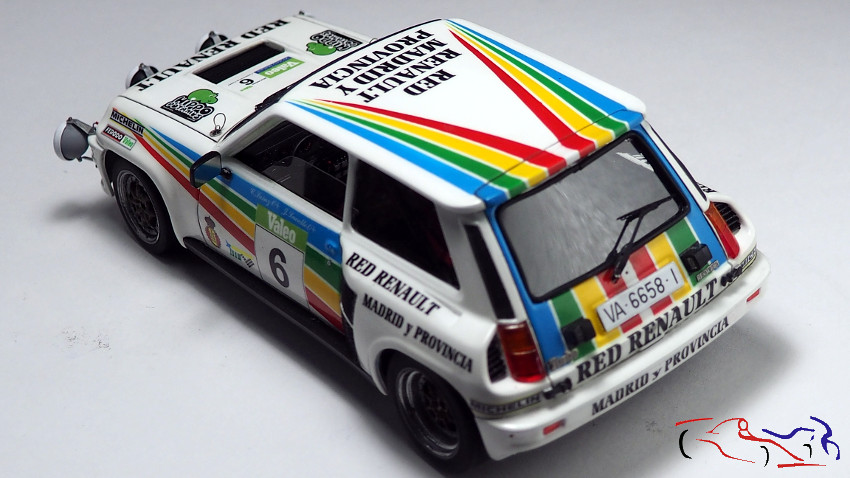
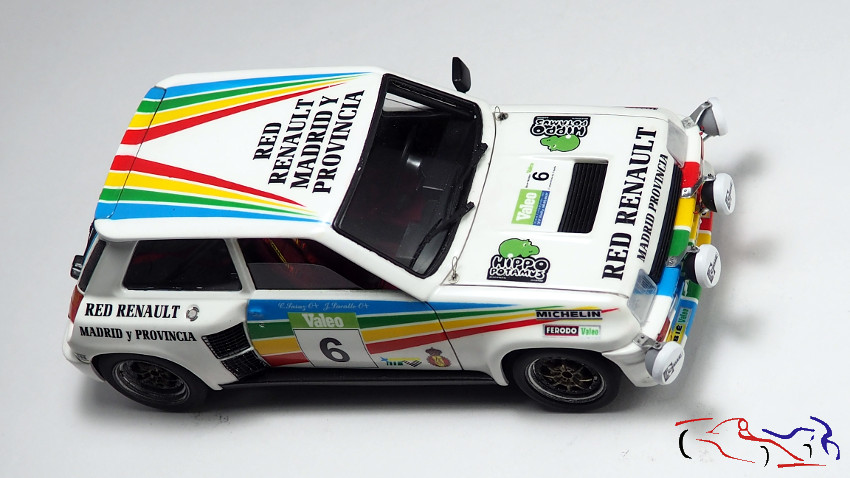
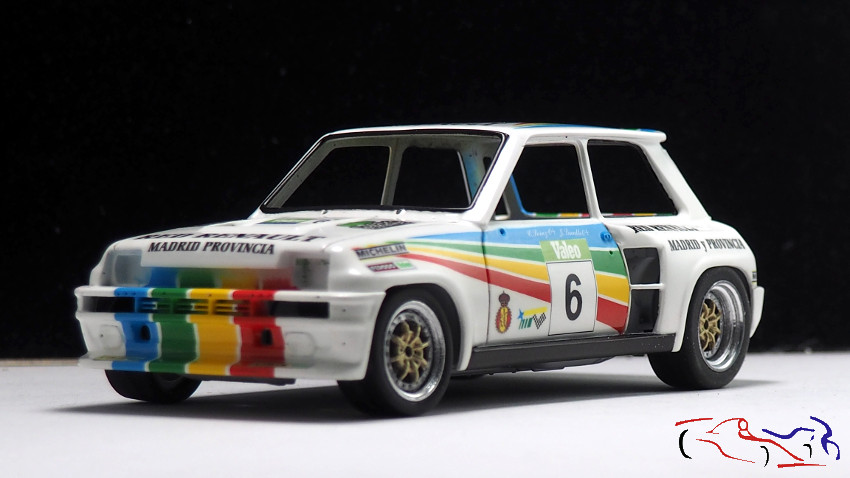
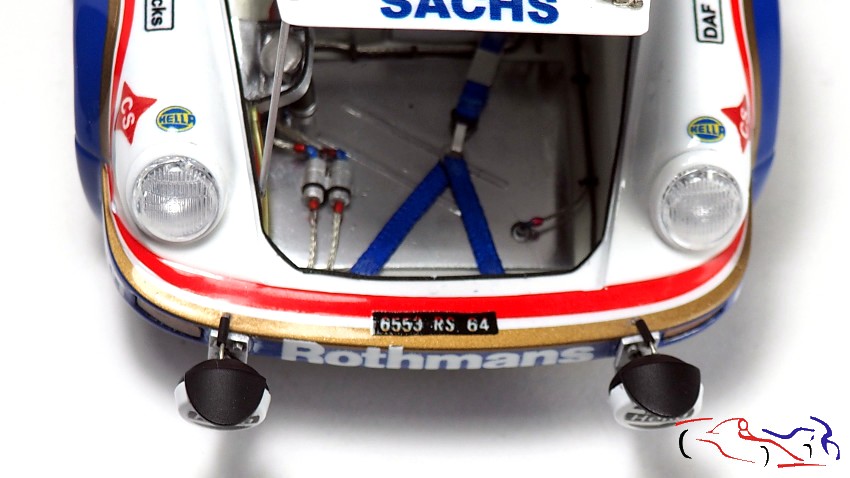
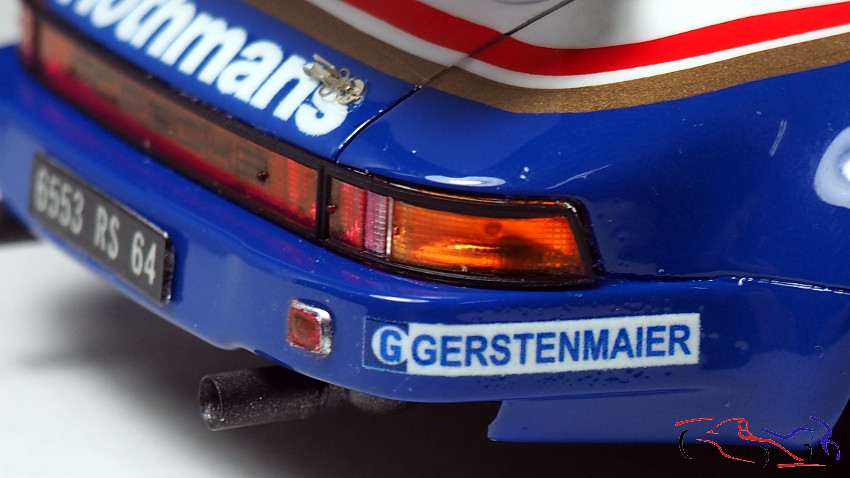
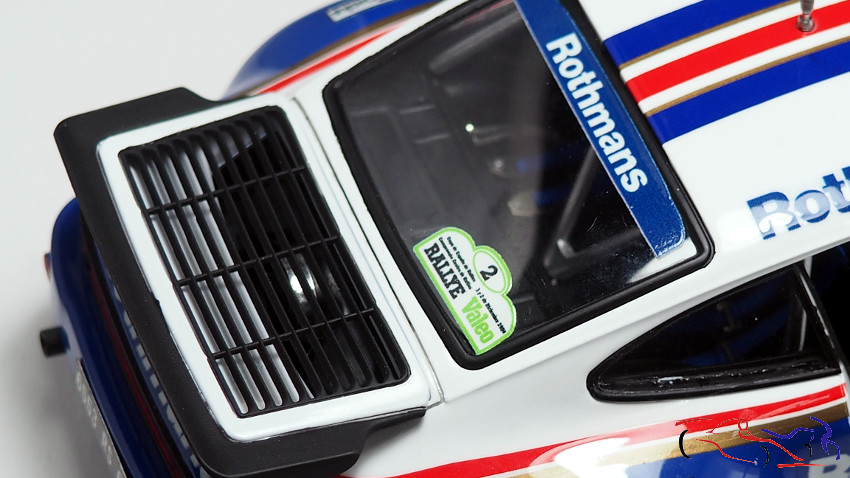
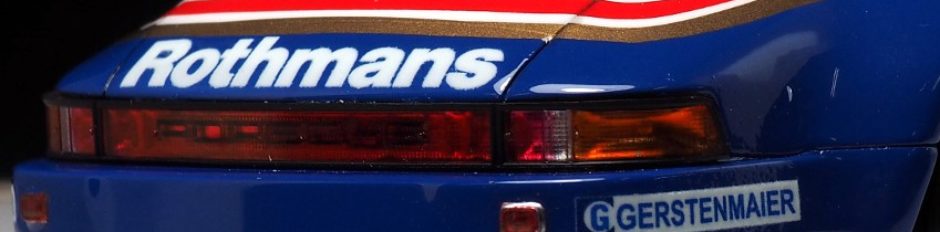
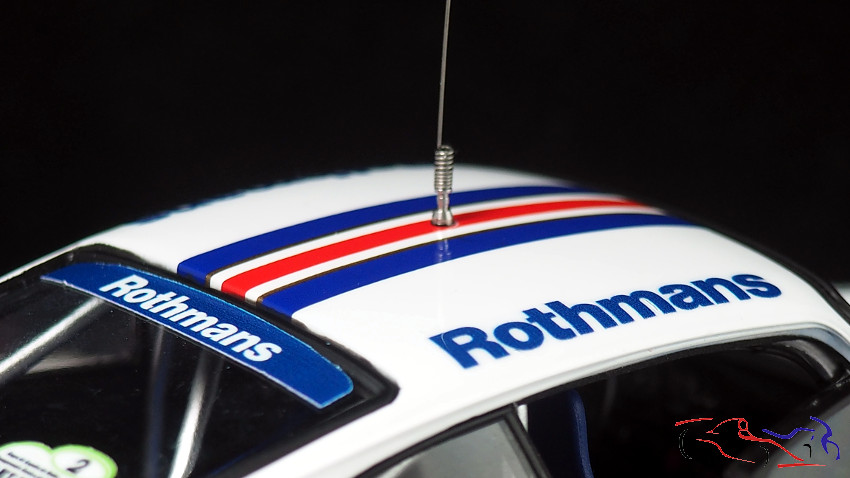
Las siguientes fotos os muestran detalles del coche:
ADDED ACCESSORIES. Several components were added to create a copy of the real car that ran in the 1984 Valeo Rally:
Scalelab24. He provided me with a TK with very well made photo-etched parts (Thank you!!) that can be easily included.
DAB Models. The steering wheel is simply magnificent!! (Thank you pablo!!)
KMP. The wheels and tires are incredible and very real. Too bad I had to shorten the kit piece to fit the rear wheels because they stuck out a lot. (Thank you Andrea!!)
JAM Scale Design. Its TK of the hood and auxiliary headlights greatly enhance the aesthetics of the car. (Thank you Ignacio Bas!!)
Spotmodel Printlab. Thanks to Mario Vallina who designed the decals for the Spanish car and included those from the Valeo rally. He also provided me with the Pirelli masks for the wheels.
Number5. The paint color is a great success for this brand!!
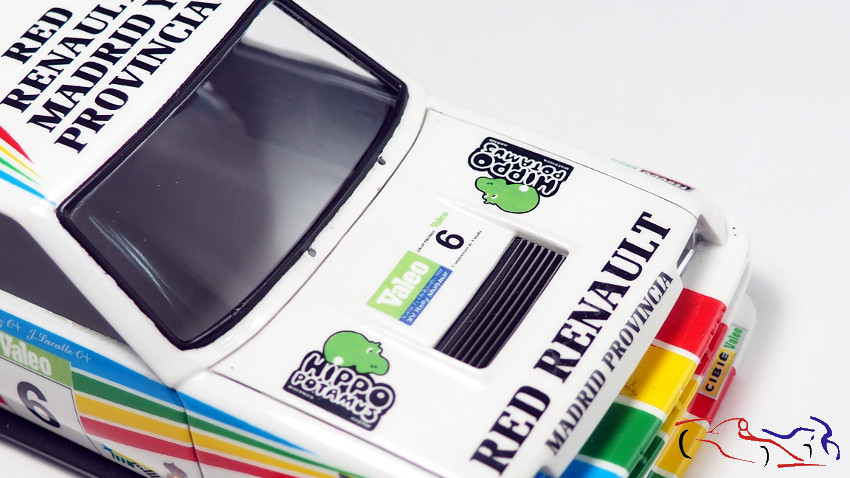
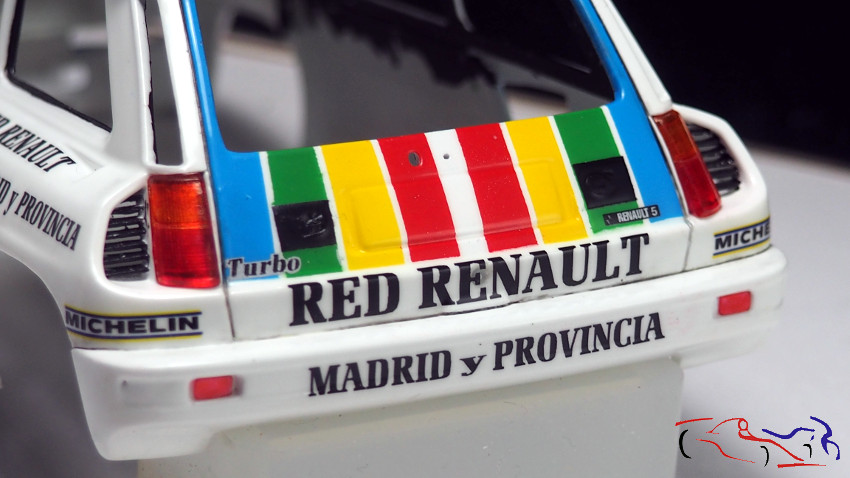
The following photos show you details of the car:
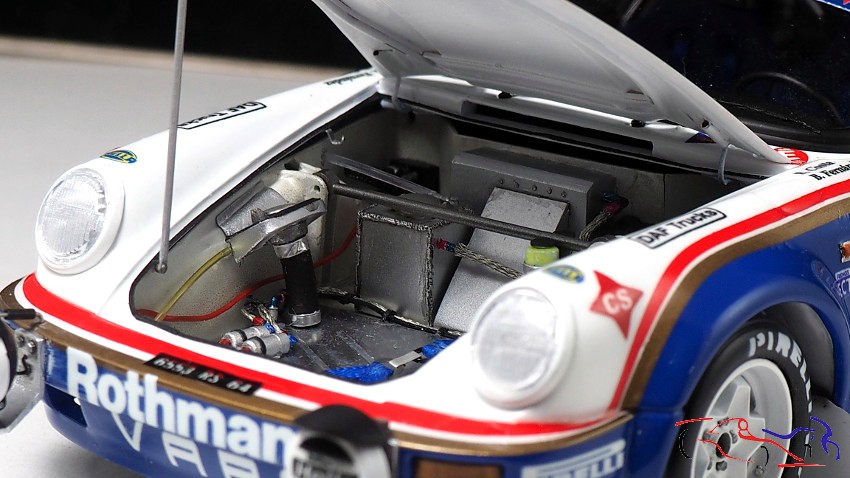
Ahora, unas fotos del capó abierto:
Now, some photos of the open hood:
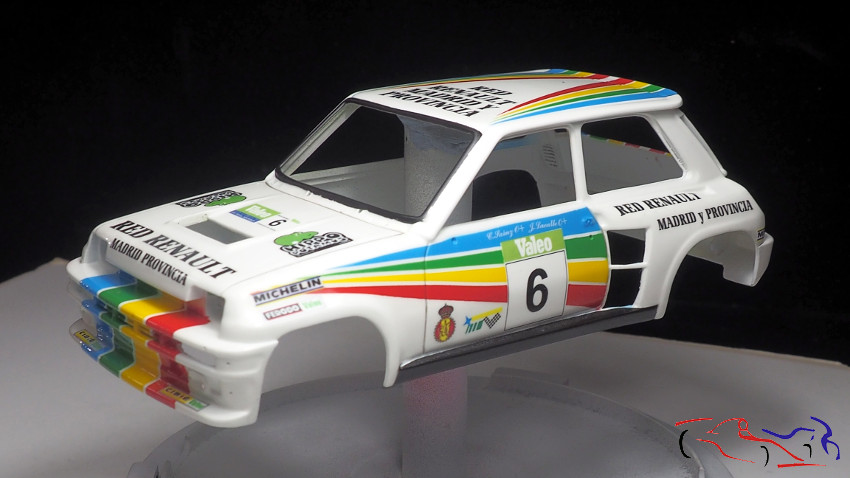
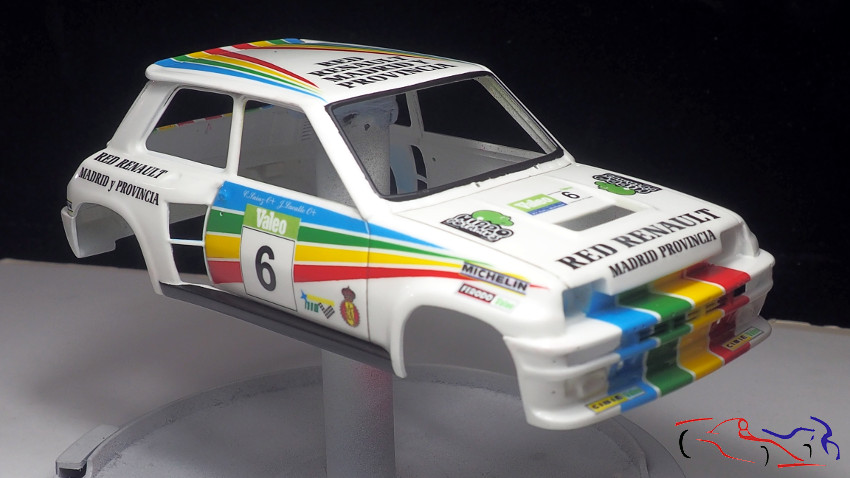
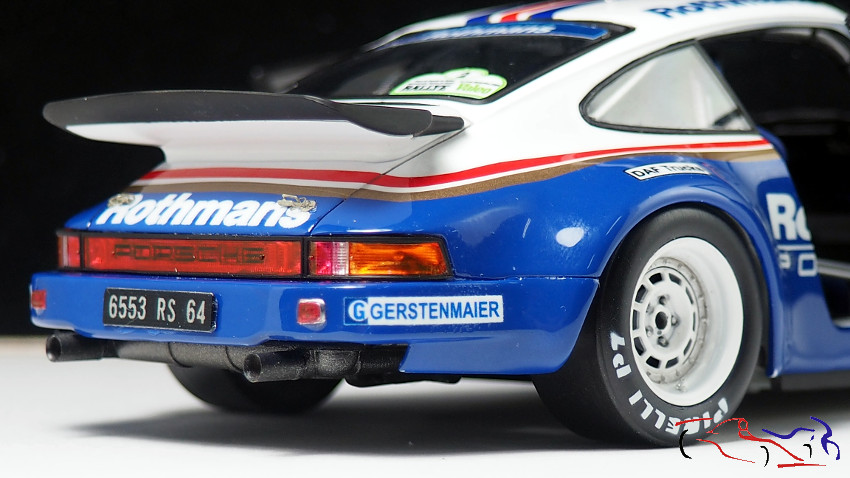
Más fotos de la carrocería:
More photos of the bodywork:
Por último, fotos con el coche puesto en su base:
Finally, photos with the car placed on its base:
Espero que os haya gustado tanto como a mi!! Gracias por ver y comentar!!
I hope you liked it as much as I did!! Thanks for viewing and commenting!!