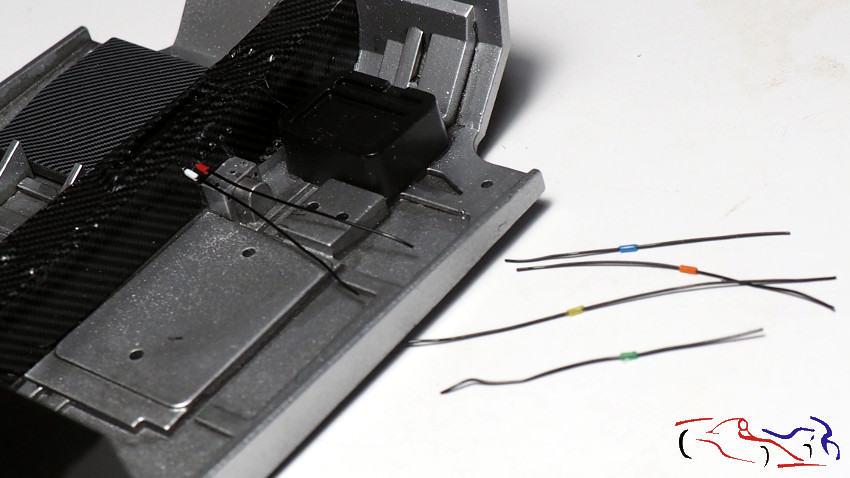
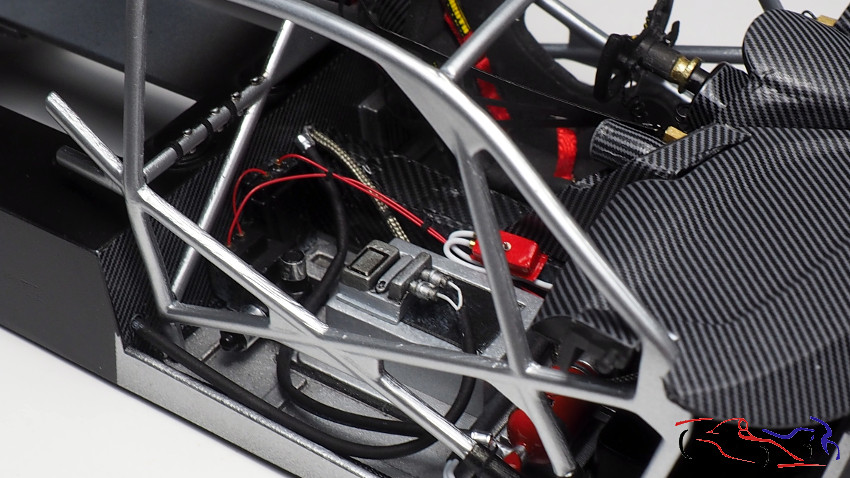
Continuamos con el Audi, y ahora vamos a detallar el interior. Empezamos por unos cables que tienen unos manguitos de colores y van colocados en el tunel central. Los hago con cable negro de 0,3 mm siendo los manguitos de colores, camisas de cable estandar.
We continue with the Audi, and now we are going to detail the interior. We start with some wires that have coloured sleeves and are placed in the central tunnel. I make them with 0,3 mm black cable, being the coloured sleeves, standard cable sleeves.
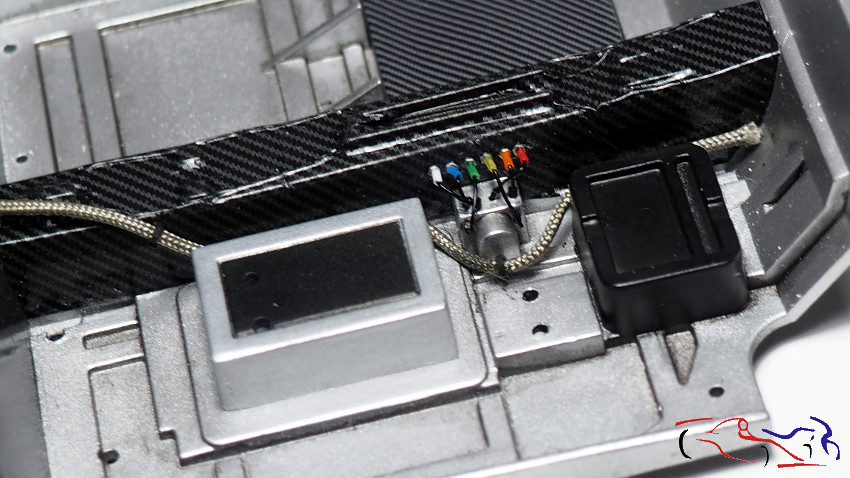
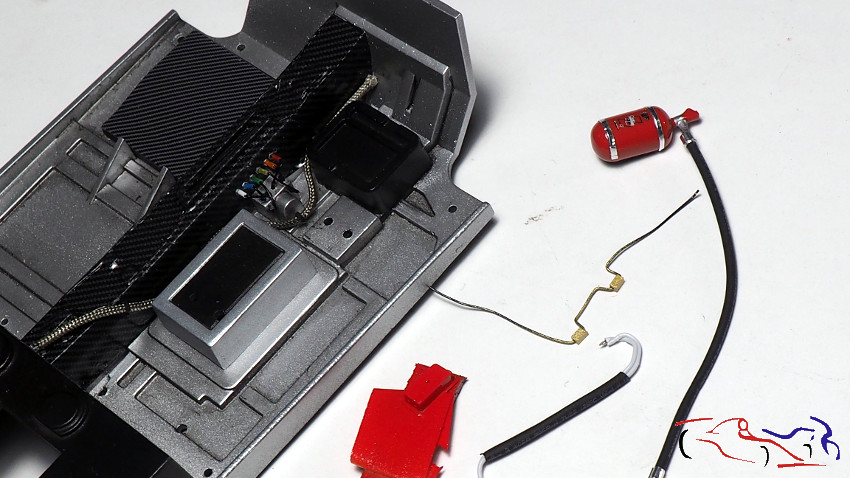
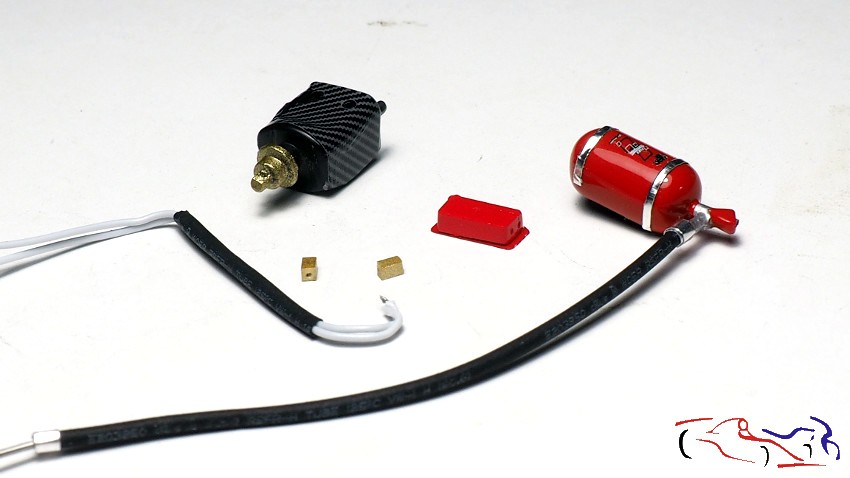
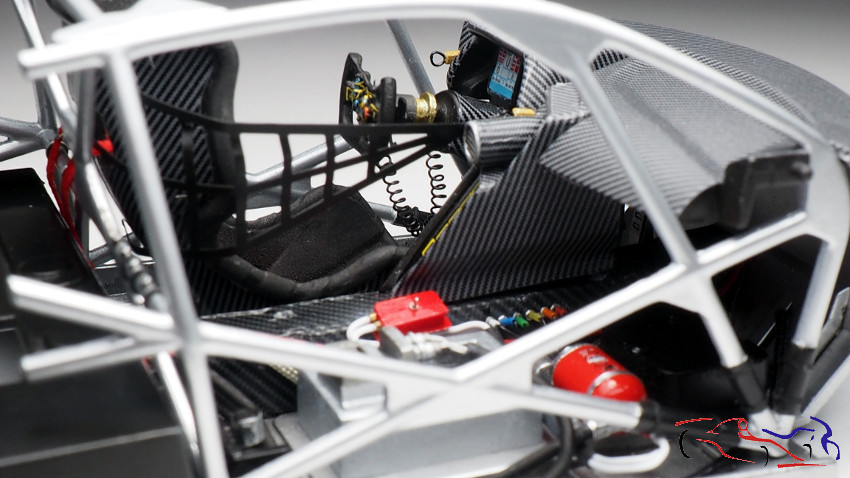
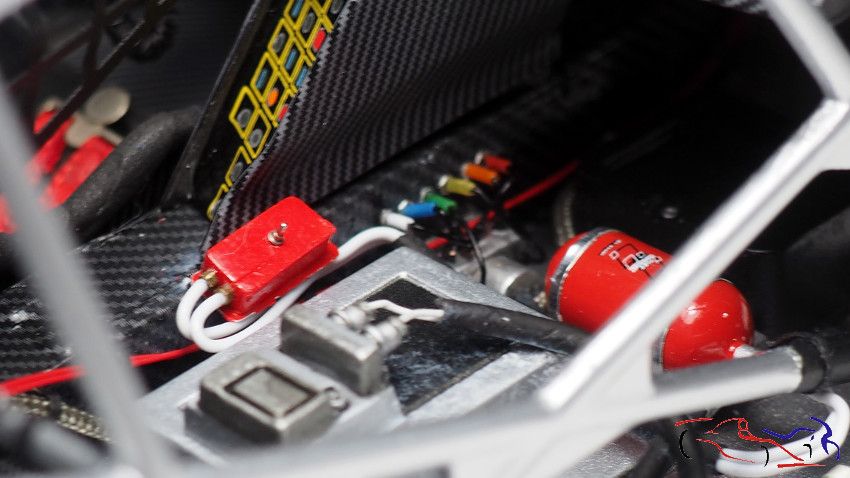
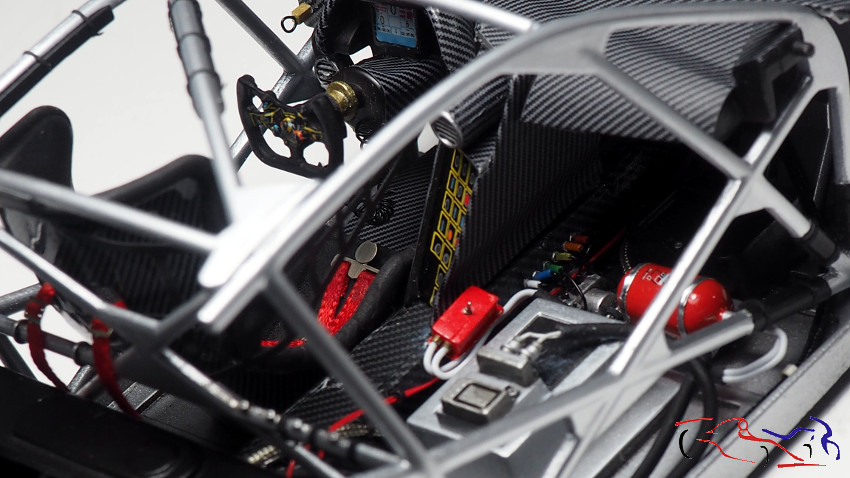
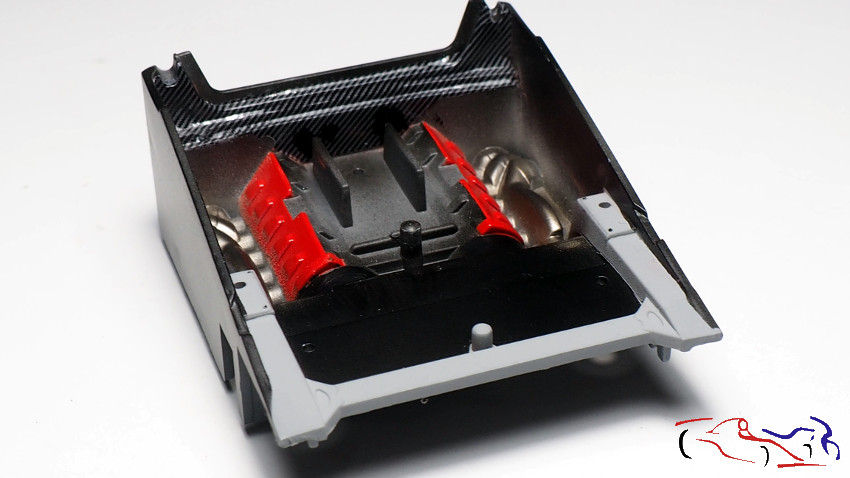
A su vez, también voy pintando piezas, colocando tubos y conexiones. Las dos piezas doradas son las fijaciones de las mallas que tiene el piloto a ambos lados, y la caja roja es el control de extintores:
At the same time, I am also painting parts, placing tubes and connections. The two golden pieces are the mesh fixings that the pilot has on both sides, and the red box is the fire extinguisher control:
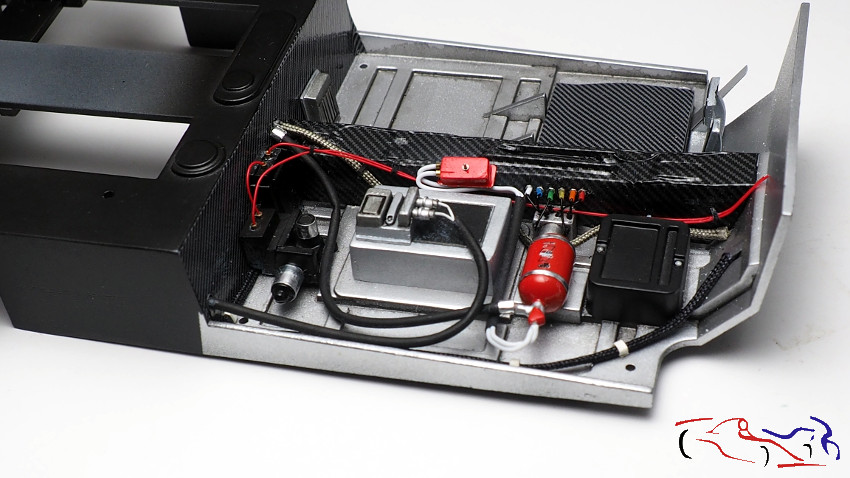
Y aquí vemos la parte de la electronica completada:
And here we see the completed electronics part:
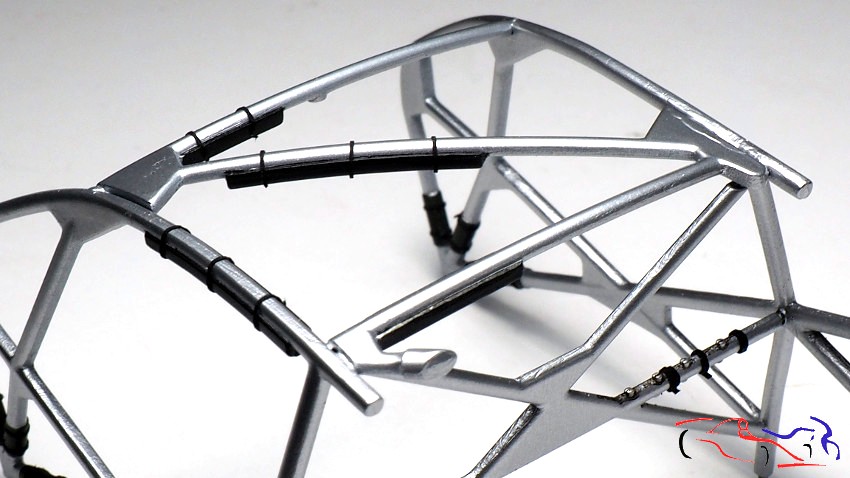
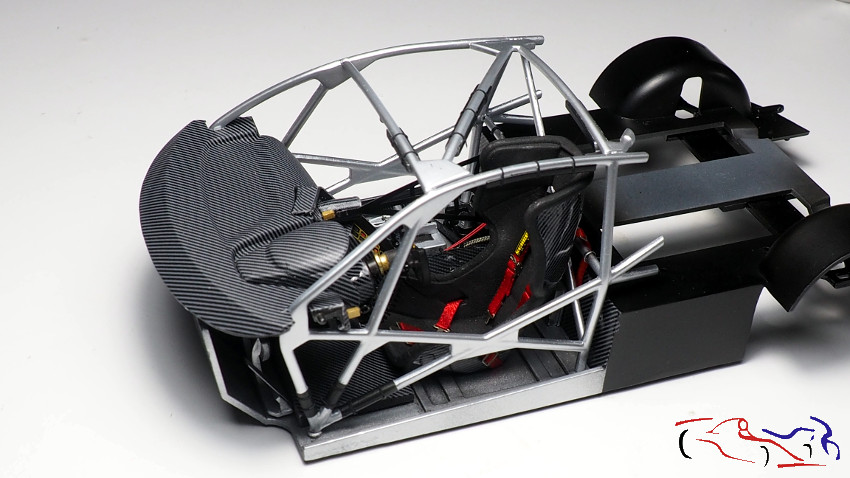
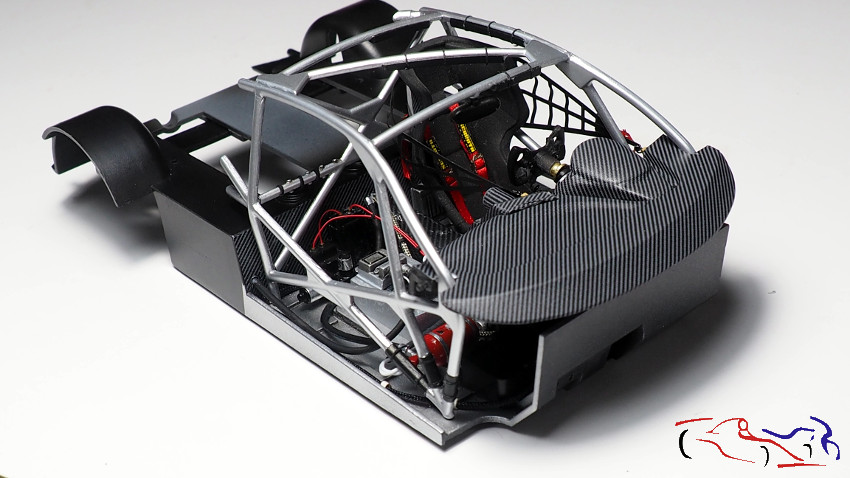
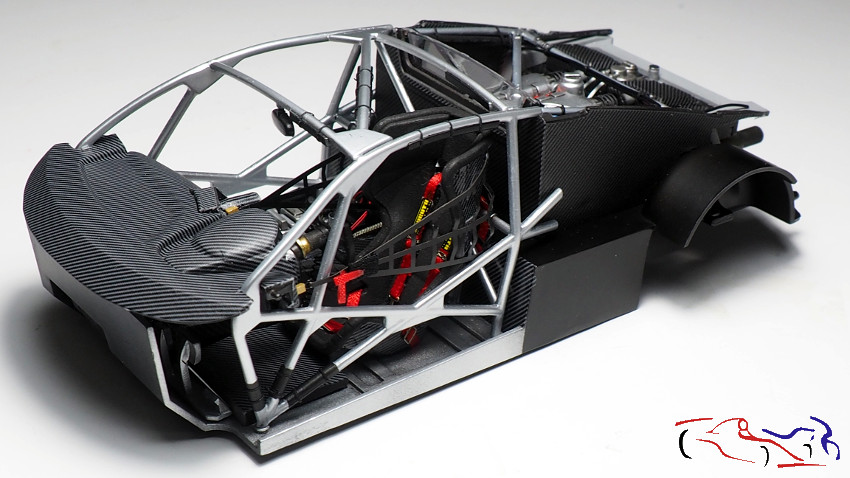
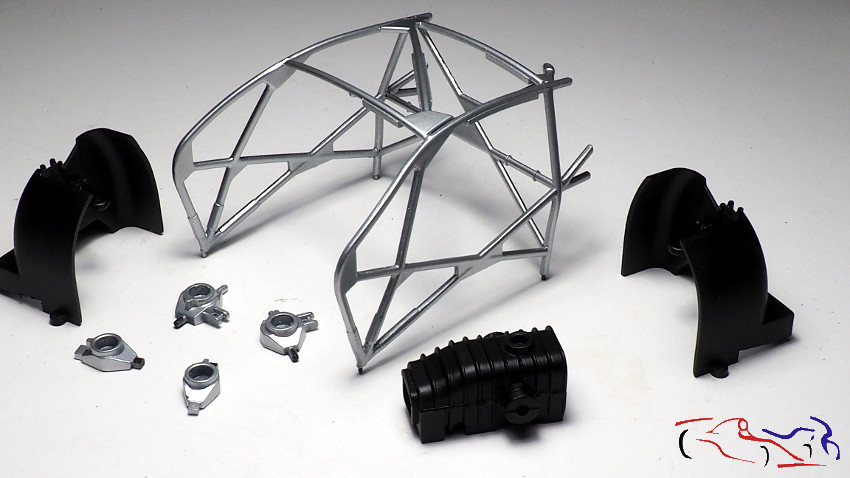
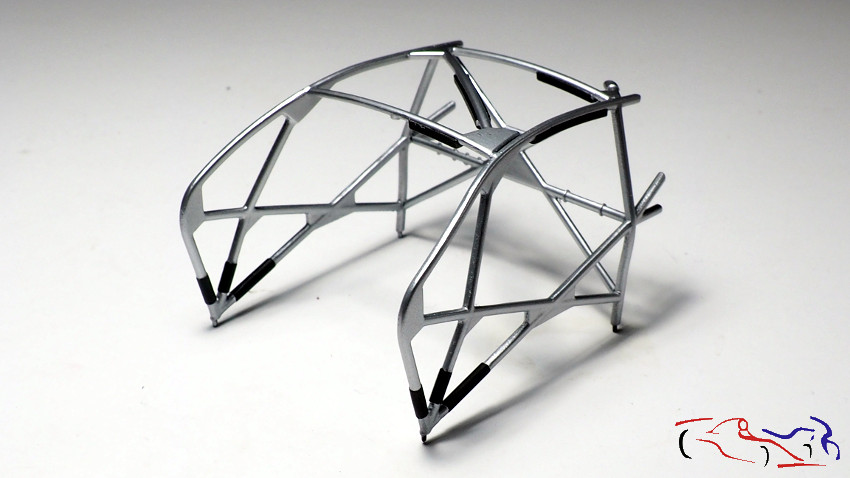
Pasamos al arco de seguridad. Le he puesto las fijaciones a todos los protectores que lleva, habiendo usado la cinta de enmascara negra de 0,2 mm de Hasegawa:
We move on to the roll bar. I have attached the fixings to all the guards on it, having used Hasegawa’s 0.2 mm black masking tape:
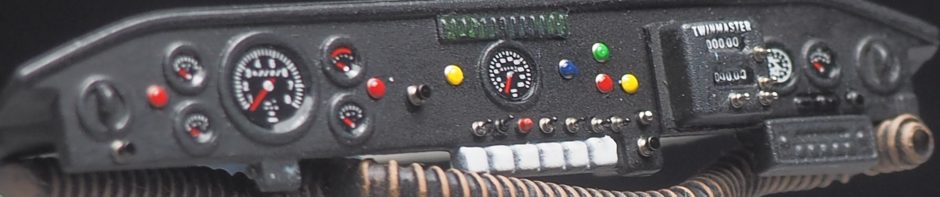
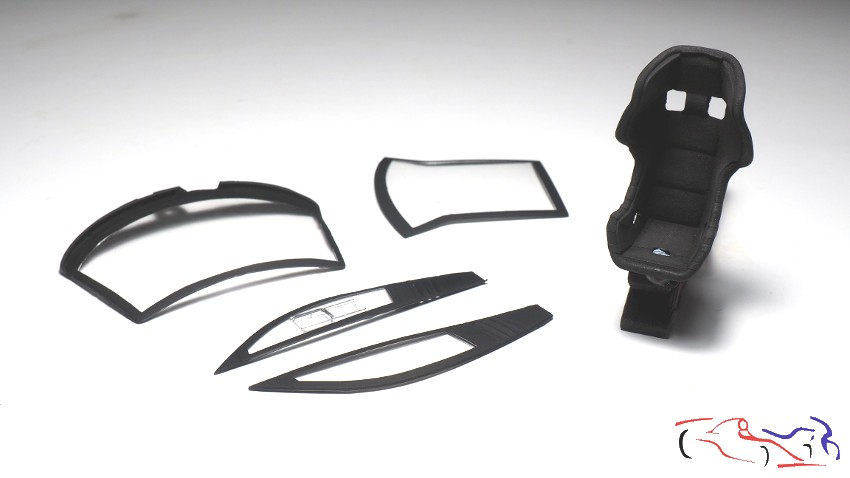
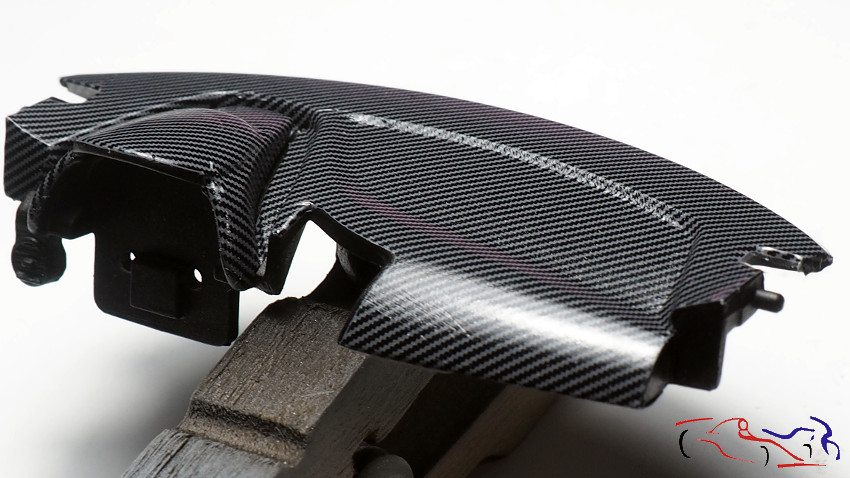
Ahora, os muestro una foto del salpicadero, una vez terminado. Destacar la fijación de la malla protectora izquierda, con una arandela por la que se meterá el extremo de la malla.
Now, I show you a picture of the finished dashboard. I have to point out the fixing of the left protective mesh, with a washer through which the end of the mesh will be inserted.
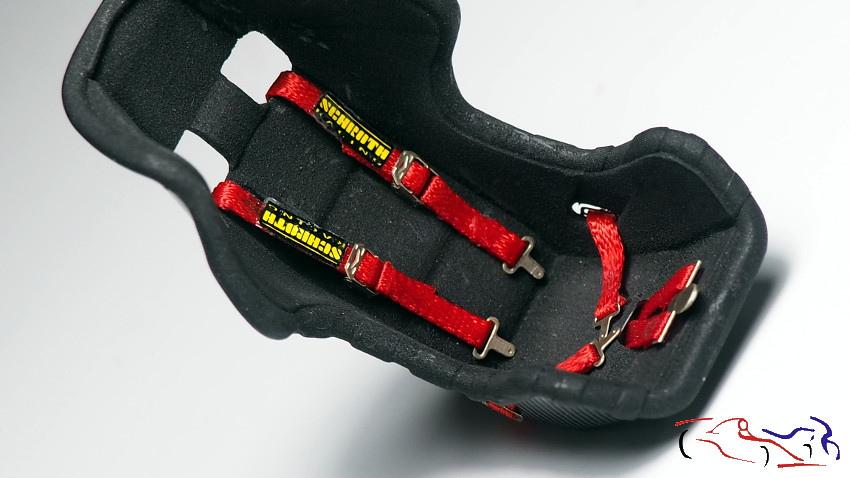
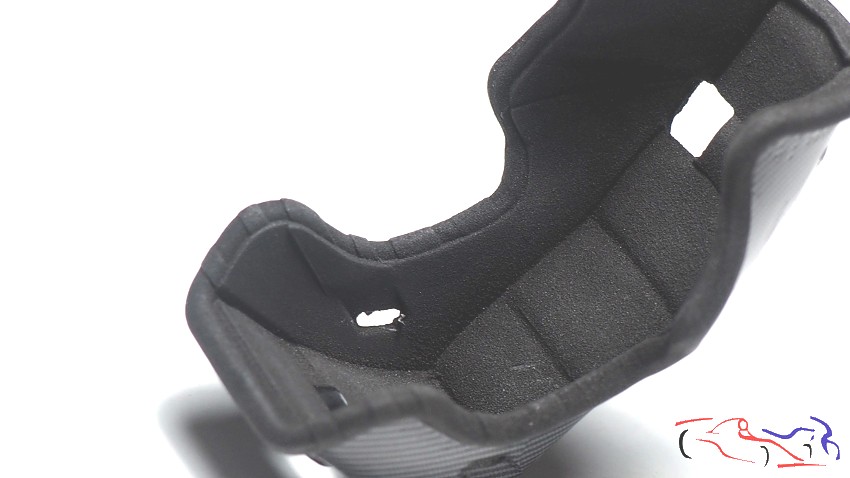
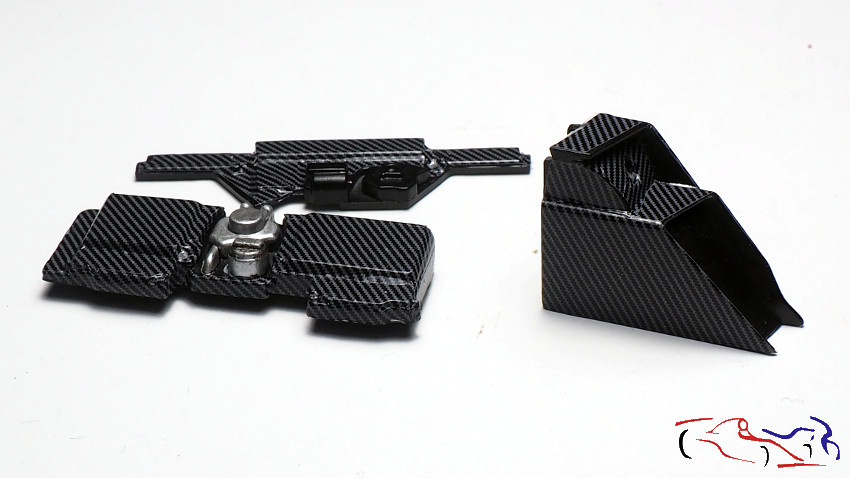
Y el asiento con los cinturones ya colocados.
And the seat with the seat belts already in place.
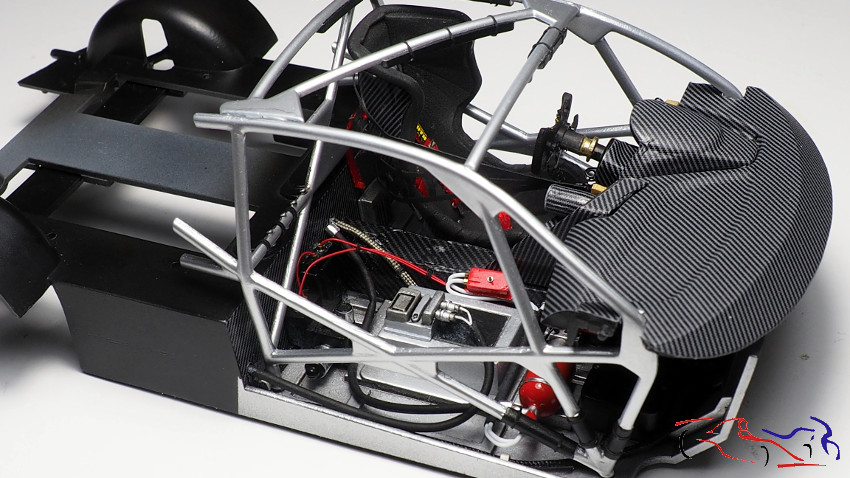
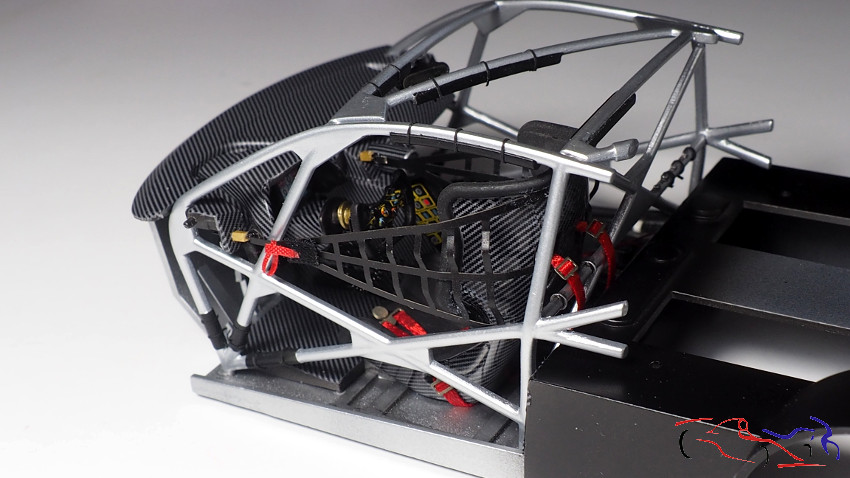
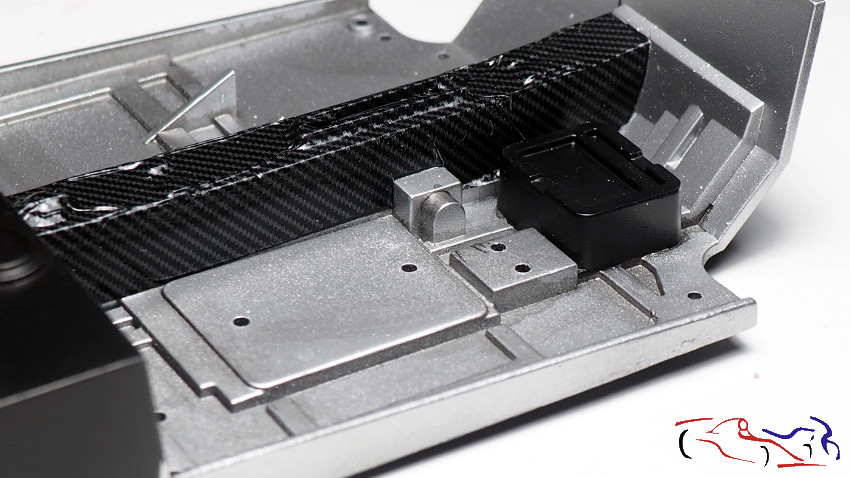
Aquí vemos como va colocada la malla derecha y su fijación en el salpicadero. Notad que he doblado la malla para que resulte como en la realidad:
Here we can see how the right mesh is positioned and how it is fixed to the dashboard. Note that I have bent the mesh to make it look like the real thing:
Y una vez montado todo, este es el resultado:
And once everything was assembled, this is the result:
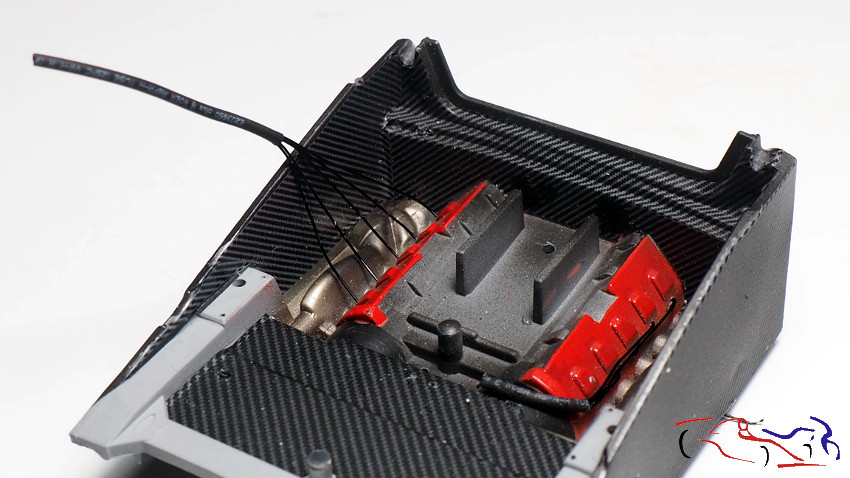
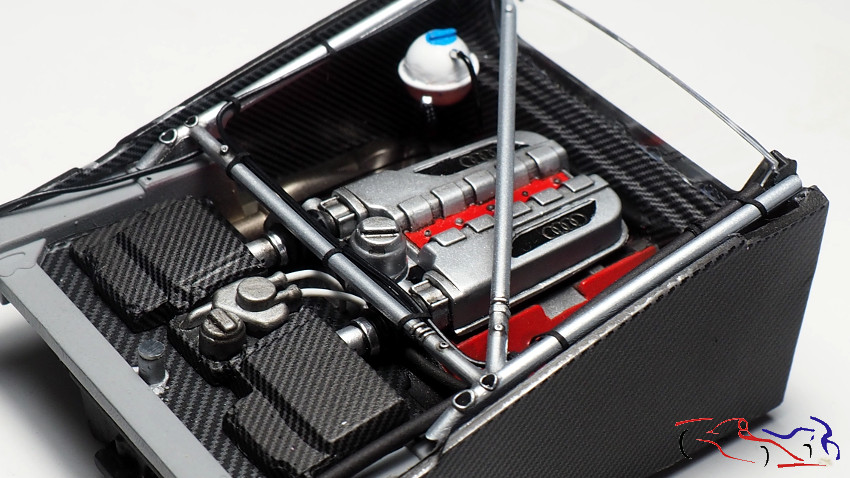
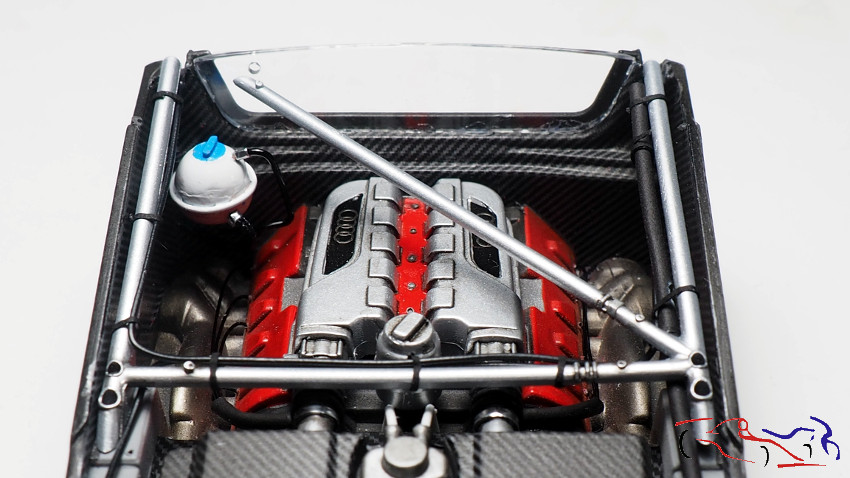
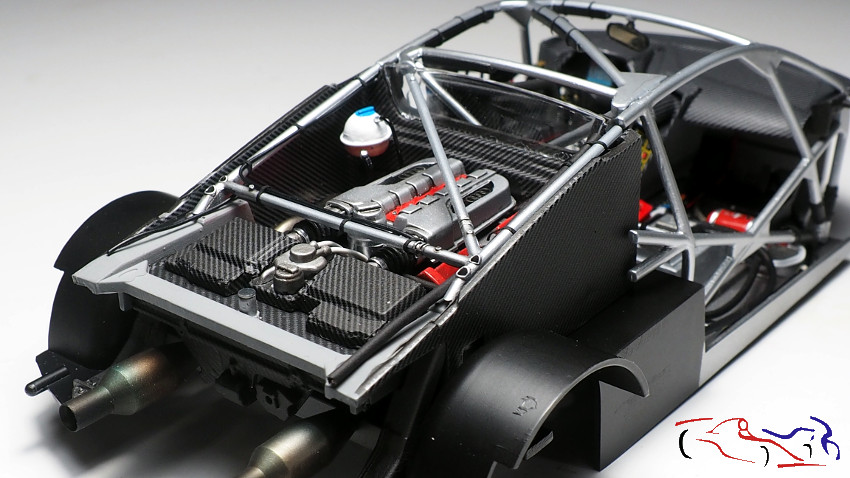
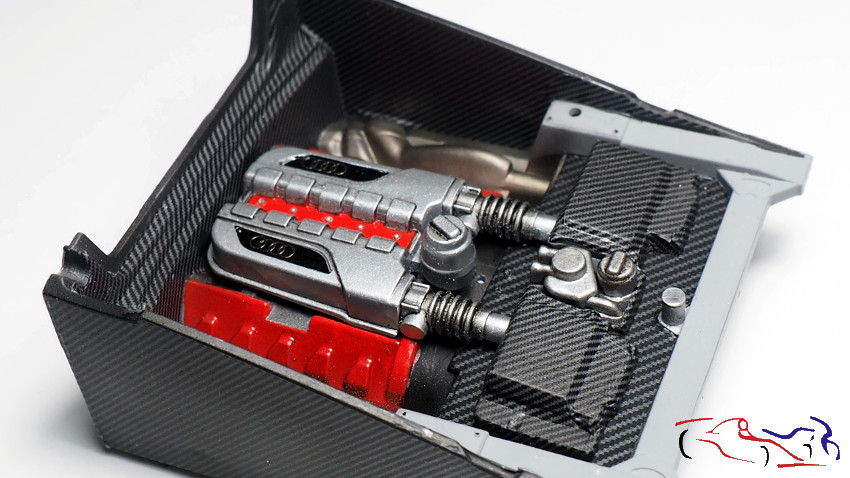
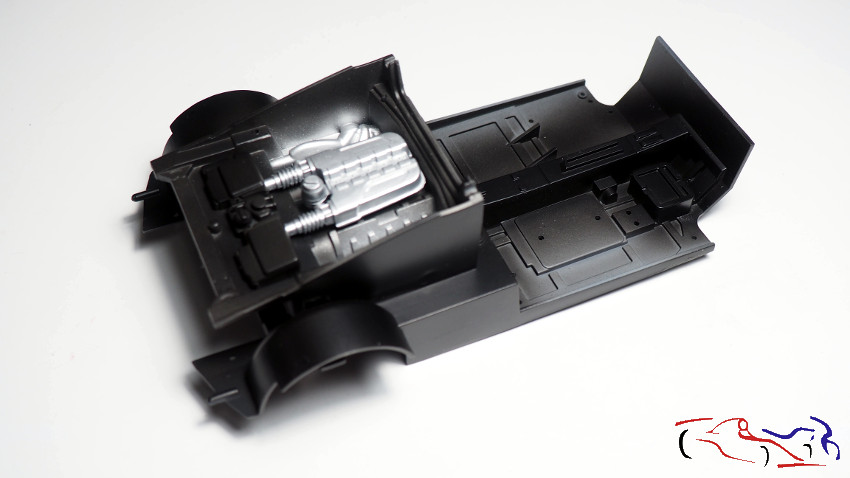
Vamos con el motor. Le añadimos los cables de las bujias, que introduciomos dentro de un tubo termorretractil:
Let’s go to the engine. We add the spark plug wires, which we put into a heat-shrinkable tube:
También cableamos la parte del arco de seguridad que lleva el motor, e incluimos el deposito blanco con el tapón azul, típico en los motores del grupo WV.
We also wired the safety arch part of the engine, and included the white tank with the blue cap, typical of the WV group engines.
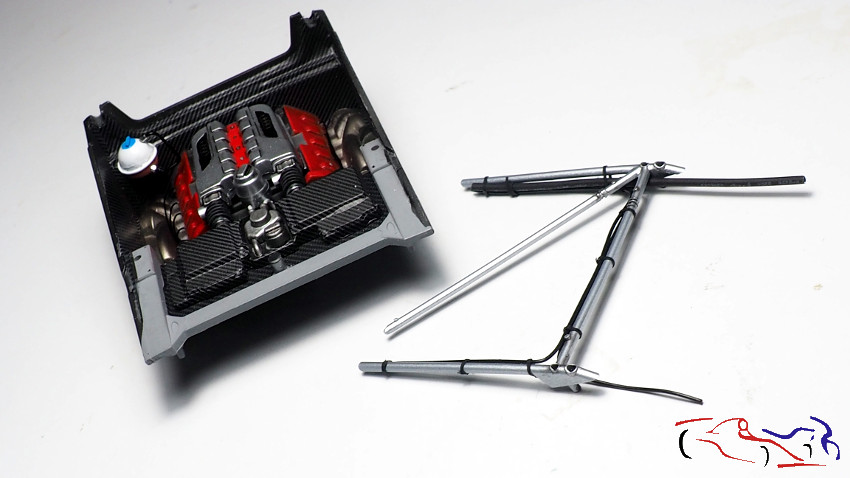
Y un par de fotos del motor terminado:
And a couple of pictures of the finished engine:
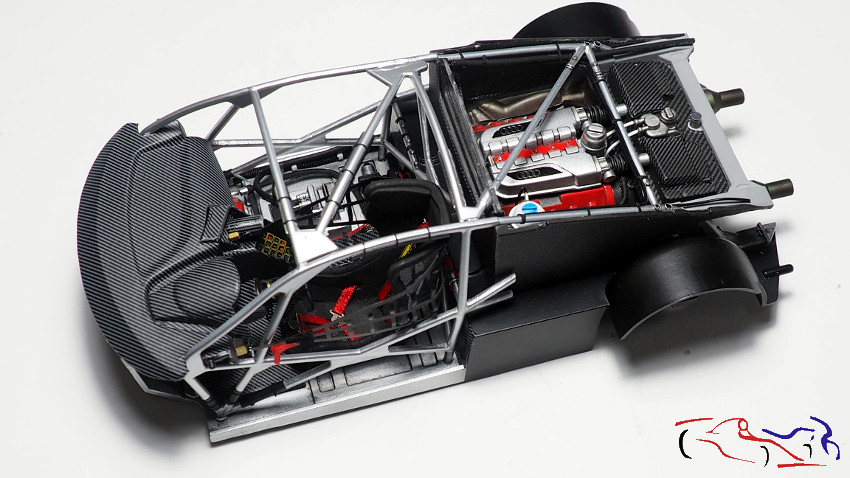
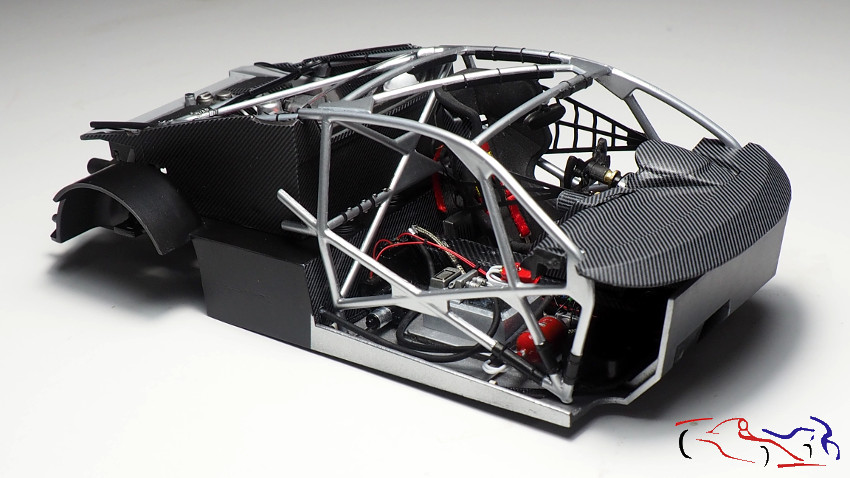
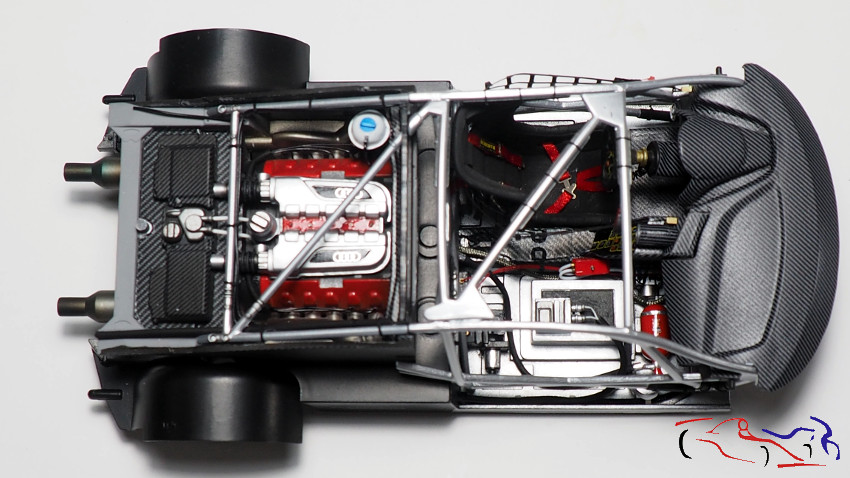
Y si unimos el motor al chasis superior con el cokpit, éste es el resultado:
And if we attach the engine to the upper chassis with the cockpit, this is the result:
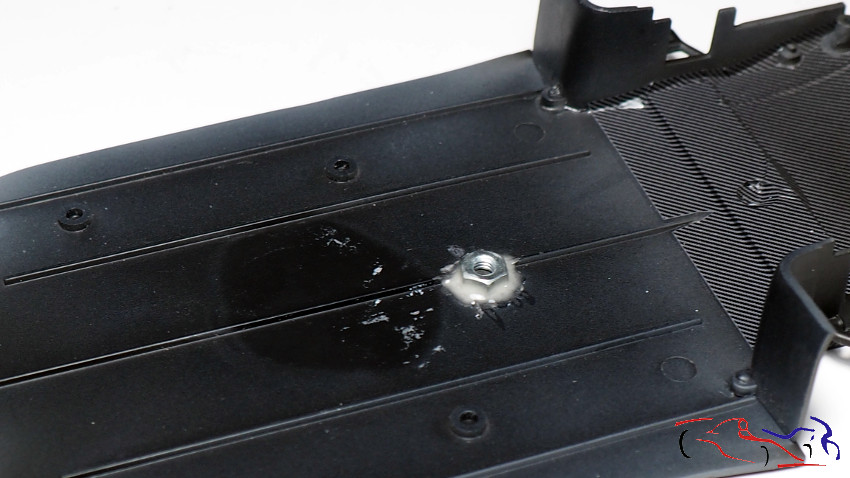
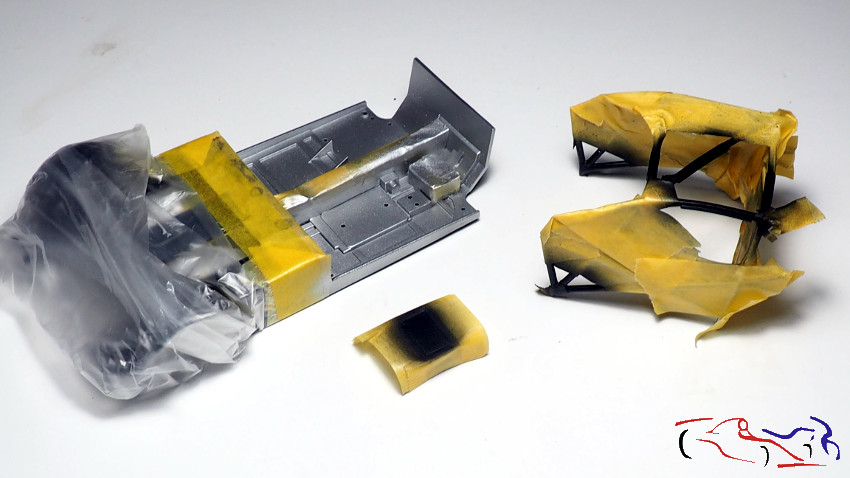
Ahora es momento de iniciar los trabajos en el chasis, y lo primero, es la fijación de la tuerca en el chasis, para fijar la maqueta a la base: ciano con polvos de talco!!
Now it’s time to start working on the chassis, and the first thing to do is to fix the nut on the chassis, to fix the model to the base: CA glue with talcum powder!
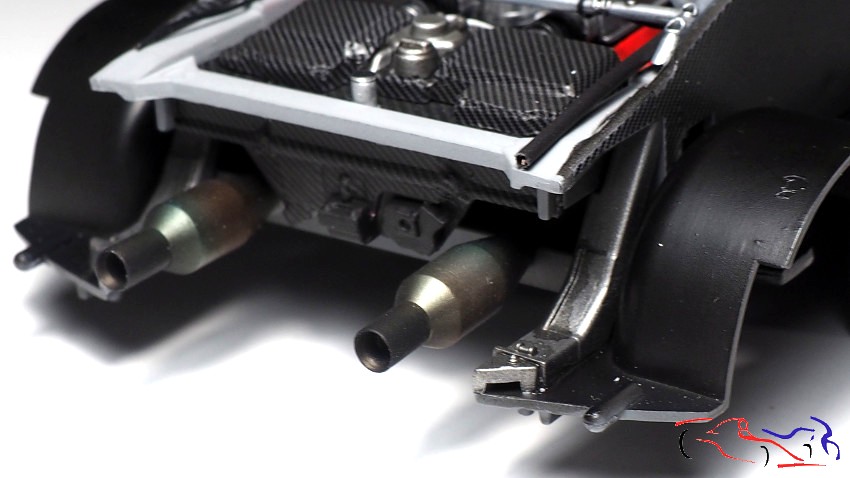
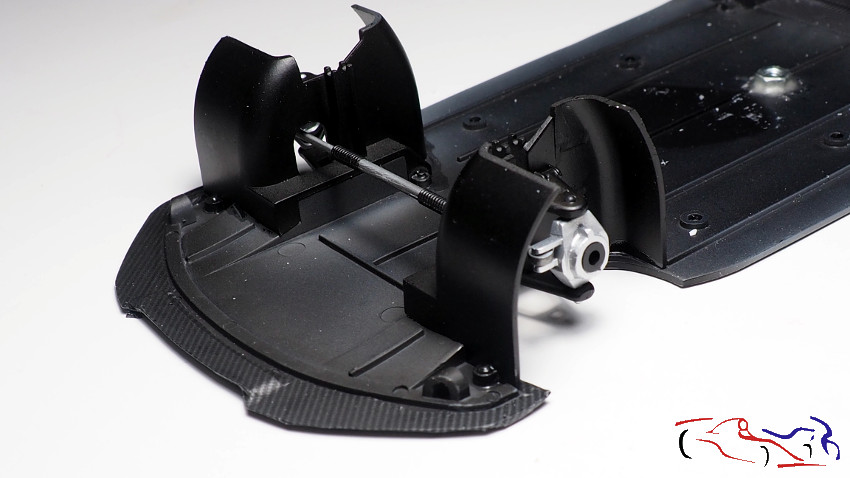
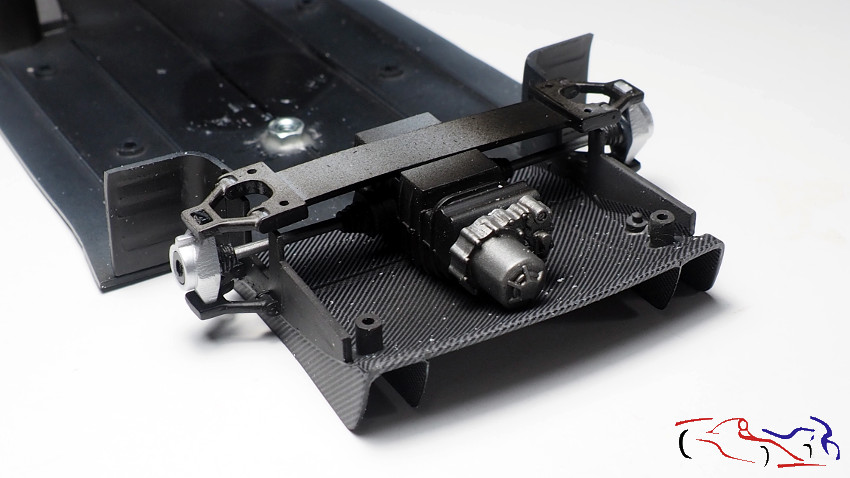
Y ahora es el turno de añadir piezas al chasis correspondinentes al eje delantero y trasero:
And now it’s time to add front and rear axle parts to the chassis:
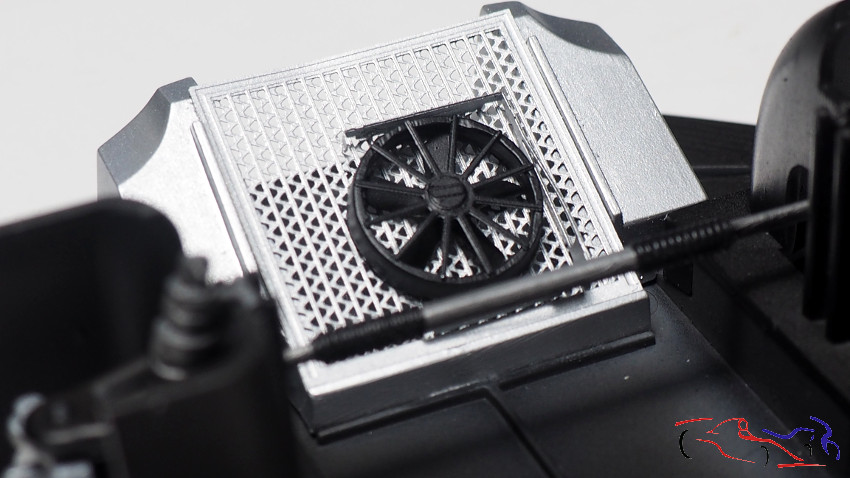
Mas detalles: el filtro del aire con el ventilador, colocado también en el chasis:
More details: the air filter with the fan, also placed in the chassis:
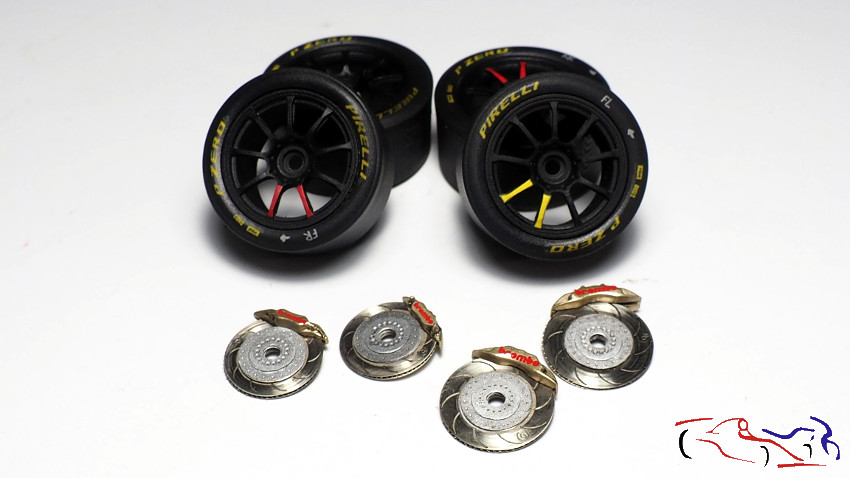
A las ruedas, les he pegado el disco con la pinza de freno:
I have glued the disc with the brake caliper to the wheels:
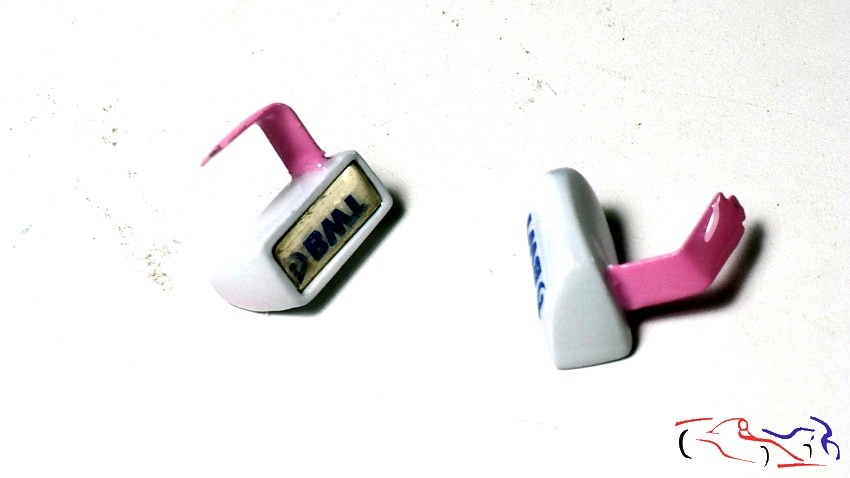
Y a los retrovisores, les he añadido la pieza de fotograbado que he pulido para que refleje como buen espejo que debe ser (se ve en el retrovisor de la izquierda, el logo del restrovisor derecho). Ese espejo se ve amarillento por la luz existente, pero es un espejo normal.
I have added the photoetched piece that I have polished to the mirrors,so that it reflects like the good mirror it should be (you can see the logo of the right mirror on the left mirror). This mirror looks yellowish because of the existing light, but it is a normal mirror.
Y para terminar, el paso previo al pulido: lijado de toda la carrocería con lija al agua de grano 1000, y posteriormente con 2000.
And finally, the step prior to polishing: sanding of the entire bodywork with 1000 grit waterproof sandpaper, and then with 2000 grit sandpaper.
Y yo creo, que la siguiente actualización será casi la final, con el pulido y pegado de piezas a la carroceria. Gracias por ver y comentar!
And I think, the next update will be almost the final one, with the polishing and gluing of parts to the body. Thanks for watching and commenting!
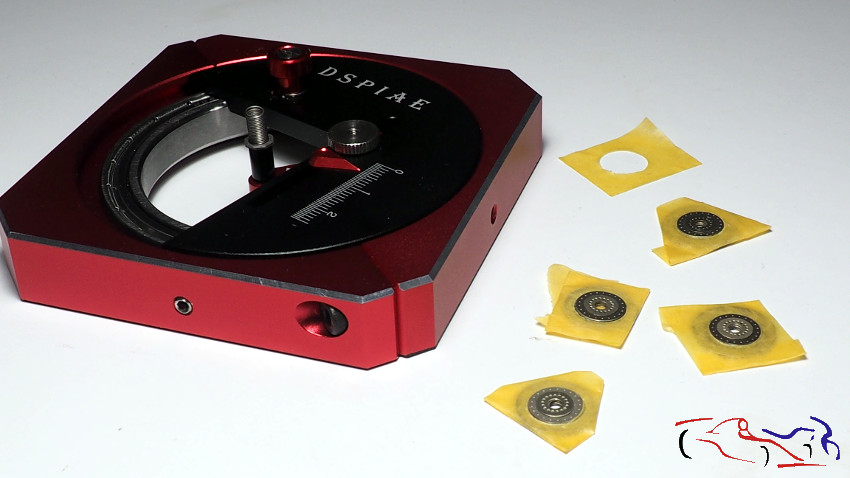
Vamos avanzando en el Audi con grandes cambios. Lo primero que os muestro es referente a los discos de freno. Como hay que pintar la parte interior, creo unas plantillas del diámetro exacto con el cortador de círculos DSPIAE, y las pongo en los discos. La pintura utilizada es Titanium Silver de Tamiya, siendo este el resultado:
We are making progress on the Audi with big changes. The first thing I show you is the brake discs. As the inside has to be painted, I create some templates of the exact diameter with the DSPIAE circle cutter, and put them on the discs. The paint used is Titanium Silver from Tamiya, and this is the result:
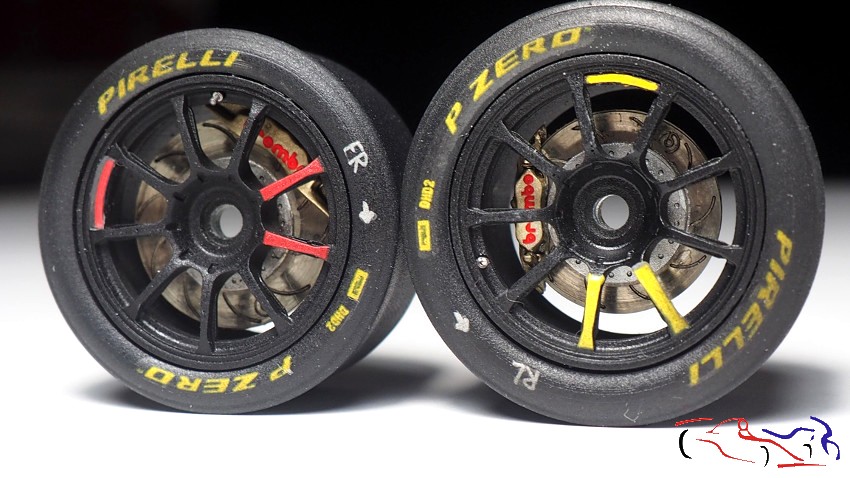
Aquí los muestro con un lavado de panel liner de Tamiya, junto a las ruedas:
Here I show them with a Tamiya liner panel wash, next to the wheels:
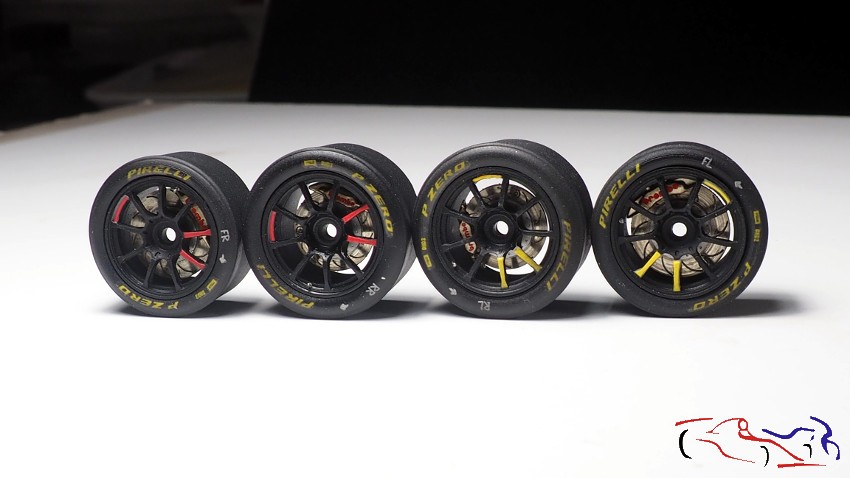
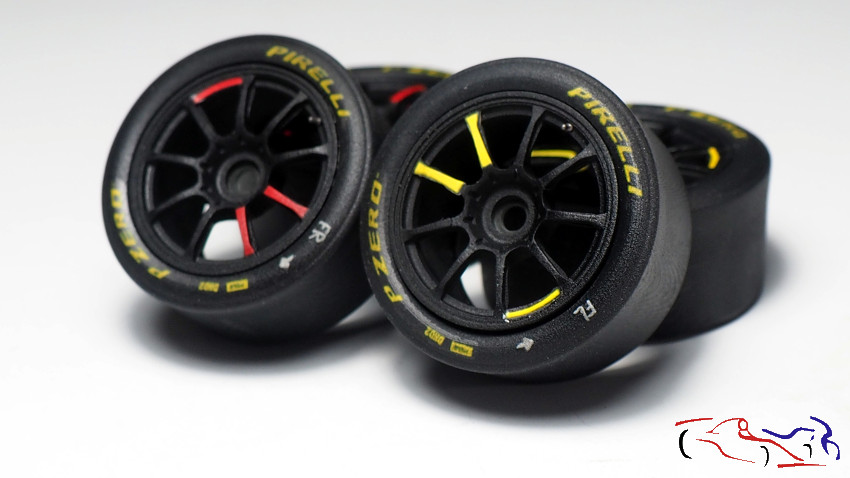
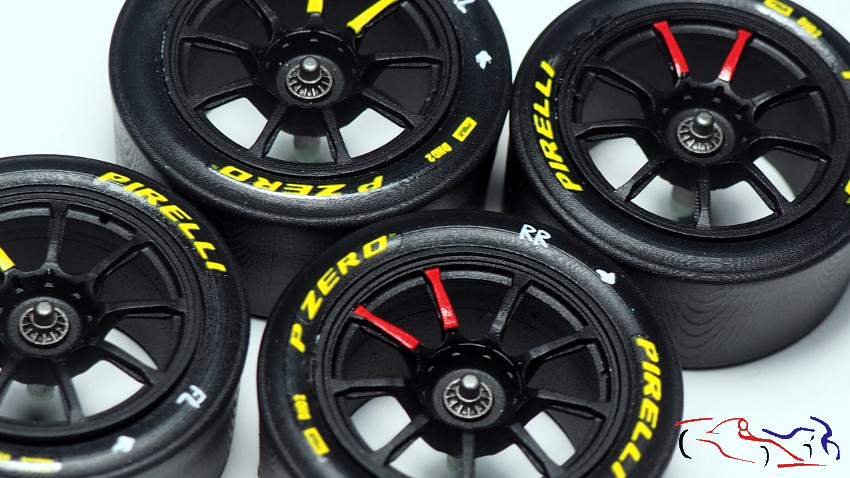
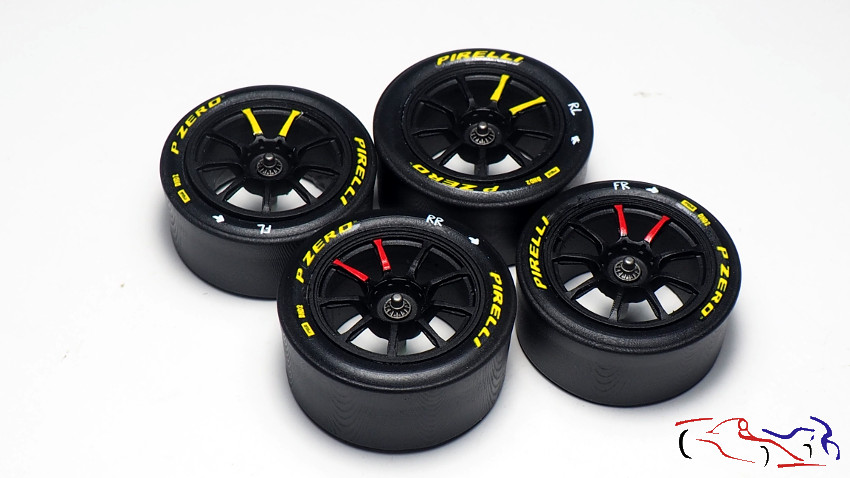
Decir que las ruedas ya están terminadas, inclyendo las válvulas:
The wheels are already finished, including the valves:
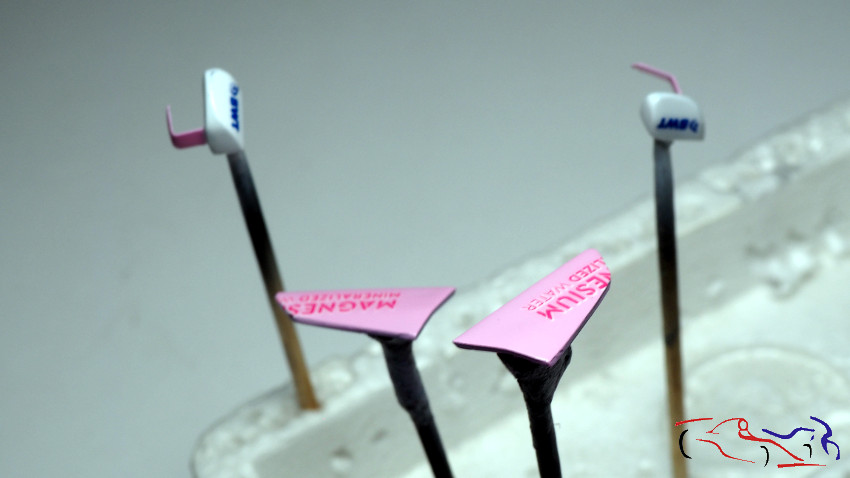
Pasamos al alerón trasero. Aquí, lo que hice fue adaptar las fijaciones de plástico a los fotograbados, pero la verdad es que en la misma hoja de los fotograbados, había una pieza muy pequeñita que sustituía a la que yo había recortado de la pieza de plástico. Por tanto, despegué la parte de plástico para colocar la pequeña pieza del fotograbado. En la foto d ela izquierda, os muestro la fijación de la derecha, tal como la había dejado; la de la izquierda, con el plástico eliminado, y las dos pequeñas piezas del fotograbado. EN la foto de la derecha, tenemos todo listo para pintar: las fijaciones ya montadas de fotograbado, y el alerón con los huecos originales tapados con masilla, en los que solo hay una rajita para insertar el fotograbado de las fijaciones (que no se ve muy bien):
Let’s move on to the rear wing. Here, what I did was to adapt the plastic fixings to the photoetched parts, but the truth is that on the same sheet, in the photoetched parts, there was a very small piece that replaced the one I had cut out of the plastic part. Therefore, I peeled off the plastic part to place the small piece of the photoengraving. In the photo on the left, I show you the fixture on the right, as I had left it; the one on the left, with the plastic removed, and the two small pieces of the photoetched parts. In the photo on the right, we have everything ready to paint: the photoetched parts already mounted, and the aileron with the original holes covered with putty, in which there is only a crack to insert the photoetched parts of the mountings (which is not very well seen):
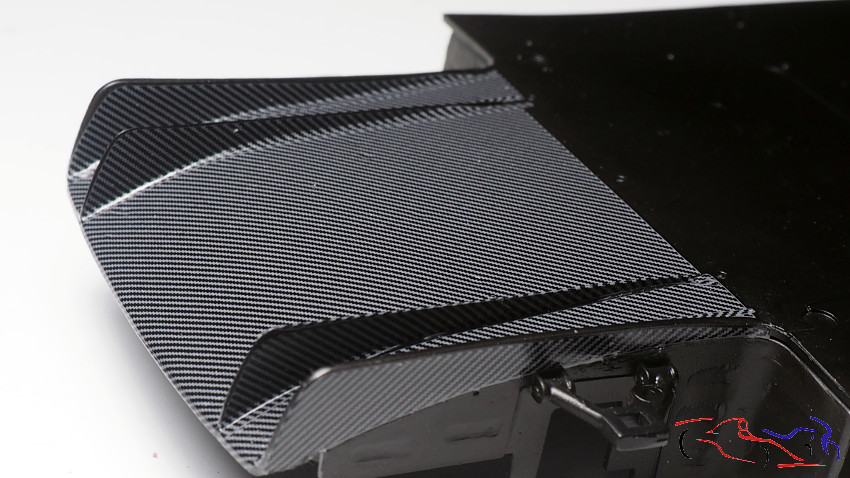
En las siguientes fotos, tenemos en la primera las derivas laterales y el propio alerón, ya pintados listos para las calcas, y en la segunda, ya con las calcas puestas, listas para lacar:
In the following pictures, we have in the first one the side drifts and the aileron itself, already painted ready for the decals, and in the second one, already with the decals on, ready to be lacquered:
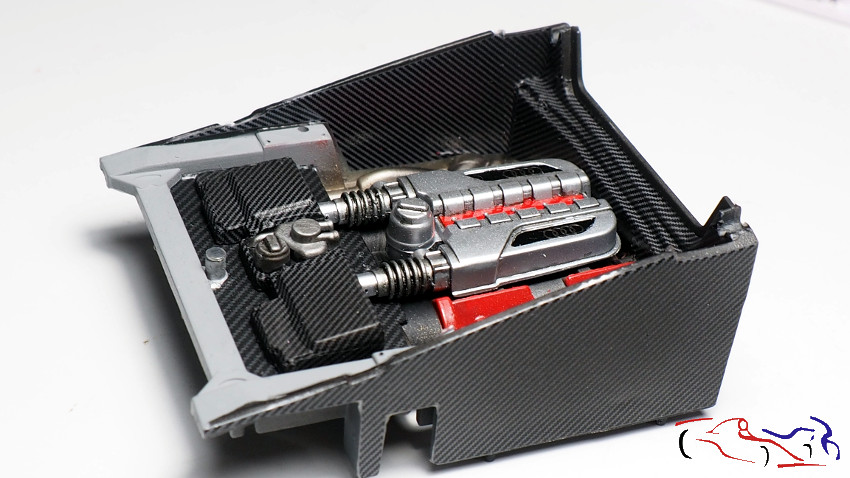
Pasamos al bloque motor, el cual ya está con las calcas de fibra y con una capa de barniz satinado, a falta de detallar y cablear:
We move on to the engine block, which is already with the fibreglass decals and a coat of satin varnish, with detailing and wiring still to be done:
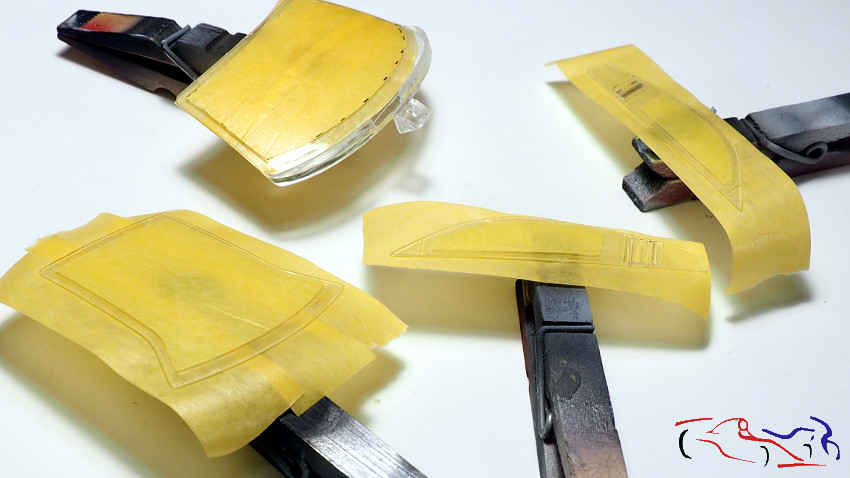
Para los cristales, preparamos las máscaras que tomamos del TK de Scalelab24, añadiendo otras por denbajo para que no encucie el cristal al pintar. Decir que las ventanas las pintaré por encima en negro mate, ya que me gustaba más de esta manera, que quedara mate la parte externa que no brillante si la pinto por debajo. Vemos los cristales enmascarados sin pintar en la primera foto, estando ya pintados en la segunda, junto al asiento:
For the windows, we prepared the masks that we took from Scalelab24’s TK, adding others underneath so that they don’t bind the glass when painting. I will paint the windows in matt black on top, as I liked it better this way, so that the external part would be matt rather than shiny if I paint it underneath. We can see the unpainted masked windows in the first picture, being already painted in the second one, next to the seat:
Y pasamos al proceso de lacado. Aquí os muestro todas las piezas que iba a lacar en sus soportes:
And now we move on to the lacquering process. Here I show you all the pieces that I was going to lacquer on their supports:
Y ahora, la carrocería lacada. Usé la laca Number5 que tenía abierta, y si bien estaba un poco espesa, le di dos manos muy ligeras y una tercera húmeda. Alguna mota tiene y alguna piel de naranja, pero la idea es pulir la carrocería, con lo que no me importaba que la capa de laca fuera gorda:
And now, the lacquered bodywork. I used the Number5 lacquer I had open, and although it was a bit thick, I applied two very light coats and a third wet one. It has some speckles and some orange peel, but the idea is to polish the bodywork, so I didn’t mind a thick coat of lacquer:
Para terminar el proceso de lacado, os muestro otras piezas. Destacar en la segunda foto, el asiento, en el que laqué la fibra trasera para enmascararla y poder acometer el siguiente proceso:
To finish the lacquering process, I show you other parts. The second picture shows the seat, where I lacquered the rear fibre to mask it and to be able to start the next process:
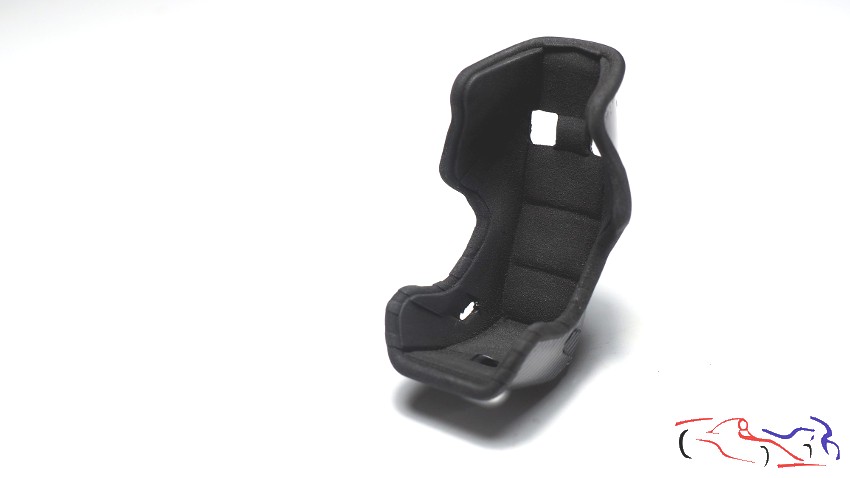
El asiento. Había oido que mezclando la pintura con polvos de talco, se podía crear esa textura típica de los asientos de competición. Y así lo hice: una vez enmascarada la fibra d ela parte trasera, y como tenía la pintura Tamiya LP3 negro mate que había diluido para los cristales, le añadí polvos de talco, una buena cantidad de ellos. Lo mezclé y lo puse en el aero con una aguja 0,4, y empecé a pintar. Dí una capa fina y esperé un poco a que se secara para ver el efecto. Me gustó y dí otra capa más espesa. Cuando se secó, le pasé un bastoncillo de algodón sobre las superficies con más desgaste, y se aclaró un poco el negro (creo que debido a los polvos de talco blancos). Y este es el resultado. Pongo una foto de lejos que es como se ve normalmente, y otra de cerca para que veáis el detalle:
The seat. I had heard that by mixing the paint with talcum powder, you could create that texture typical of competition seats. And so I did it: once the fiber of the rear part was masked, and as I had the Tamiya LP3 matt black paint that I had diluted for the windows, I added talcum powder, a good amount of it. I mixed it and put it in the airbrush with a 0.4 needle, and started painting. I did a thin coat and waited a bit for it to dry to see the effect. I liked it and did another thicker coat. When it was dry, I ran a cotton swab over the surfaces with more wear, and the black lightened a bit (I think because of the white talcum powder). And this is the result. I put a picture from a distance, which is how it normally looks, and a close-up picture so you can see the detail:
Espero que os haya gustado, y gracias por ver y comentar!!
I hope you liked it, and thanks for watching and commenting!
En esta actualización voy a hablar solo de calcas: de las del kit, de las de fibra de la hoja de calcas de Racing43, de las de fibra que he recortado yo, y de las de LB Production de la carrocería. En total han sido unas 5 tardes que he pasado colocando casi todo el tema de las calcas. Y empezamos con las de fibra: En las siguientes fotos, os muetro algunas piezas que no he tenido que tocar, y que venian en la hoja de calcas de Racing43. Decir que son un poco duras, para lo que los liquidos micro y el secador de pelo, son unos utiles muy necesarios. También he encontrado que algunas calcas no encajan bien en las piezas. La terminación será en satinado ya que ese acabado me gusta más, excepto en el asiento, que lo voy a lacar, y después de hacerlo, haré una máscara para pintar la parte delantera. Y este es el resultado:
In this update I’m going to talk only about decals: the ones from the kit, the fibre ones from the Racing43 decal sheet, the fibre ones I cut myself, and the LB Production decals from the bodywork. In total I have spent about 5 afternoons fitting almost all the decals. And we start with the fiber: In the following pictures, I show you some pieces that I have not had to touch, and that came in the Racing43 decals sheet. I have to say that they are a bit hard, so the micro liquids and the hair dryer are very necessary tools. I have also found that some decals do not fit well on the parts. The finish will be satin as I like that finish better, except for the seat, which I’m going to lacquer, and after doing it, I’ll make a mask to paint the front part. And this is the result:
Vamos ahora con piezas donde yo he creado las calcas, porque no venían en la hoja. La primera es la pieza de la izquierda, en la foto de la izquierda. Esa pieza tenía calcas para las partes superiores, estando los alterales sin ella. por tanto, hice patrones con cinta de enmascarar, los pasé a la hoja de calcas y las recorté. La fibra era la misma que la de fRacing43 pero en la hoja venían dos recuadros que usé para recortar las mias. Sin embargo, en la foto de la derecha, la fibra que use era de TMF, ya descatalogada, siguiendo el mismo proceso.
Let’s go now to the pieces where I have created the decals, because they were not included in the sheet. The first one is the piece on the left, in the photo on the left. That piece had decals for the upper parts, being the alterals without it. Therefore, I made patterns with masking tape, transferred them to the decal sheet and cut them out. The fibre was the same as fRacing43’s but on the sheet there were two squares that I used to cut out my own. However, in the photo on the right, the fibre I used was from TMF, already discontinued, following the same process.
Pasamos a las ruedas, y coloco las calcas de LB Production: hay que diferenciar las derechas (con las dos barras rojas en los radios) y las del lado izquierdo (con las dos barras amarillas). Además, añadí las calcas del sentido de marcha (la flecha blanca) y de la posición de las mismas, es decir, F – Front, R – Rear, L – left, R – Rigth, que van de dos en dos, es decir, FR & RR para las del lado derecho, y FL & RL, para las del izquierdo. Estas calcas blancas son de Decalcas.
We move on to the wheels, and I put the LB Production decals: we have to differentiate between the right-hand ones (with the two red bars on the spokes) and the left-hand ones (with the two yellow bars). I also added the decals for the direction of travel (the white arrow) and their position, i.e. F – Front, R – Rear, L – left, R – Right, which go in pairs, i.e. FR & RR for the right side, and FL & RL, for the left side. These white decals are from Decalcas.
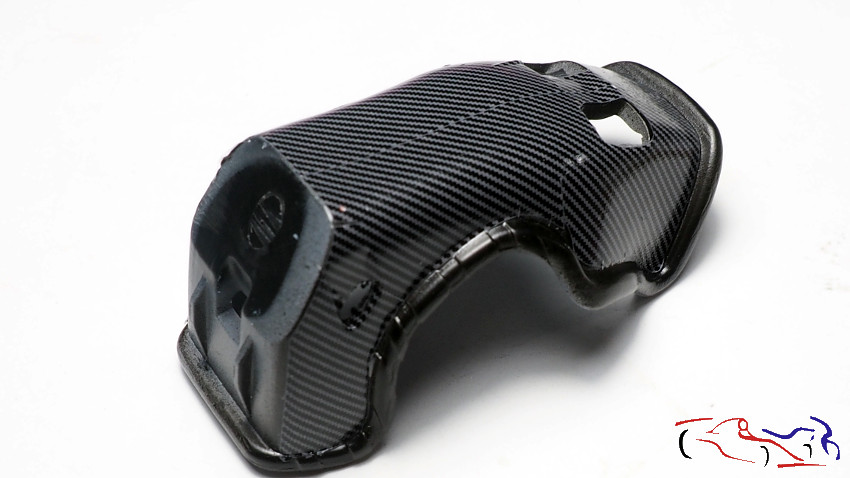
A continuación, os muestro la caja donde va el motor, que va hecha de fibra, pero no en la hoja de calcas, no están las calcas de todo los lados. De hecho, faltan dos que se ven bastante: una es la parte donde se ve ahora fibra (esa calca la recorté yo), y la de la parte inferior negra, por delante del vástago que aparece en la parte de abajo. Deciros que no siempre se acierta, y que la fibra existente la pusse antes de pintar, y al enmascarar, la máscara se llevó parte de la que habia puesto, en los laterales de ese panel. Pero cosrte otras y las puse. Cuando tenga una foto de todo, os la enseño.
Next, I show you the box where the engine goes, which is made of fibre, but not on the decal sheet, the decals are not on all the sides. In fact, there are two missing decals that are quite visible: one is the part where the fibre is now visible (I cut that decal myself), and the one on the lower black part, in front of the piston rod that appears at the bottom. I have to tell you that you don’t always get it right, and that I put the existing fibre before painting, and when masking, the mask took part of the one I had put, on the sides of that panel. But I sewed others and put them on. When I have a photo of everything, I’ll show it to you.
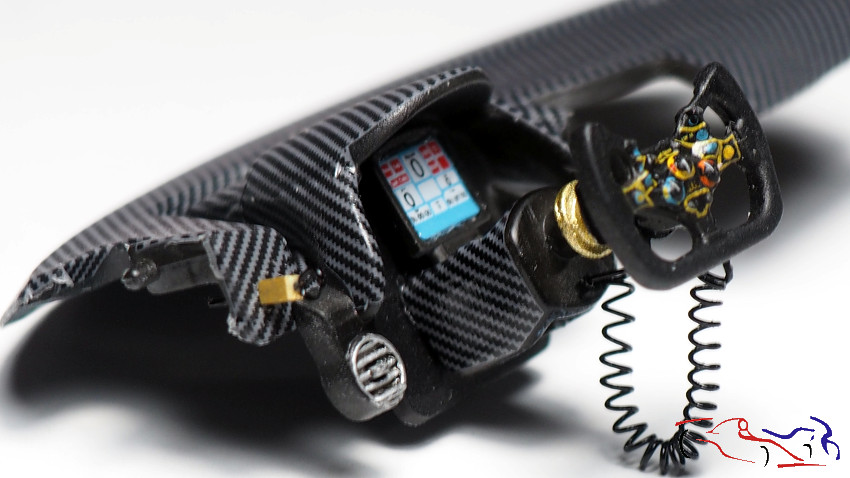
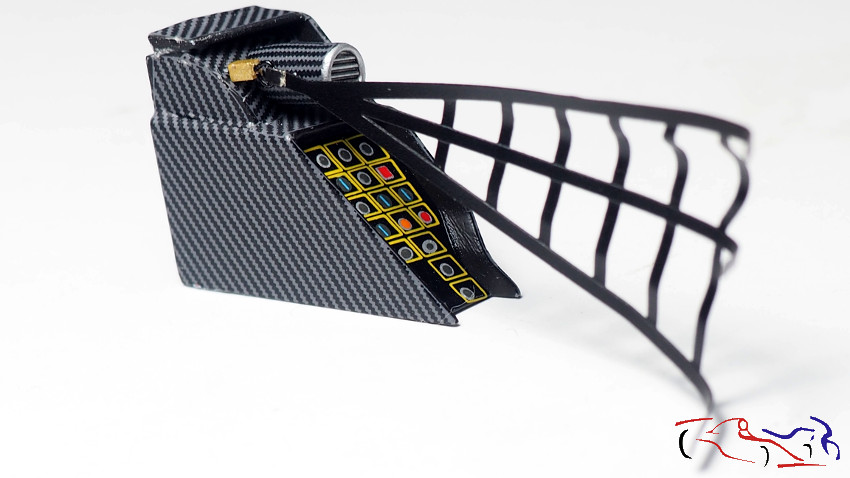
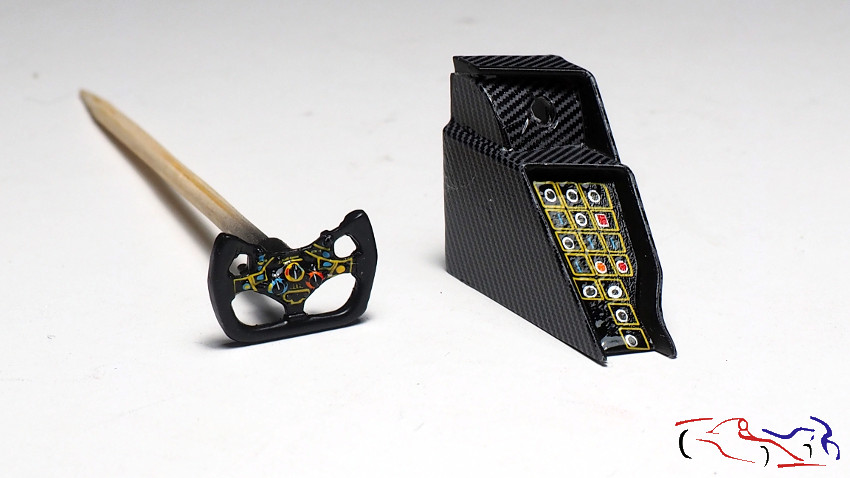
Y como no, en el cokpit tenemos el volante, con sus muchos botones de colores, y la consola de los controles. Para el volante, tuve que aplicar pmucho líquido y presión, para que se adaptara a todas las formas prominentes que tenía.
And of course, in the cokpit we have the steering wheel, with its many coloured buttons, and the control console. For the steering wheel, I had to apply a lot of liquid and pressure, so that it would adapt to all the prominent shapes it had.
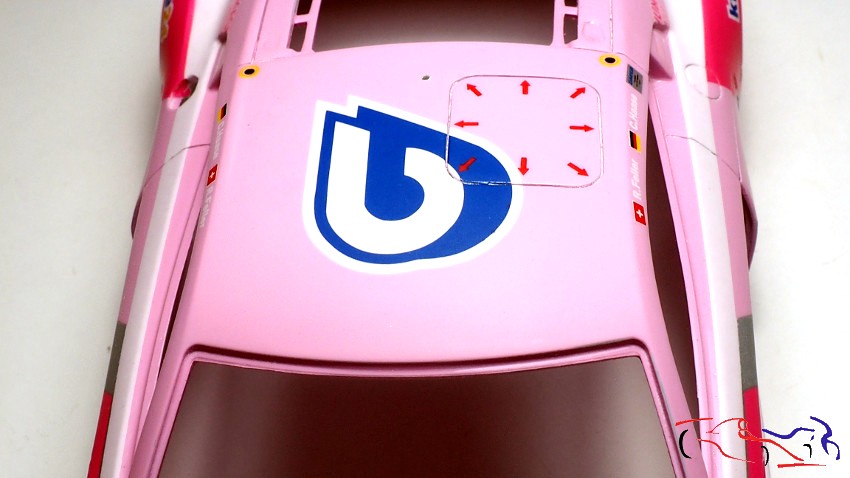
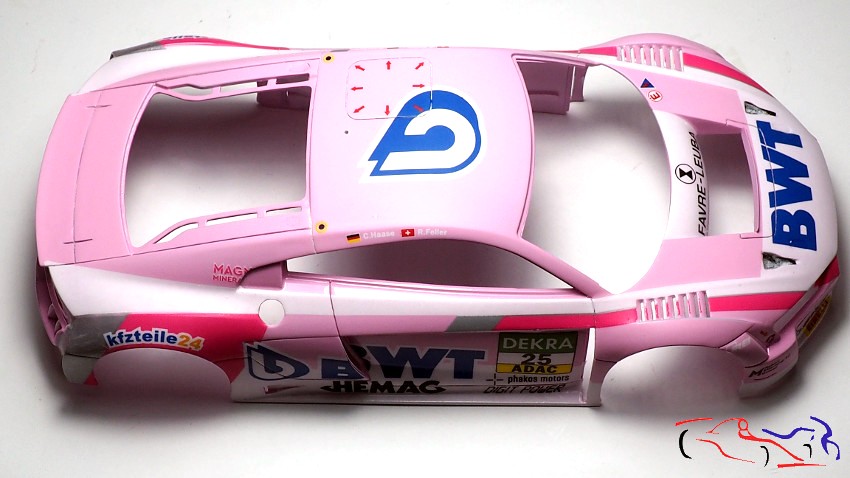
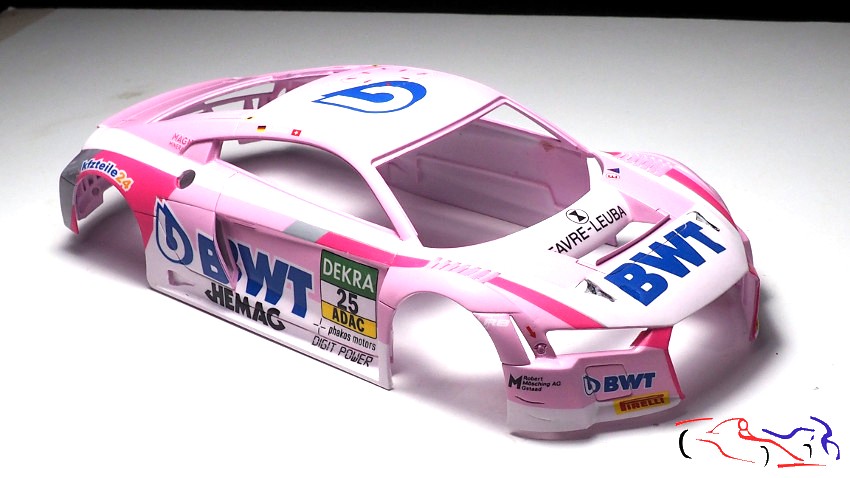
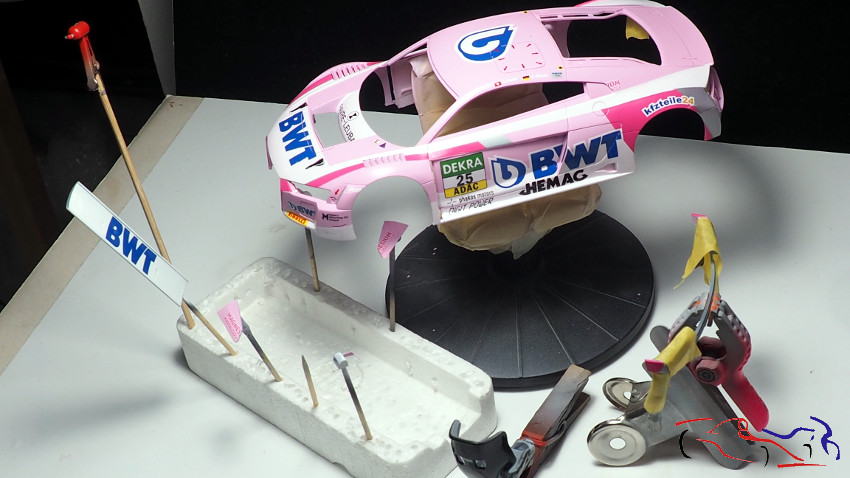
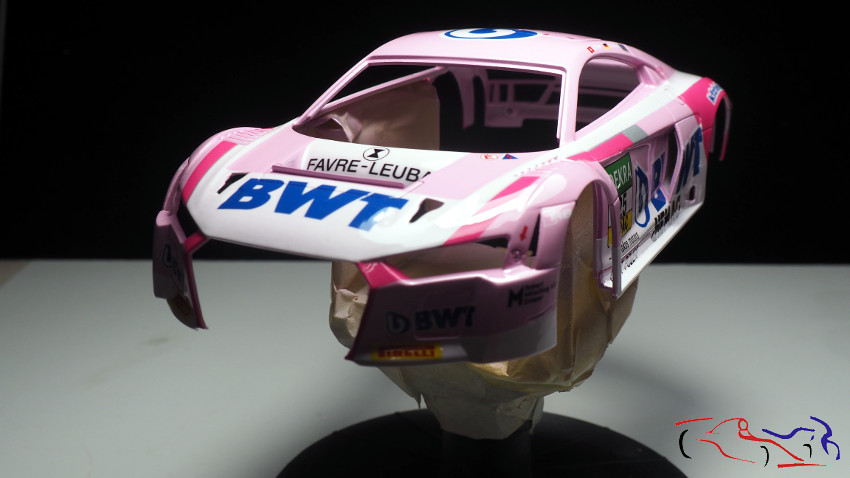
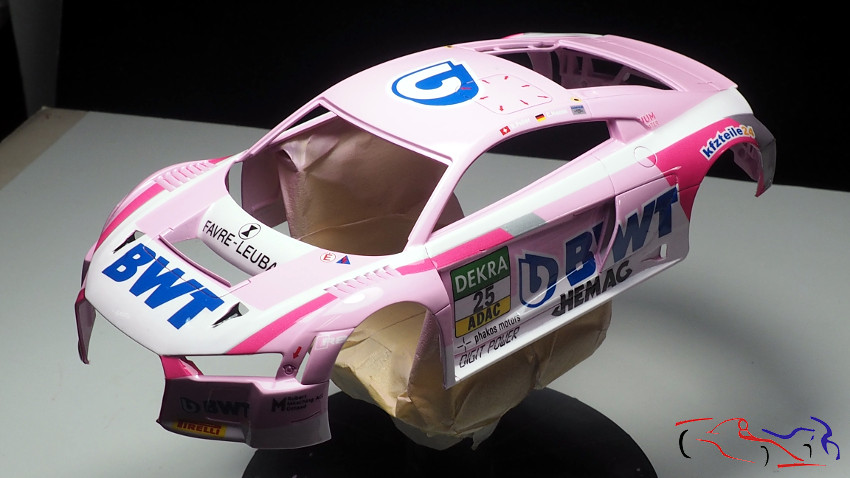
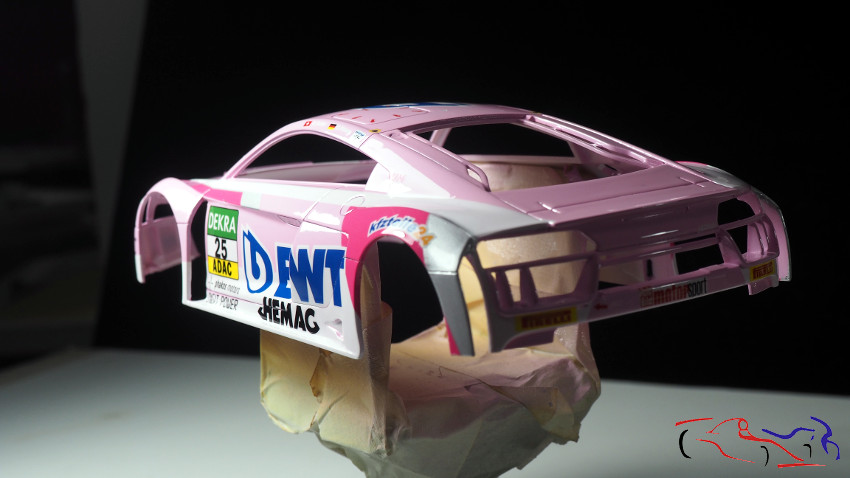
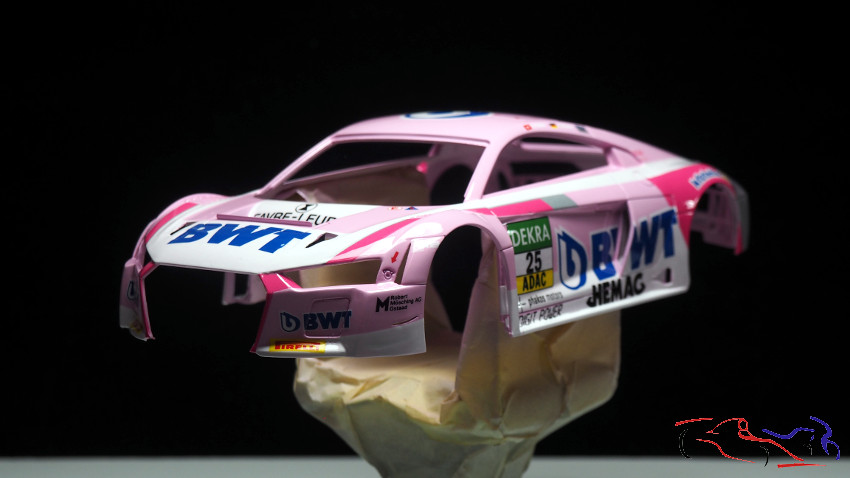
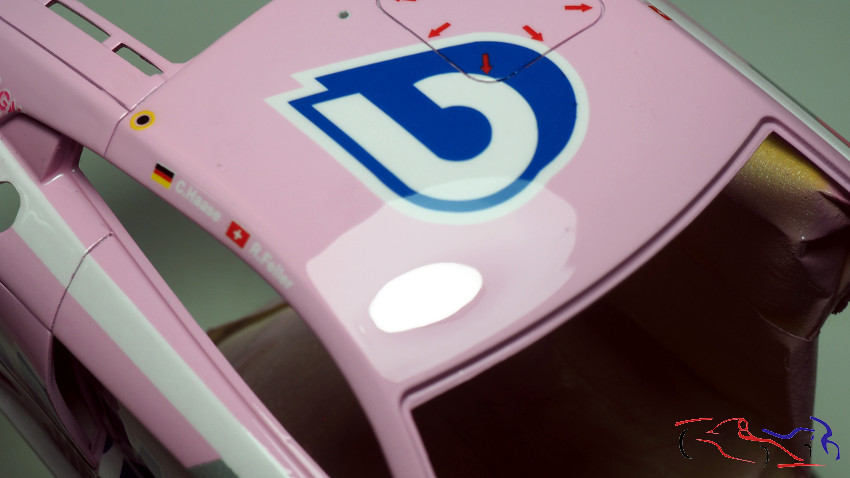
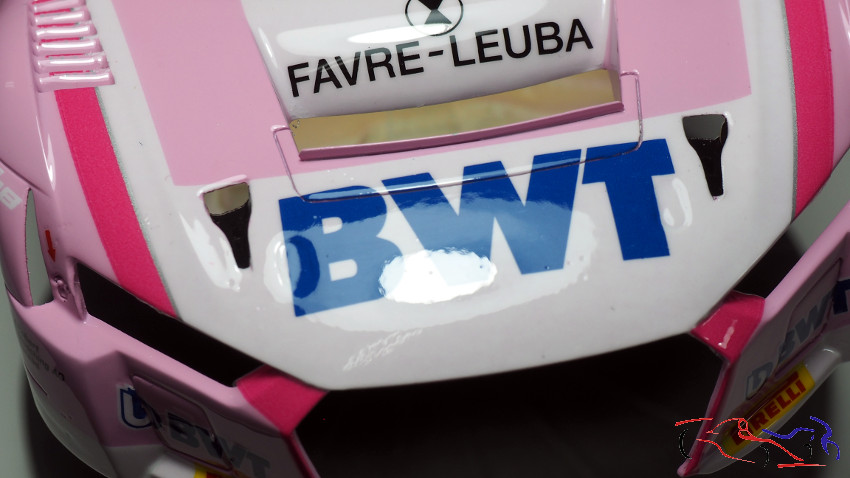
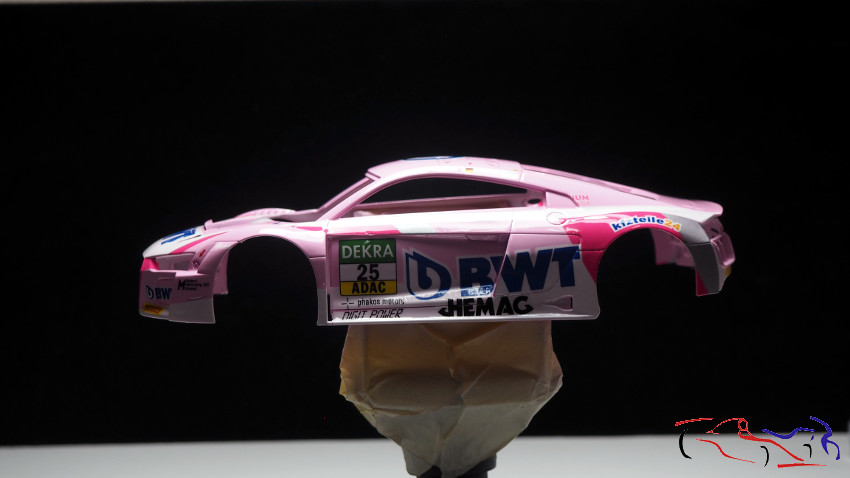
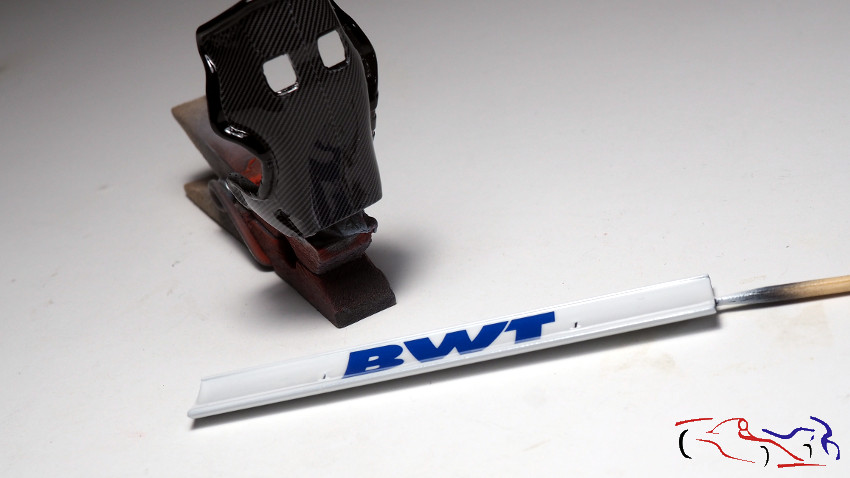
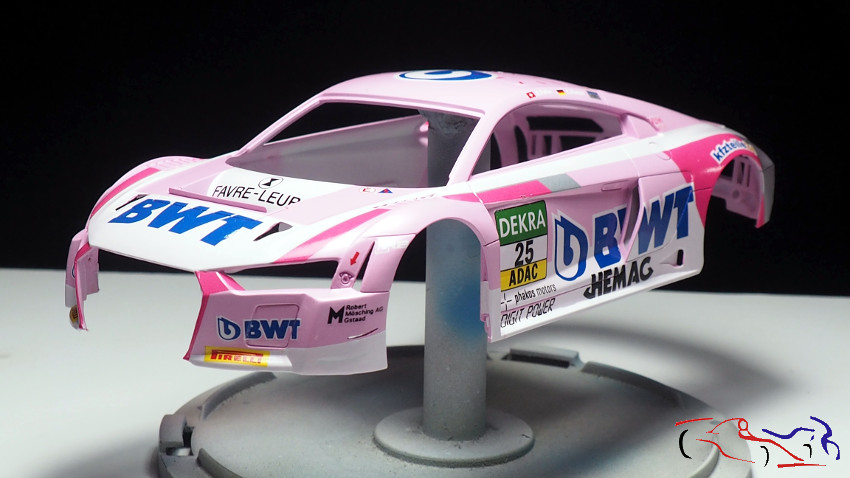
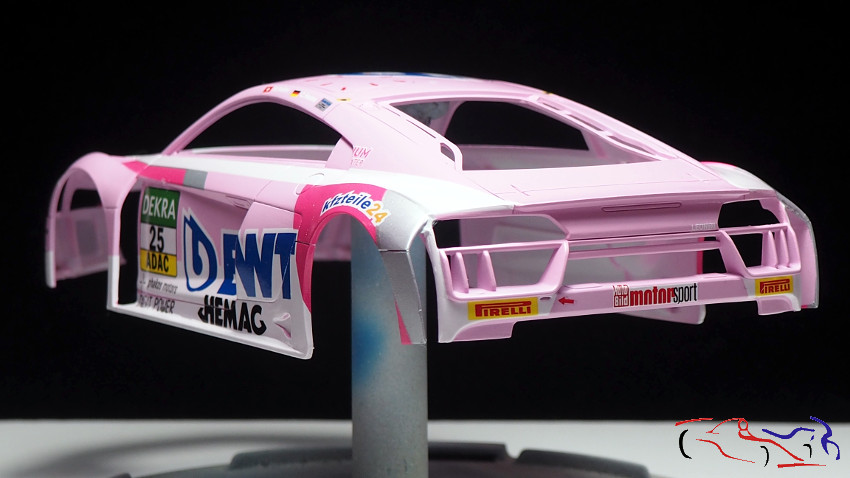
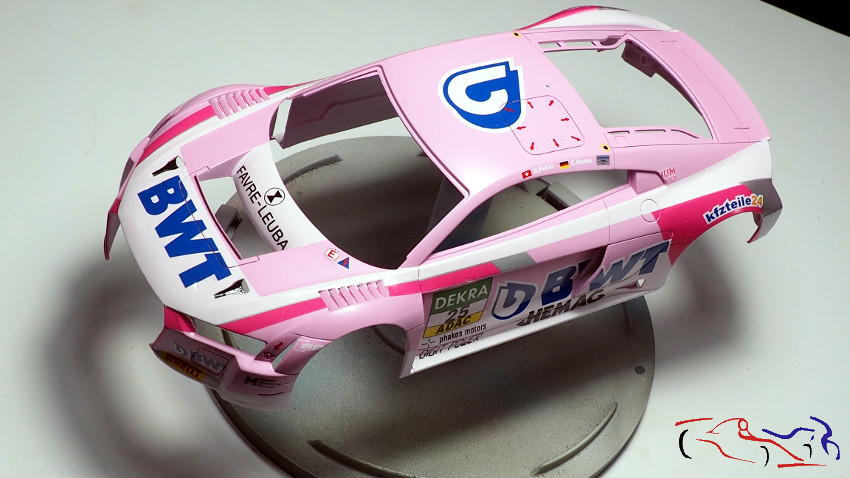
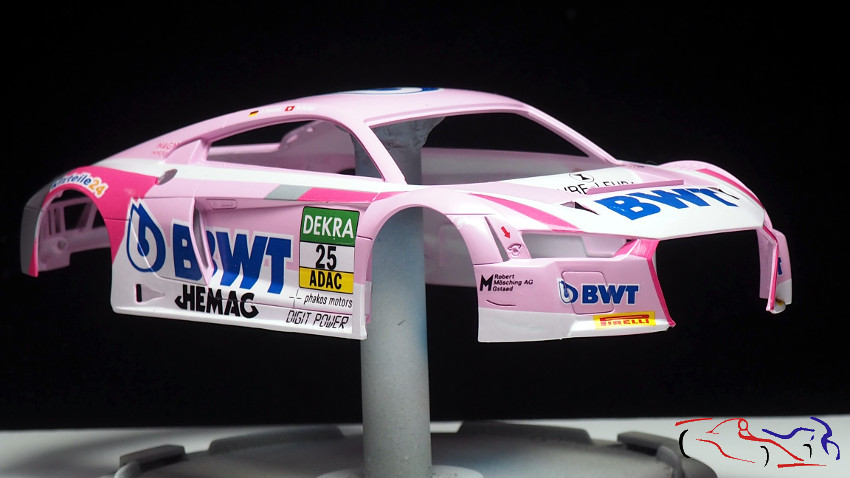
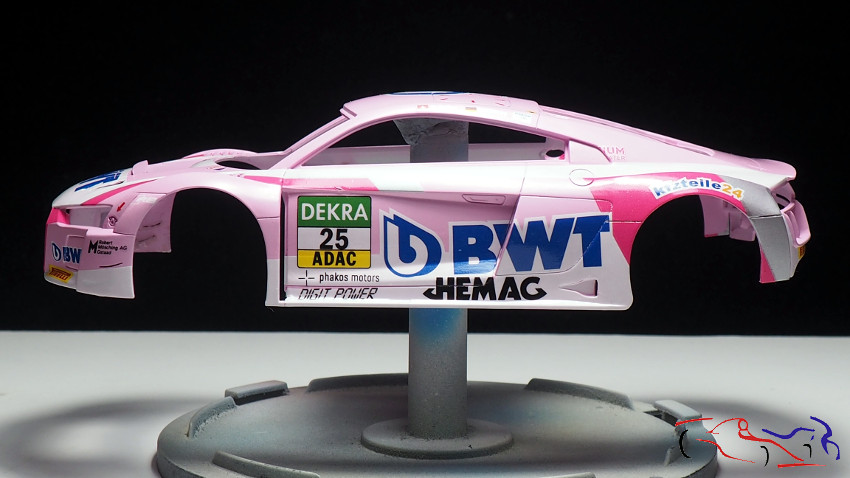
Y para teminar, las fotos de la carrocería. La hoja lleva calcas para poner todos los colores menos el rosa de la base, o llso logos por separado si quieres pintar el blanco, rosa fuerte y gris, además del rosa d ela base. Yo elegí las calcas, y para ello, hay unas que tienes que poner antes de otras, porque van debajo. Usé los liquidos Micro y el secador. Estas calcas son muy finas, y se adpatan y trabajan muy bien!!
And to finish, the photos of the bodywork. The sheet has decals to put all the colours except the pink of the base, or the logos separately if you want to paint the white, hot pink and grey, in addition to the pink of the base. I chose the decals, and for this, there are some that you have to put before others, because they go underneath. I used the Micro liquids and the hairdryer. These decals are very thin, and they adapt and work very well!.
Y esto es todo por hoy. Gracias por ver y comentar!!
And that’s all for today. Thanks for watching and commenting!
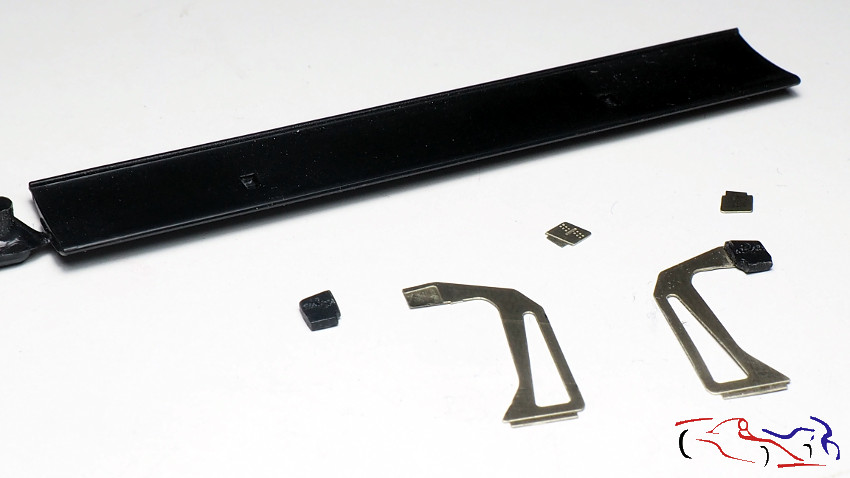
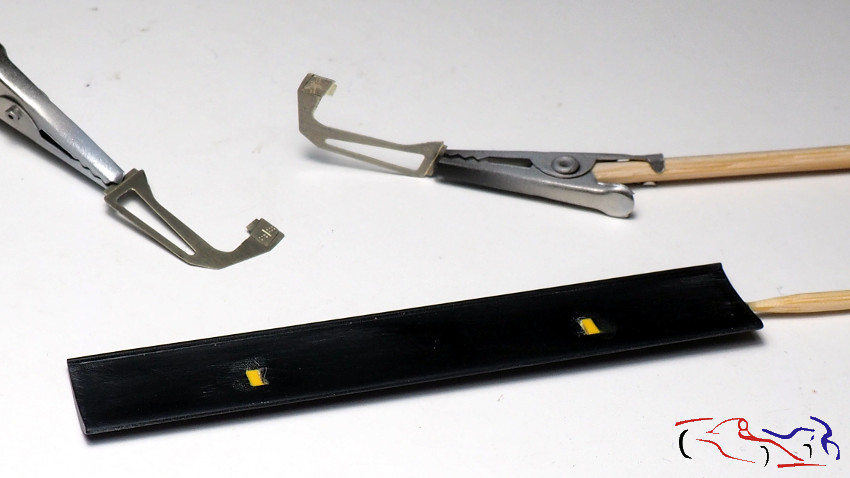
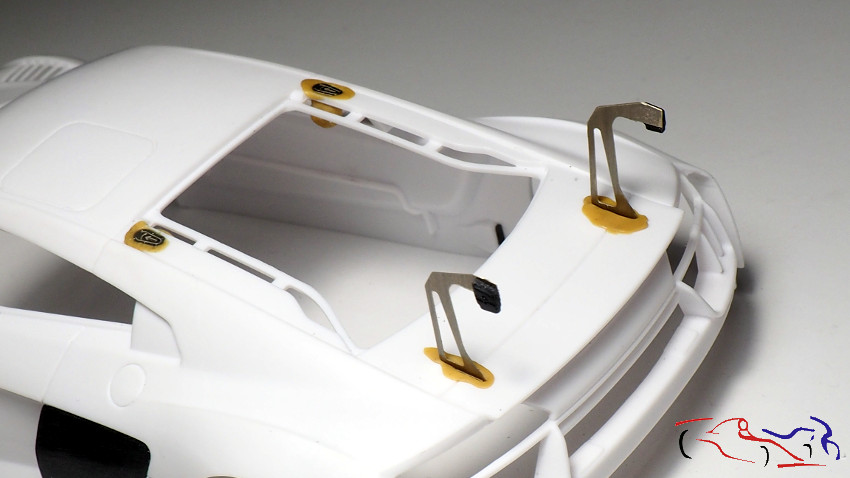
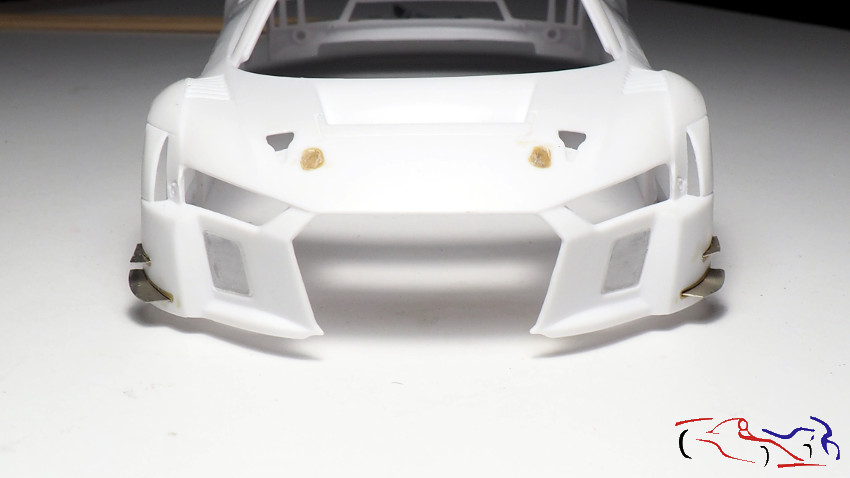
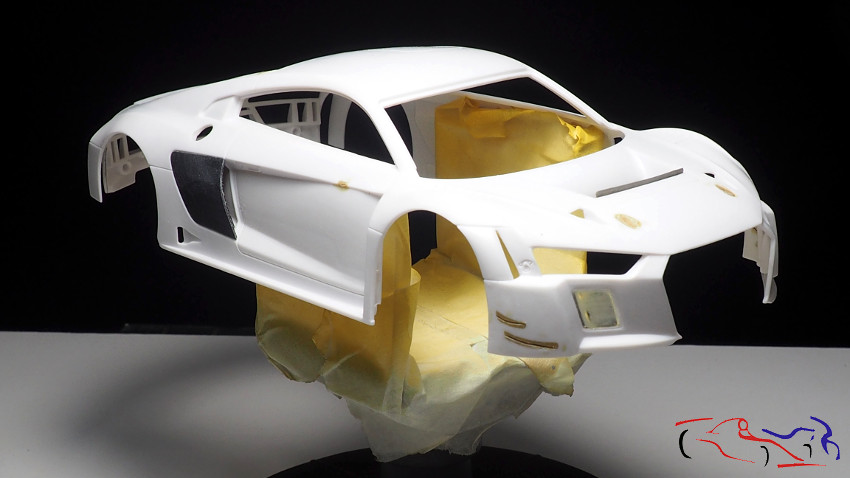
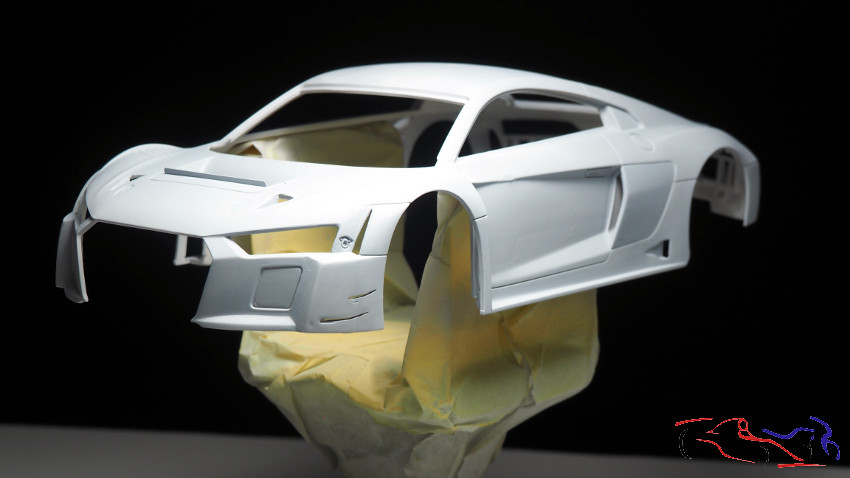
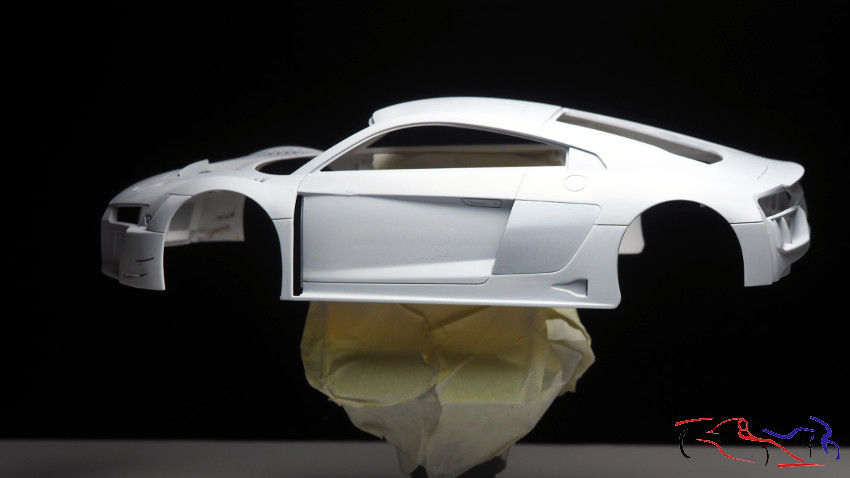
Continuamos con este modelo. He usado la masilla epoxy para rellenar los huecos de la carrocería donde había que poner piezas de plástico y que he sustituido por fotograbados. Y mientras estaba blanda la masilla, he incrustado dichos fotograbados para dejar el hueco necesario para pegarlos cuando esté terminada la carrocería. En la foto de la izquierda, veis los soportes del alerón trasero y las fijaciones del portón, mientras en la derecha, aparecen las fijaciones del capó y de las derivas laterales del faldón. En la tercera foto, ya tenemos lijadas las masillas.
We continue with this model. I used the epoxy putty to fill the holes in the body where I had to put plastic parts and I have replaced by photoetched parts. And while the putty was soft, I have embedded these photoetched parts to leave the necessary hole to glue them when the bodywork is finished. In the photo on the left, you can see the rear wing supports and the tailgate fixings, while on the right, are the fixings of the hood and the side skirt drifts. In the third photo, we have already sanded the putties.
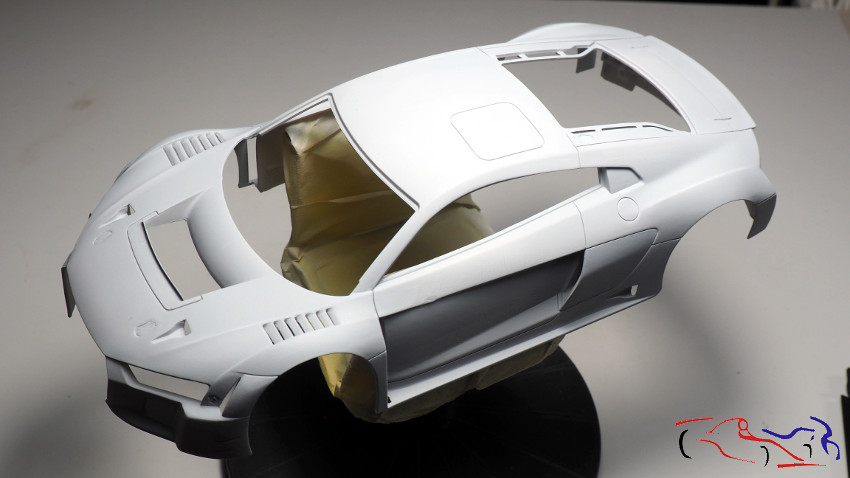
Una vez lijada la masilla epoxy, pasamos a imprimar la carrocería con Gravity Spain:
After sanding the epoxy putty, we primed the bodywork with Gravity Spain:
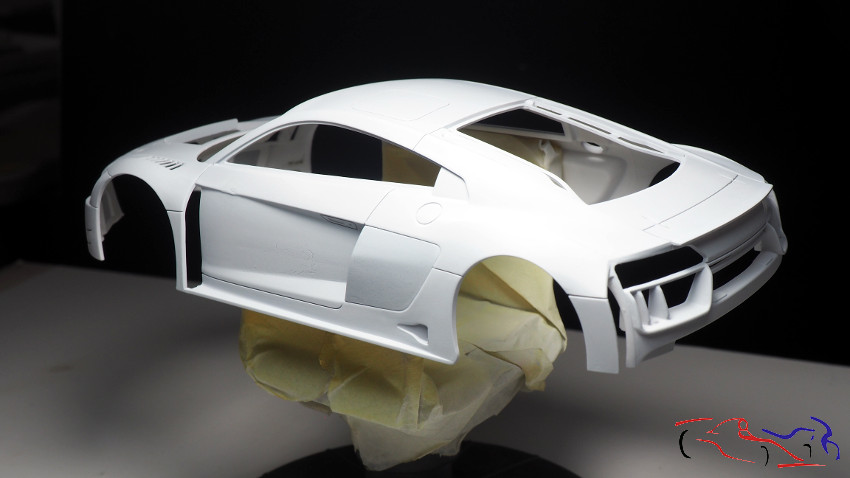
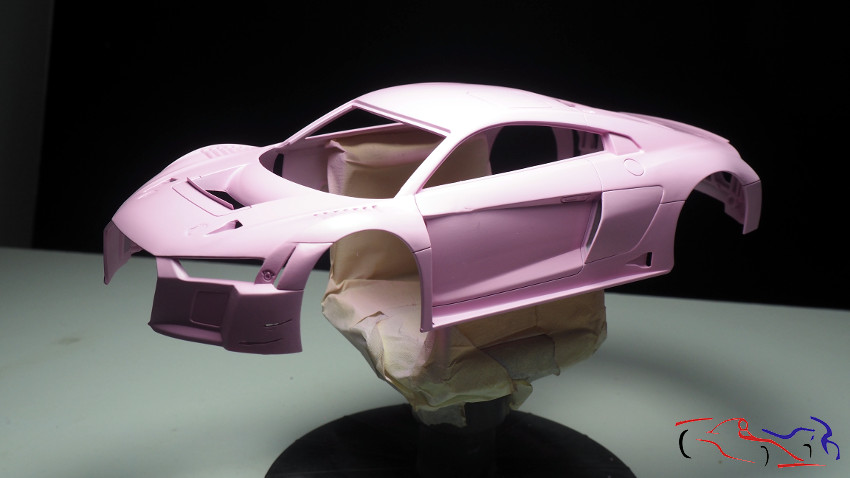
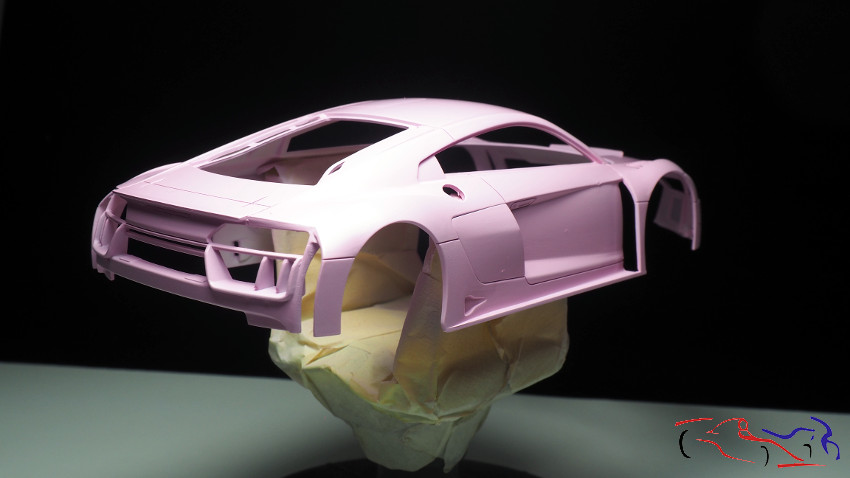
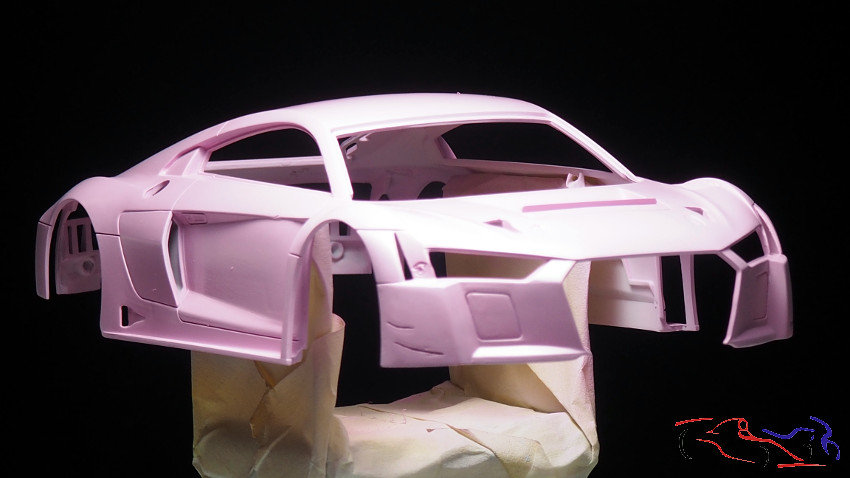
Una vez seca la imprimación, lijamos la carrocería con una esponja de grano 3000, y pasamos a pintarla, también con Gravity Spain:
Once the primer is dry, sand the bodywork with a 3000 grain sponge, and paint it, also with Gravity Spain:
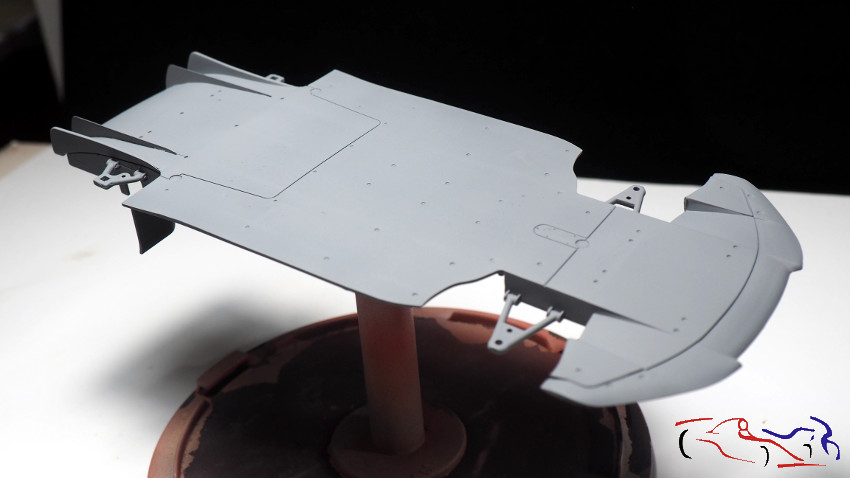
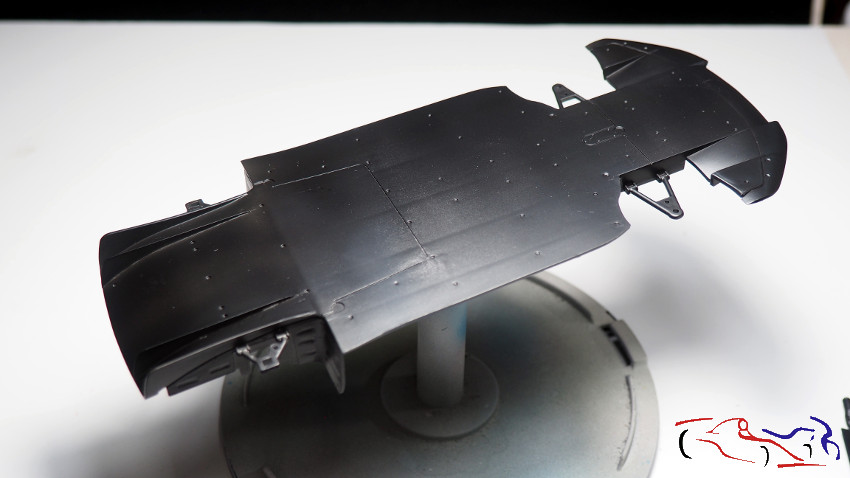
Al mismo tiempo, imprimo y pinto con negro semimate de Zero el chasis:
At the same time, I prime and paint the chassis with Zero semi-matte black:
Y como suelo agrupar todos los procesos de pintura, también le toca el turno a la cuna del cockpit y del motor. Aquí los vemos imprimados y pintados con el mismo negro semimate de Zero. Decir que en la foto de la derecha, vemos también partes del motor pintados ce Aluminio de Zero:
And as I usually group all painting processes, it is also the turn of the cockpit and engine cradle. Here we see them primed and painted with the same semi-matte black from Zero. Say that in the photo on the right, we also see parts of the motor painted with Zero’s Aluminum:
Más procesos de pintura: el arco y las fijaciones de los discos de freno pintados de Aluminio de Zero, y las piezas negras con el semimate, también de Zero.
More painting processes: the arch and the brake disc mountings painted in Zero Aluminum, and the black parts with the semi-matt, also from Zero.
Y para pintar detalles, tenemos que enmascarar. Aquí está la cuna enmascarada y pintada de Aluminio, la jaula pintada de negro semimate para las almohadillas, y otra pieza del cockpit, pintada tambièn de negro. Y a la derecha, sin las máscaras:
And to paint details, we have to mask. Here’s the masked and painted Aluminium cradle, the cage painted semi-matt black for the pads, and another piece of the cockpit, also painted black. And on the right, without the masks:
En las siguientes fotos, vemos la cuna y la jaula en más detalle:
In the following pictures, we see the cradle and the cage in more detail:
La siguiente foto es del radiador ya pintado sin pegar (y sin dar lavados):
The next picture is of the radiator already painted without glue (and without any washes):
En cuanto a las ruedas, una vez imprimadas, he pintado las llantas con negro semimate y los neumáticos con el negro goma, ambos de Zero. Y las tuercas con el Aluminio, que posteriormente he dado un lavado con el panel liner de Tamiya:
As for the wheels, once primed, I painted the rims with semi-matt black and the tyres with rubber black, both from Zero. And the nuts with Aluminium, which I then washed with Tamiya panel liner:
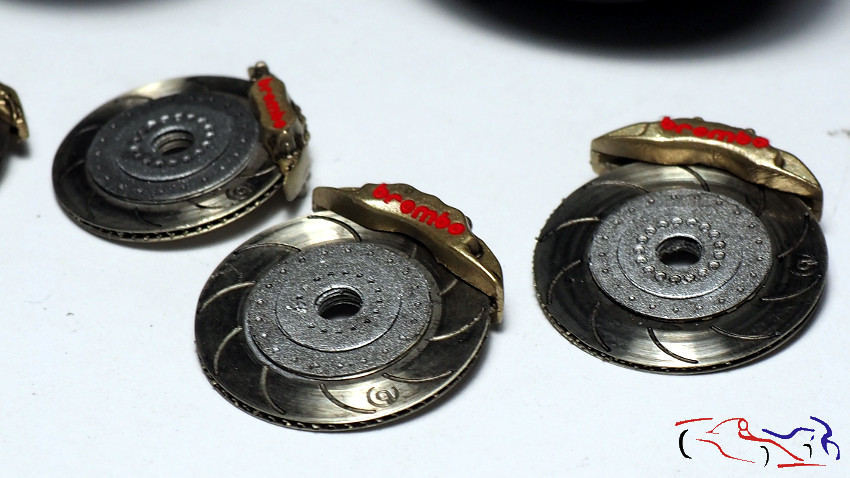
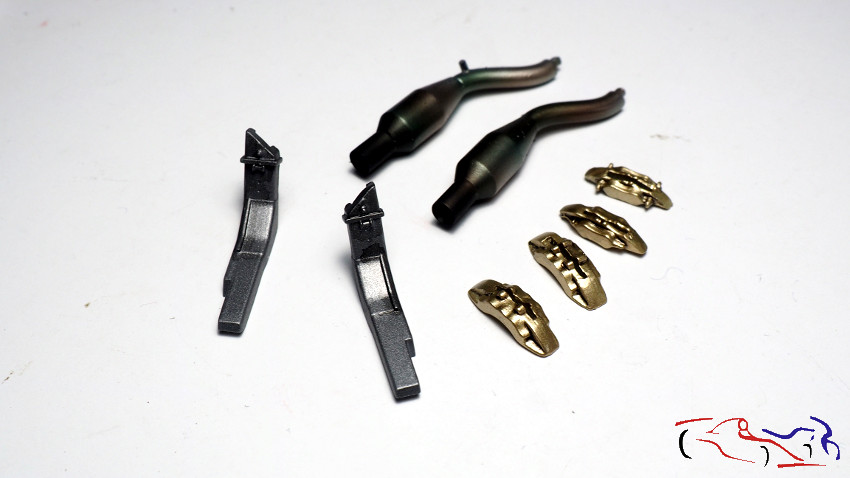
Y para terminar, os dejo una foto con los escapes quemados con pinturas Alclad, las pinzas de freno doradas, y unos soportes traseros ìntados con Steel, de Zero:
And to finish, I leave you a picture with the exhausts burnt with Alclad paints, the golden brake calipers, and some rear brackets painted with Steel, from Zero:
Inicio este nuevo proyecto en parte para desestresarme un poco del Lancia Delta, ya que al menos yo, necesito terminar piezas, pintarlas y terminar maquetas. El Lancia me está llevando mucho tiempo para pensar en las soluciones de las bisagras y aunque me gusta, hay que terminar algo!
I’m starting this new project partly to de-stress a bit from the Lancia Delta, as I, at least, need to finish parts, paint them and finish models. The Lancia is taking me a lot of time to think about the solutions for the hinges and although I like it, something has to be finished!
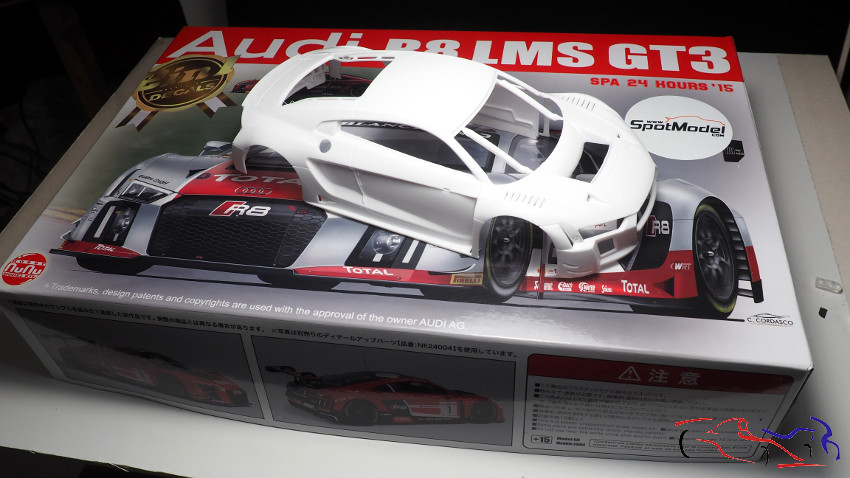
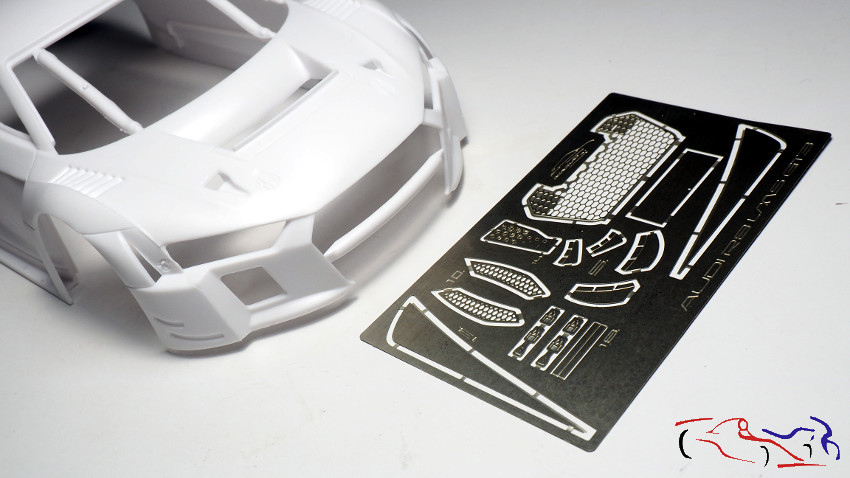
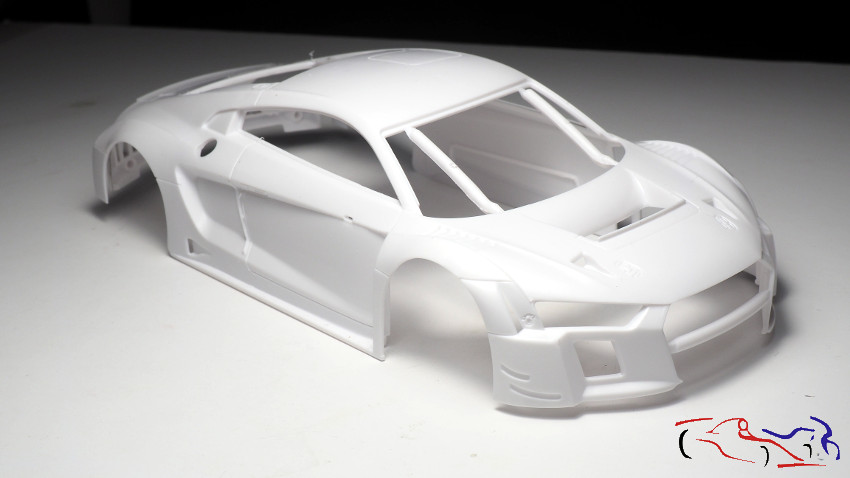
El kit es el Audi R8 LMS GT3 que ha realizado Nunu a escala 1/24, y del cual muestro la carrocería sobre la caja:
The kit is the Audi R8 LMS GT3 that Nunu has made in 1/24 scale, and of which I show the bodywork on the box:
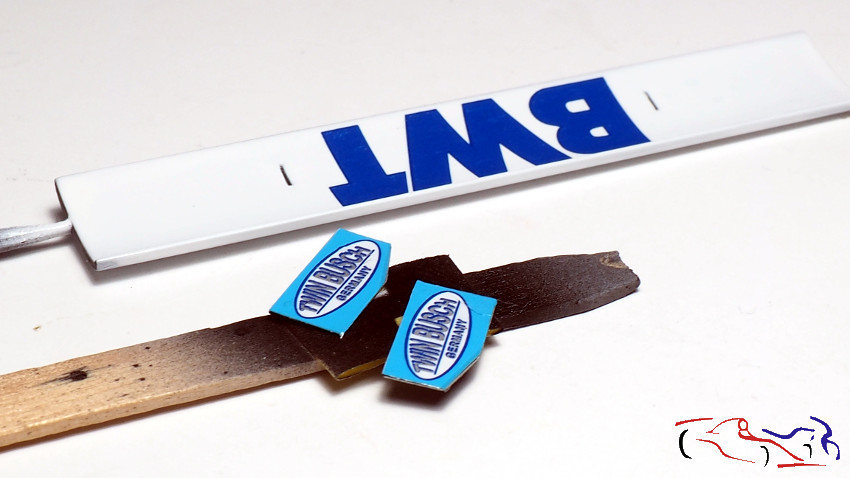
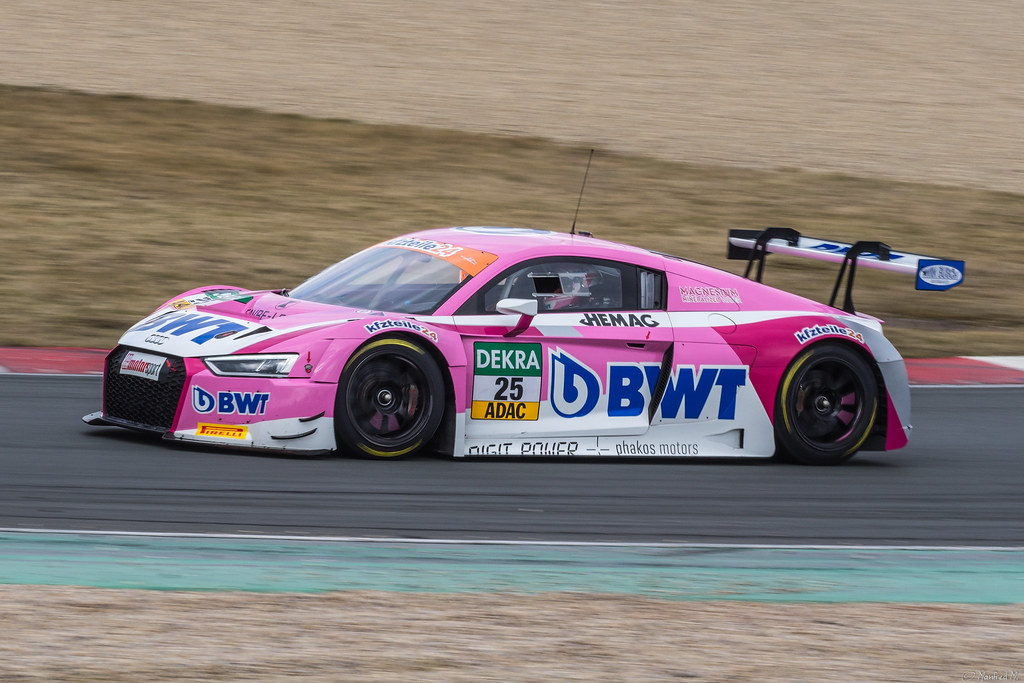
Y la decoración elegida es la de BWT, muy vistosa y atractiva!!
And the chosen livery is the BWT, very attractive and eye-catching!
A su vez, me gustaría que esta maqueta no me lleve mucho tiempo por lo que no voy a abrir ninguna puerta ni nada. Pero no lo voy a dejar solo el coche, por tanto ¿qué le voy a incluir? Las calcas de BWT de LB Productions, los fotograbados de Scalelab 24, y las ruedas de KMP:
At the same time, I don’t want this model to take a lot of time, so I’m not going to open any doors or anything. But I’m not going to leave the car alone, so what am I going to enhance it? The BWT decals from LB Productions, the photoetched parts from Scalelab 24, and the wheels from KMP:
Decir que Scalelab 24 me mandó sin coste (un buen punto a su favor) una actualización de los fotograbados con algunas piezas mejoradas:
Just to say that Scalelab 24 sent me free of charge (a good point in their favour) an update of the photoetched parts with some improved ones:
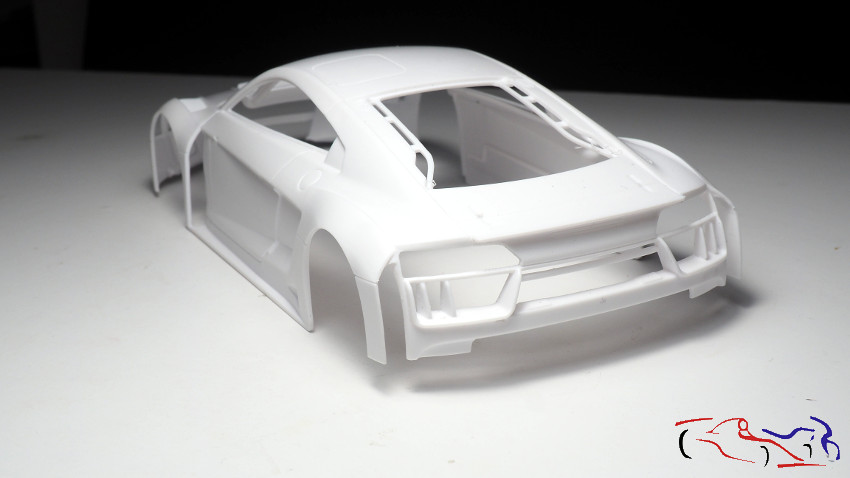
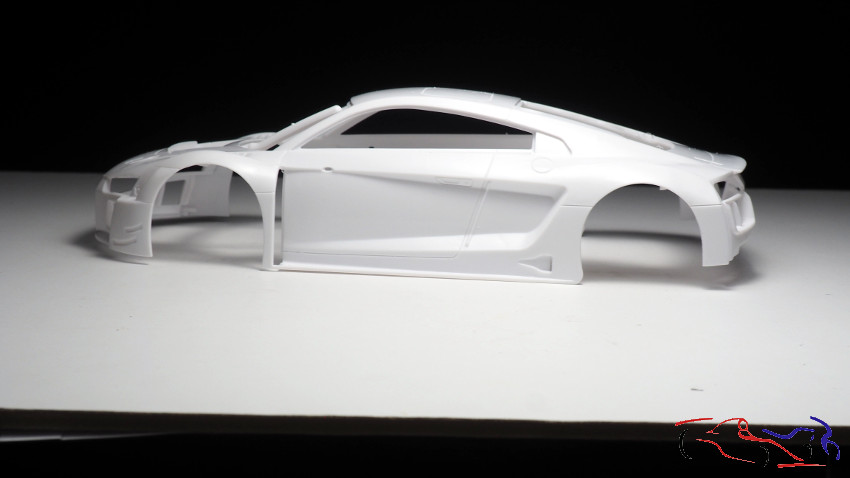
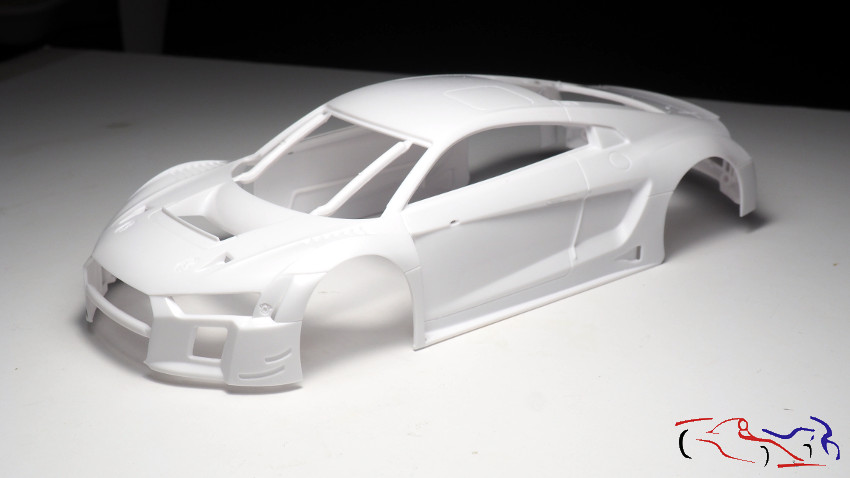
Y empezamos con el kit. La carrocería parece tener buenas formas y aquí os la muestro. Tiene pocas rebabas o lineas de molde, y el plástico no es malo. Otra cosa son las piezas de plástico negro, que no me gustan nada:
And we start with the kit. The body seems to be in good shape and here I show it to you. It has few burrs or mould lines, and the plastic is not bad. Another thing is the black plastic parts, which I don’t like at all:
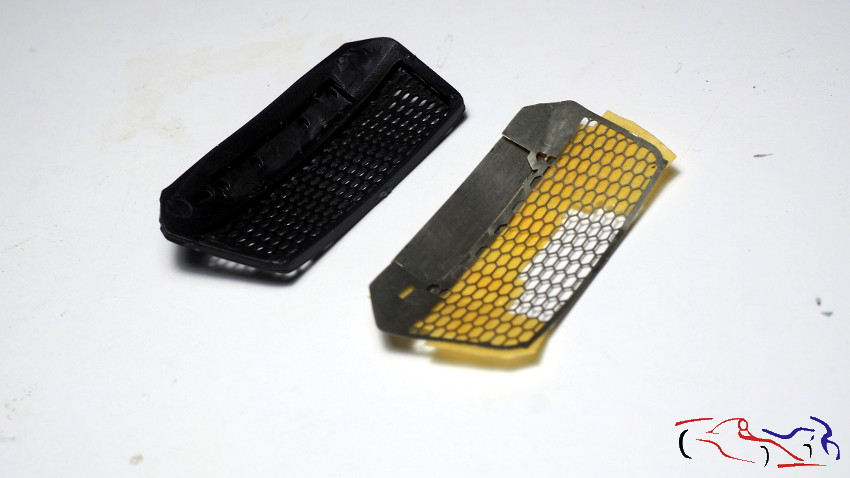
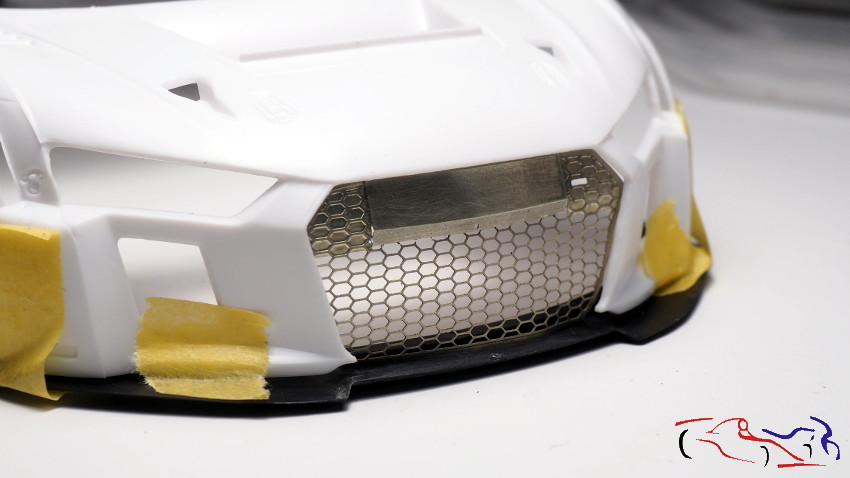
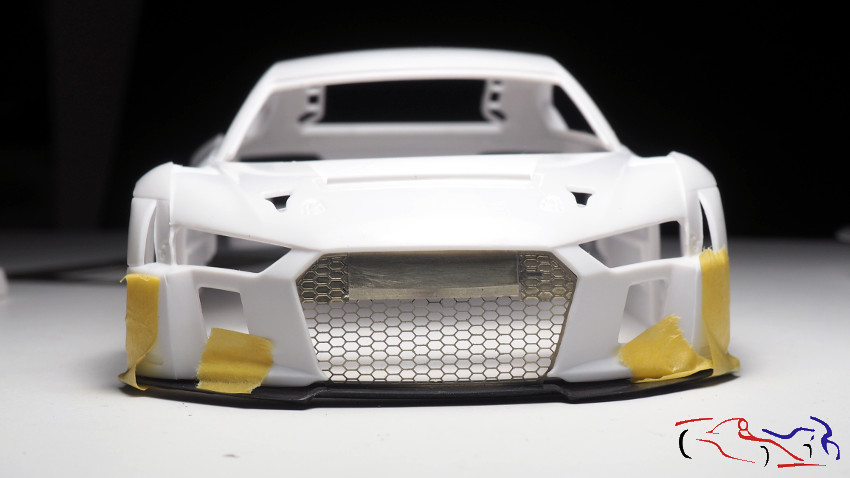
Lo primero que hago es adaptar los dos fotograbados de la rejilla delantera, a la pieza de plástico original. Pongo el fotograbado encima y con los dedos lo voy dando la misma forma que la original. Después le pongo la chapa superior del centro y los fijo por la parte exterior con cinta de enmascarar. Este proceso lo vi en un video de Youtube de “Scaleauto shop”, que hizo el mismo Audi con el mismo TK de Scalelab24:
The first thing I do is to adapt the two photoetched parts of the front grille to the original plastic piece. I put the photoetched parts on top and I give it the same shape as the original one pressing with my fingers. Then I put the top plate in the middle and fix them on the outside with masking tape. I saw this process in a Youtube video from “Scaleauto shop”, which made the same Audi with the same TK from Scalelab24:
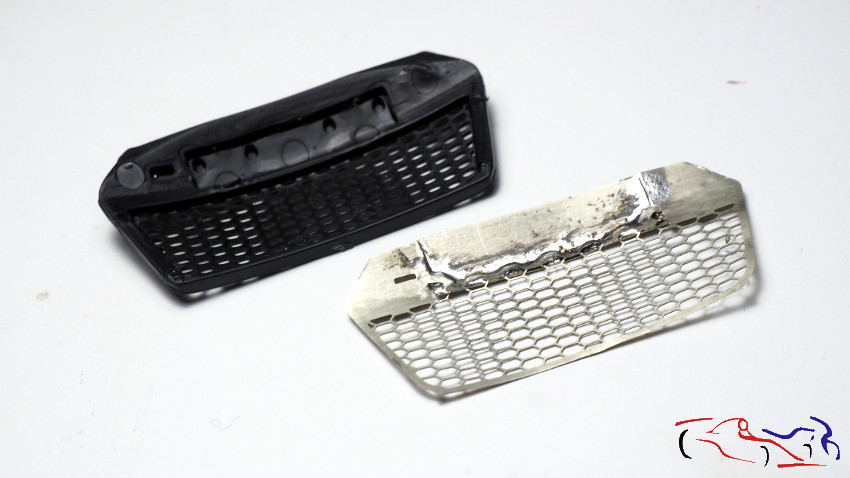
A continuación, le doy la vuelta y lo sueldo con estaño, en la foto de la izquierda, siendo el resultado la foto de la derecha:
Then, I turn it upside down and I solder it with tin, ( in the left photo), being the result in the right photo:
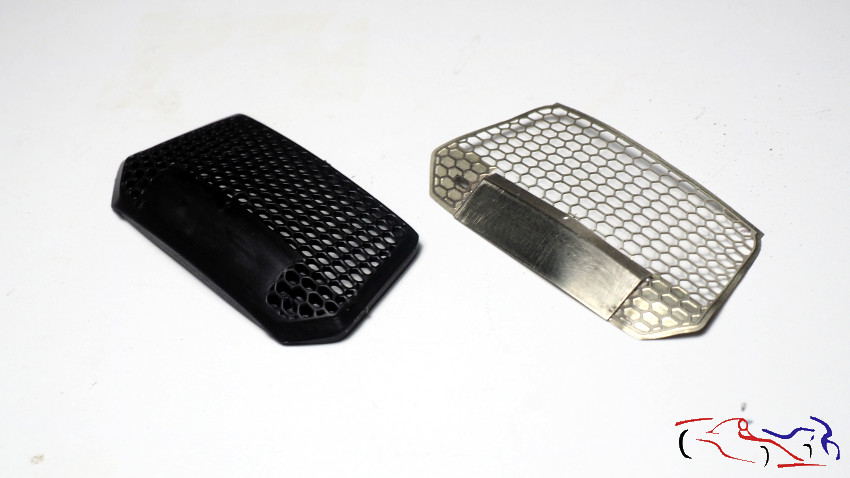
Siendo éste el resultado!!
This is the result!:
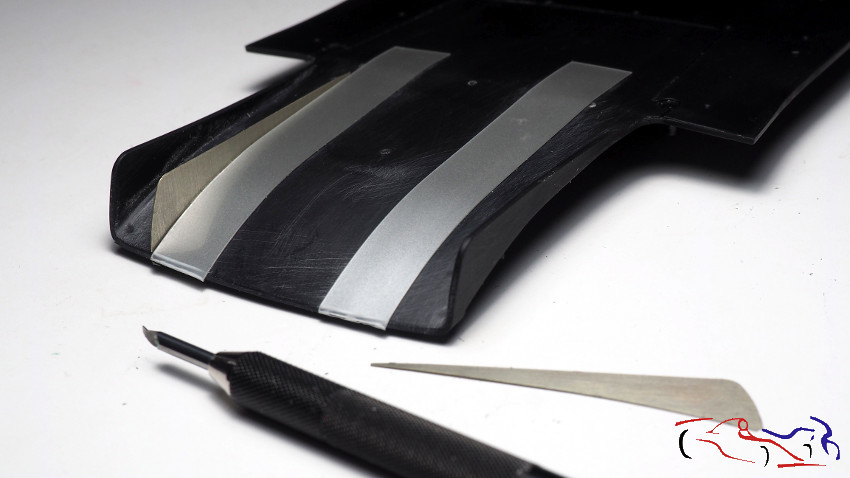
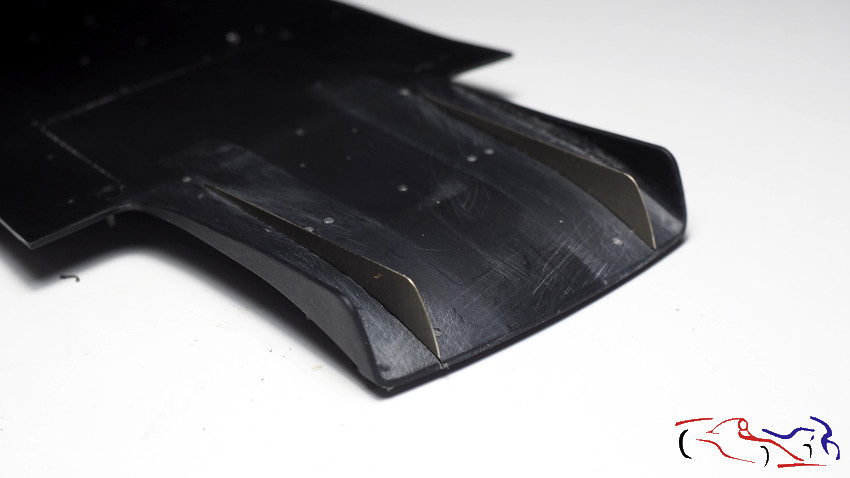
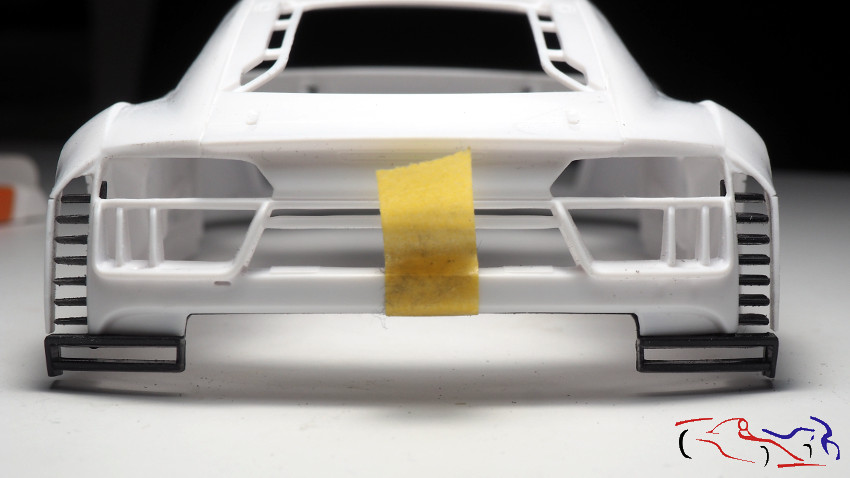
Pasamos a la parte trasera del chasis, donde tenemos el difusor con dos 4 planos verticales: dos laterales y dos centrales, que voy a remplazar por dos fotograbados. Para ello, los elimino, y haré una linea en el plástico donde insertaré los fotograbados. Para hacer esa linea, coloco a modo de de guias, unas Dymo de las antiguas (foto de la derecha), y por las que paso un perfilador, haciendo la linea honda para colocar el fotograbado. Una vez hechas las dos, inserto lso fotograbados y los pego con ciano:
Let’s move on to the rear part of the chassis, where we have the diffuser with two 4 vertical planes: two lateral and two central ones, which I’m going to replace with two photoetched parts. To do this, I remove them, and make a line in the plastic where I will insert the photoetched parts. To make this line, I place some old Dymo as a guides (photo on the right), through which I pass a profiler, making the deep line to place the photoengraving. Once the two lines are made, I insert the photoengravings and glue them with cyano:
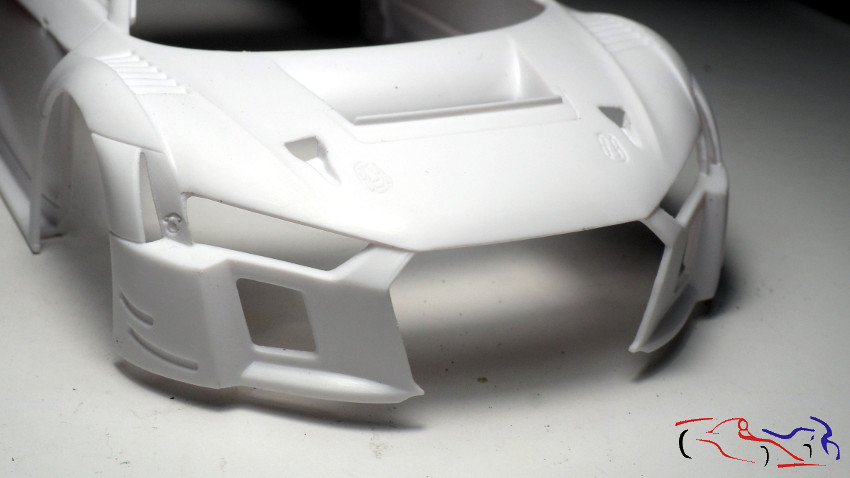
Volvemos a la carrocería. En este paso, afilo las tomas de aire NACA tanto del frontal como de los laterales, para que el perfile de la carrocería no sea tan ancho. Aquí las vemos una vez afiladas.
Back to the bodywork. In this step, I sharpen the NACA air intakes on the front and sides, so that the bodywork profile is not so wide. Here you can see them once they have been sharpened.
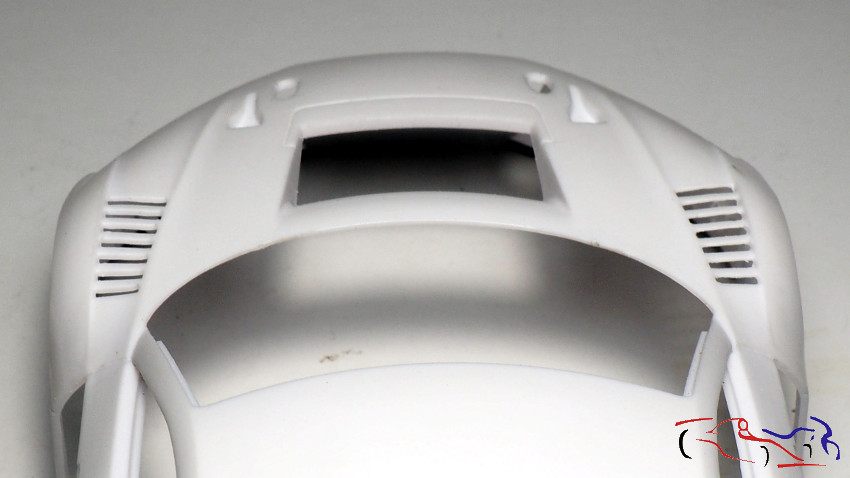
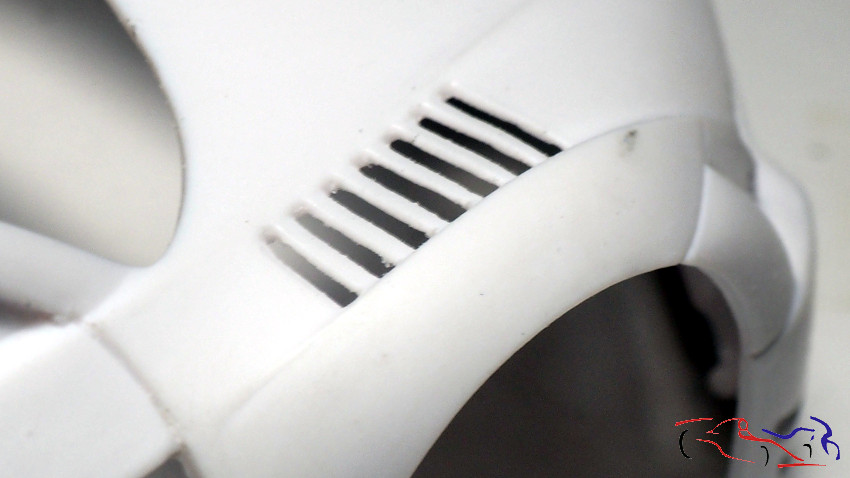
Seguimos con la carrocería, afinando ahora las salidas de aire que hay sobre las ruedas delanteras. En la primera foto, vemos la diferencia entre las originales del aldo izquierdo, y las modificadas del lado derecho. La segunda foto nos muestra las rejilas originales y la tercera foto, las rejillas modificadas, a falta de afinarlas:
We continue with the bodywork, tuning now the air outlets on the front wheels. In the first photo, we can see the difference between the original ones on the left side, and the modified ones on the right side. The second photo shows the original grilles and the third photo shows the modified grilles, still to be tuned:
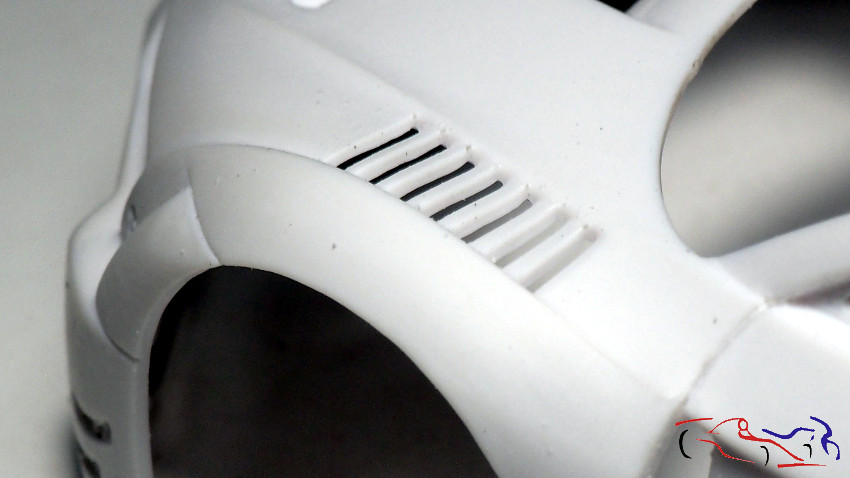
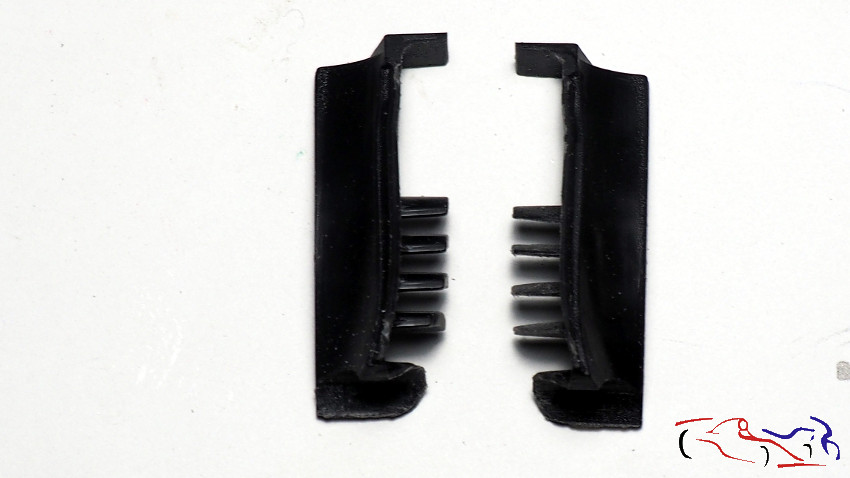
Más modificaciones. Ahora le toca el turno a la pieza negra posterior, que contiene los deflectores de las salidas de aire traseras. Como veis, la izquierda ya está lijada y los deflectores son más finos, comparando con los de la derecha, que aun no los he modificado.
More modifications. Now it’s the turn of the rear black piece, which contains the rear air outlet deflectors. As you can see, the left one is already sanded and the deflectors are thinner, compared to the ones on the right, which I haven’t modified yet.
Igual ocurre con las piezas que hay detrás de las ruedas delanteras. En este caso, de las dos piezas d ela fotografia siguiente, la pieza derecha ya está modificada. En ambos casos, he usado limas y lijas porque he pensado que sustituir los deflectores horizontales por los fotograbados era muy complicado y laborioso, y puesto que no quiero complicarme mucho. Respecto al plástico negro de Nunu, no me gusta porque no es fino y es dificil de trabajar, dejando muchos restos al lijar, y que hay que afinar las piezas mucho. Además, las piezas tienen muchas rebabas!!,
The same applies to the parts behind the front wheels. In this case, the two pieces of the following picture, the right piece is already modified. In both cases, I have used files and sandpaper because I thought that replacing the horizontal deflectors with the photoetched ones was very complicated and laborious, and because I don’t want to complicate things too much. Regarding the black plastic from Nunu, I don’t like it because it’s not thin and it’s difficult to work with, leaving a lot of remains when sanding, and the pieces have to be very fine. Besides, the pieces have a lot of burrs!
A continuación, vamos a continuar con la carrocería. Como hay muchos fotograbados que voy a utilizar, es necesario preparar donde se van a colocar para que se adapten mejor. Empezamos por las fijaciones del capó y del motor. Como esas fijaciones van al nivel de la carrocería, hago sus correspondientes agujeros, para rellenarlos posteriormente con masilla epoxy. Este proceso es el mismo que mencioné anteriomente, de “Scaleauto shop”.
Next, we are going to continue with the bodywork. As there are a lot of photo-etched parts to be used, it is necessary to prepare where they will be placed so that they fit better. We start with the bonnet and engine mountings. As these fixings go at the level of the bodywork, I make their corresponding holes, to fill them later with epoxy putty. This process is the same named above from “Scaleauto shop”.
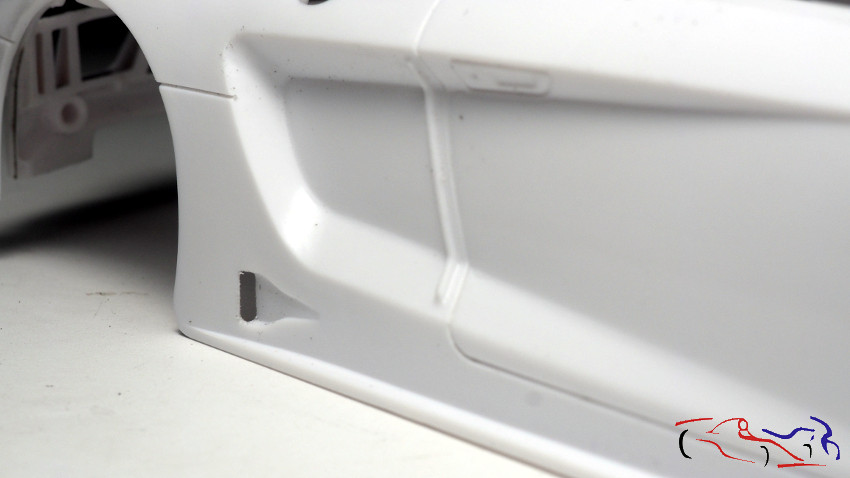
De la misma manera, taladro los huecos de las derivas laterales del faldón delantero. Más adelante, pondré masilla epoxy donde insertaré los fotograbados, que después retiraré para dejar el hueco. En este hueco será donde los coloque una vez terminada la carrocería y las derivas. Este mismo proceso lo usaré en las fijaciones de los retrovisores y del alerón trasero.
In the same way, I drill the holes in the side drifts of the front apron. Later, I will put epoxy putty where I will insert the photoetched parts, which I will later remove to leave the hole. This hole will be where I will place them once the bodywork and the drifts are finished. I will use the same process for the rear view mirrors and the rear wing.
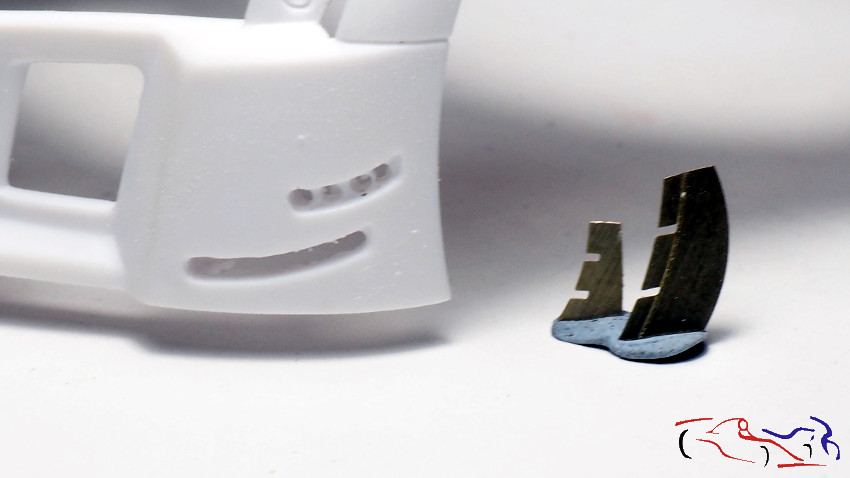
Respecto a los retorvisores, el TK de Scalelab24 trae las fijaciones para sustituir las del kit. Para ello, cortamos la base del retrovisor, le hacemos una guia con el panelador donde insertaremos el fotograbado. En la imagen, vemos un retrovisor origunal en la parte de arriba, y uno modificado en la parte izquierda. A la derecha tenemos el fotograbado y la base eliminada del retrovisor original.
Regarding the rear-view mirrors, the Scalelab24 TK comes with the fixings to replace those of the kit. To do this, we cut the base of the mirror, we make a guide with the panel where we will insert the photoetched parts. In the image, we see an original mirror on the top, and a modified one on the left. On the right we have the photoetched parts and the base removed from the original mirror.
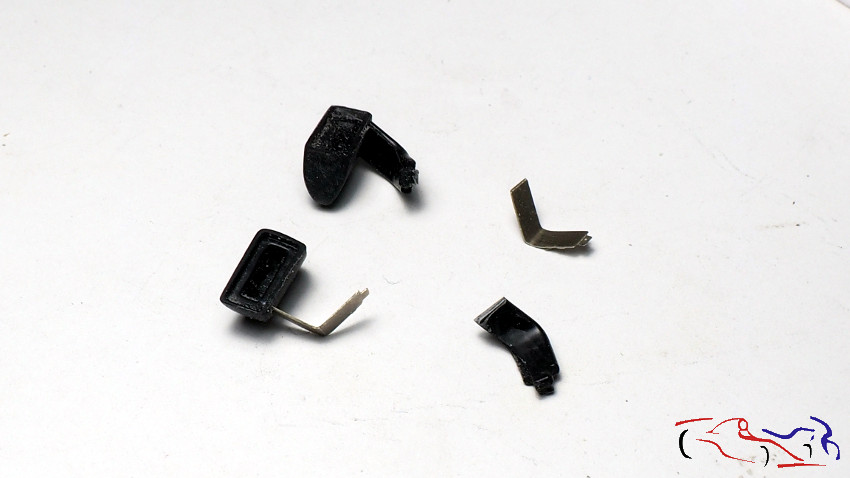
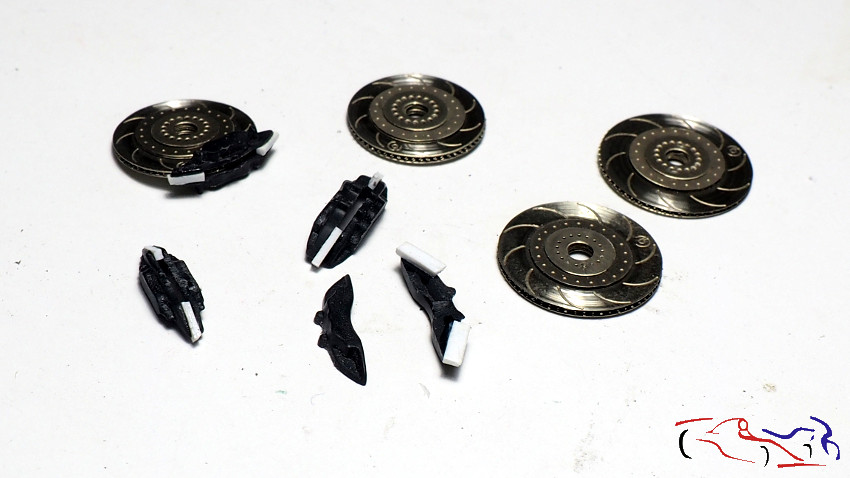
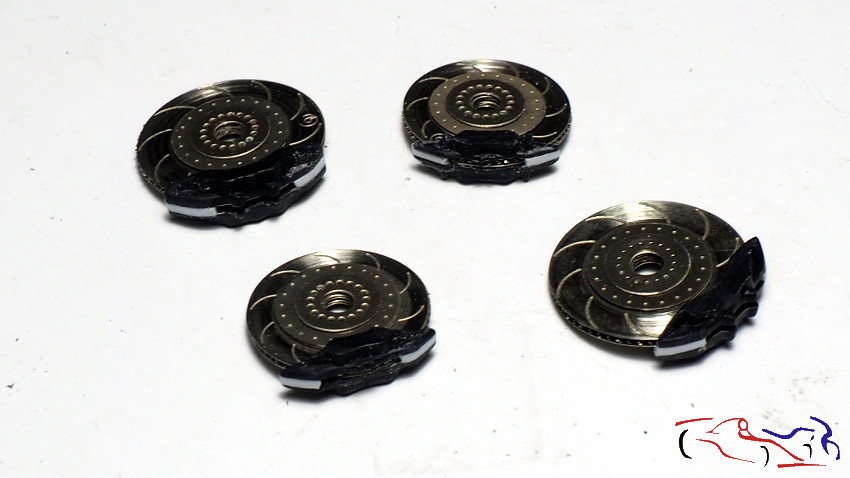
Pasamos a los frenos. El TK de Scalelab24 trae los discos, pero no las pinzas. Por tanto, tenfo que usar las del kit. Para ello, necesito cortarlas de las piezas originales, separando las dos mitades de cada disco. Uso el minitaladro con un disco de corte. En la foto de la derecha, vemos los lados laterales de las pinzas, ya separados de los discos.
We move on to the brakes. The Scalelab24 TK comes with the discs, but not the calipers. Therefore, I have to use the ones from the kit. To do this, I need to cut them from the original parts, separating the two halves of each disc. I use the mini drill with a cut-off wheel. In the picture on the right, we can see the lateral sides of the calipers, already separated from the discs.
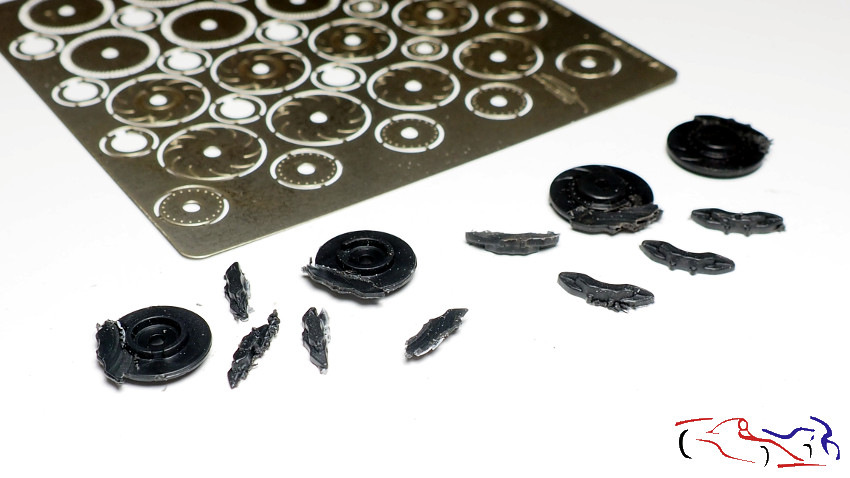
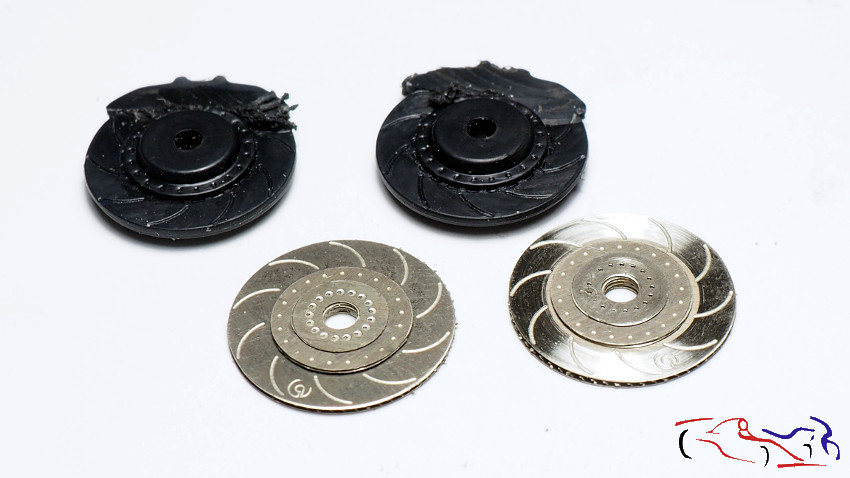
Una vez separados los laterales de los discos, hay que poner una pieza en los extremos que los separe para poder introducir los discos de fotograbado. Una vez pegadas las dos artes de los discos, limamos y lijamos para adaptarlos a las formas de las pinzas.
We move on to the brakes. The Scalelab24 TK comes with the discs, but not the calipers. Therefore, I have to use the ones from the kit. To do this, I need to cut them from the original parts, separating the two halves of each disc. I use the mini drill with a cut-off wheel. In the picture on the right, we can see the lateral sides of the calipers, already separated from the discs.
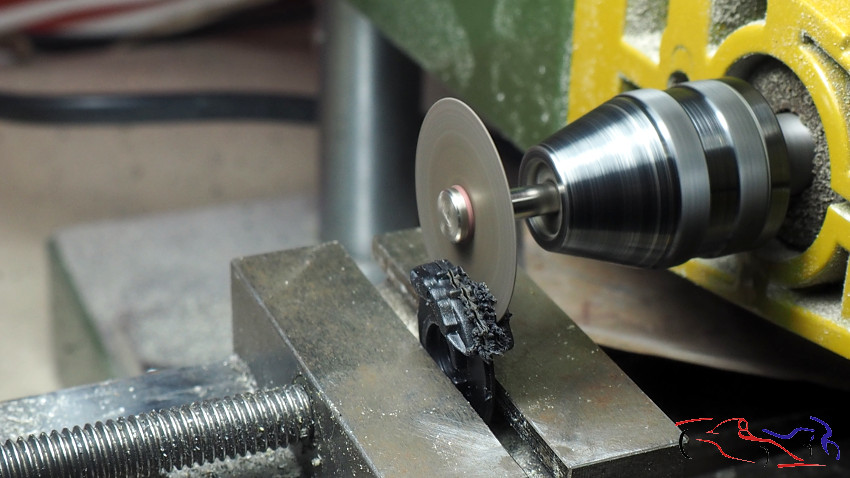
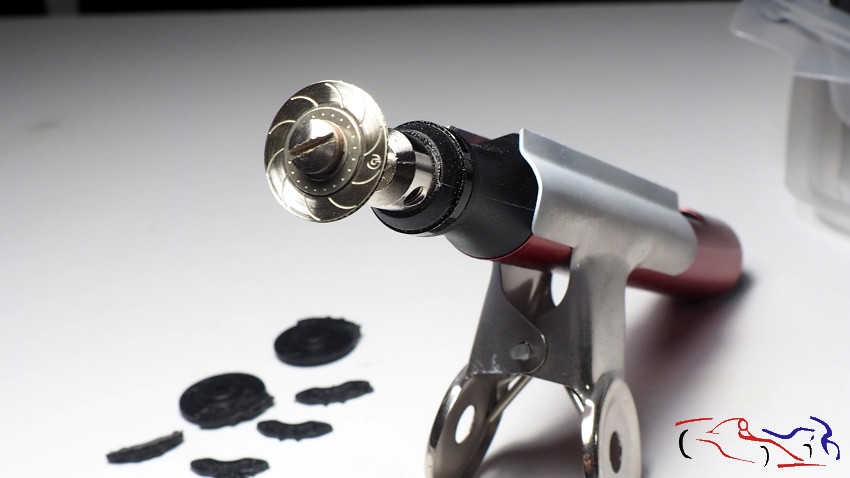
Y habéis visto los discos como brillan? Incluso tienen las marcas concéntricas de las zapatas del freno!! Pues eso lo he hecho poniendo el disco en el soporte de sierras en mi minitaladro nuevo de la marca Dspiae, y le he pasado una lija de grano 100. El resultado se ve en la foto d ela derecha, comparandolo con un disco sin tratar.
And have you seen how shiny the discs are? They even have the concentric marks of the brake shoes on them! I did this by putting the disc on the saw stand on my new Dspiae mini-drill, and sanded it with 100 grit sandpaper. The result is shown in the photo on the right, compared to an untreated disc.
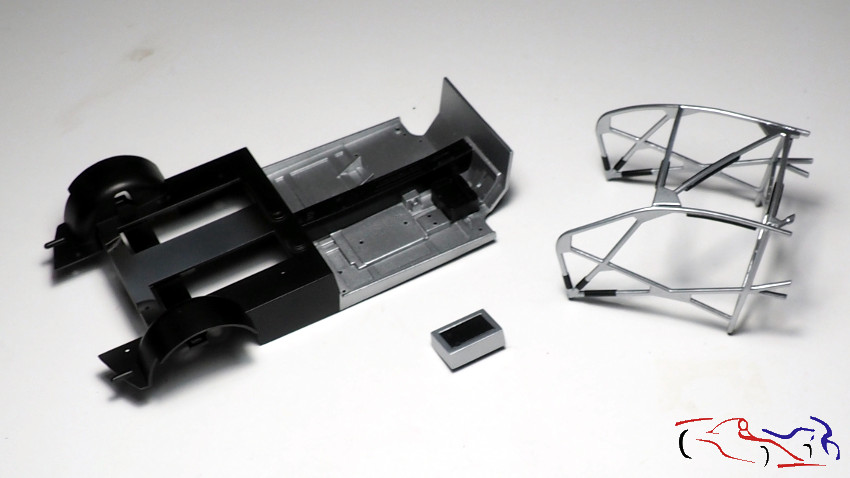
Más cosas: he montado también la jaula para ir imprimándola.
More things: I have also assembled the cage for priming..
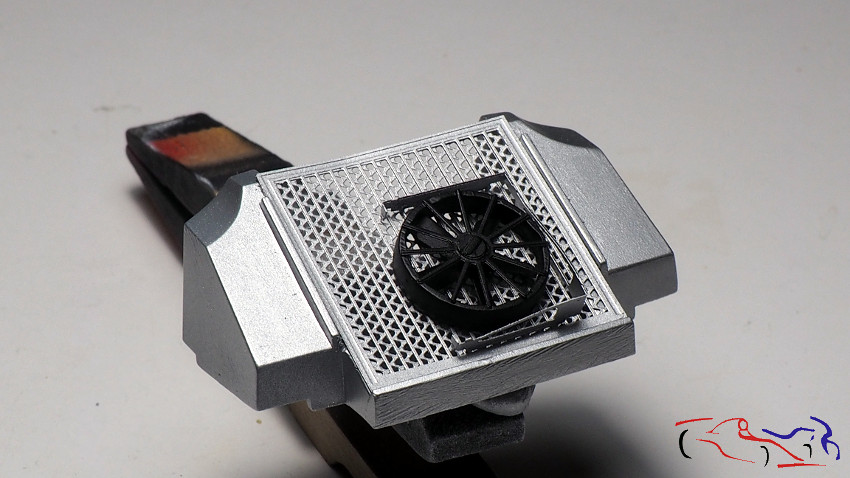
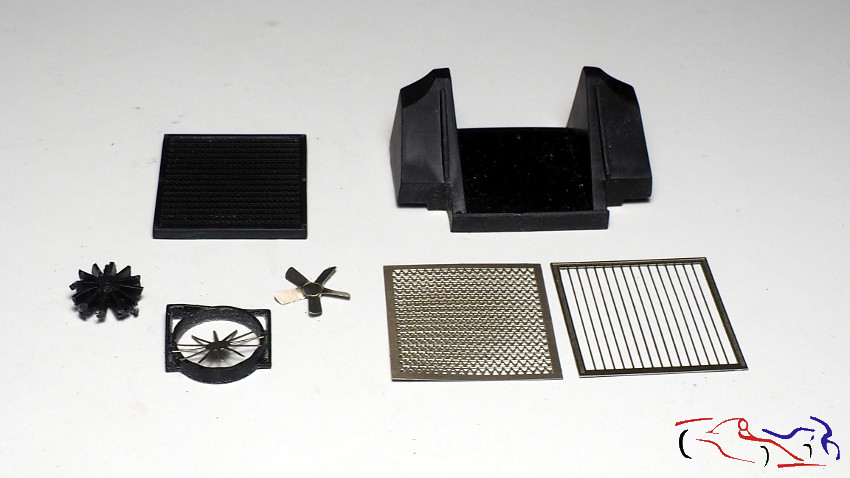
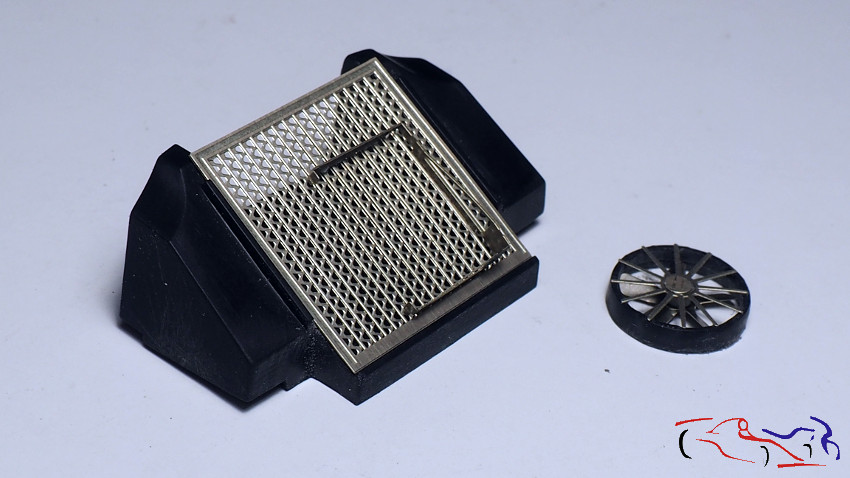
Pasamos al radiador delantero. Las piezas negras son las originales (base, radiador y ventilador) aunque ya he cortado el ventlador de su aro, para incluir el de fotograbado. Las dos rejillas sustituiran a la pieza negra de la izquierda. Y en la foto de la derecha, se ven las rejillas ya pegadas, y el ventilador aparte, ya que va pintado de negro, mientras la base va de aluminio.
Let’s move on to the front radiator. The black pieces are the original ones (base, radiator and fan) although I have already cut off the radiator rim to include the photoetched one. The two grilles will replace the black piece on the left. And in the photo on the right, you can see the grilles already glued, and the fan apart, as it is painted black, while the base is made of aluminium.age for priming..
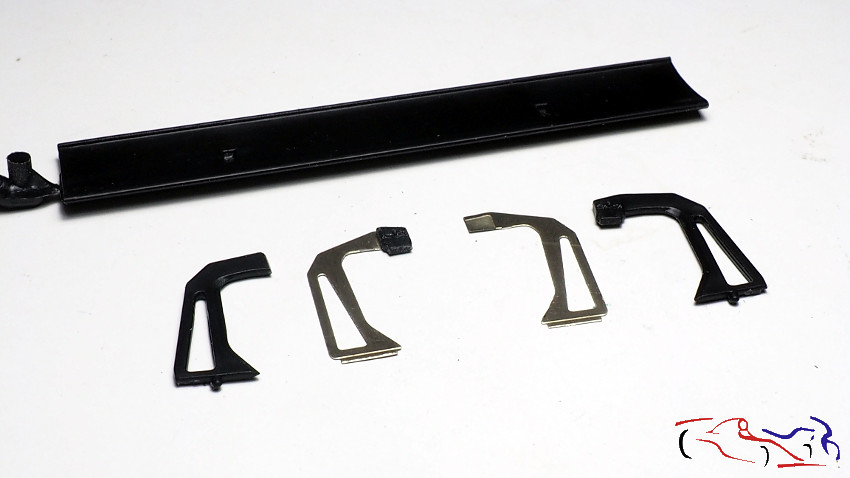
Otras piezas que sustituimos por fotograbado son los soportes del alerón, pero no lo sustituyen completamente, ya que la pieza que sujeta el aleron, hay que cortarla del original y pegarla en el fotograbado, tal y como muestro en la foto. De izquierda a derecha: soporte original sin la pieza recortada, fotograbado con la pieza pegada, fotograbado original y pieza original del kit.
Other parts that we replaced with photoetched parts are the aileron supports, but they do not replace it completely, as the piece that holds the aileron has to be cut from the original and glued on the photoetched part, as I show in the photo. From left to right: original support without the cut piece, photoetched parts with the glued piece, original photoetched parts and original part from the kit.
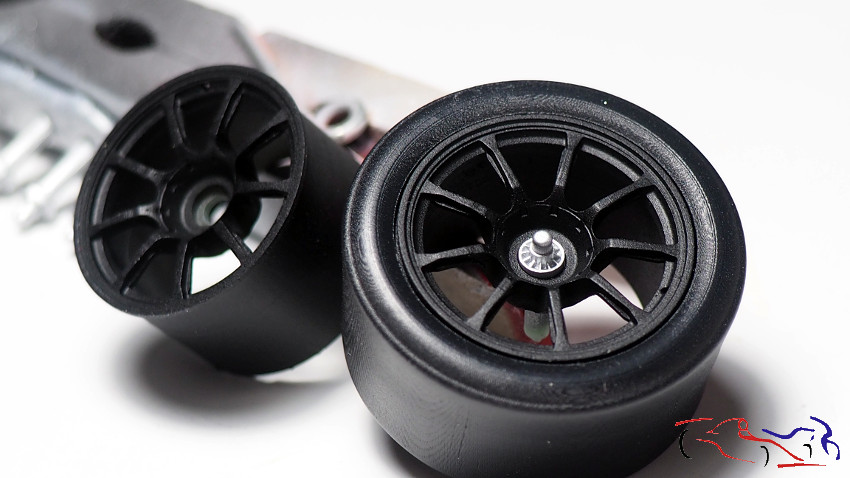
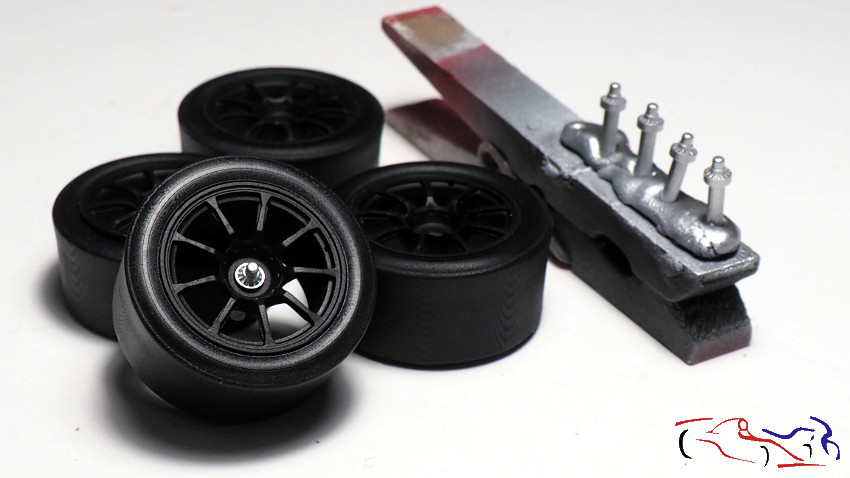
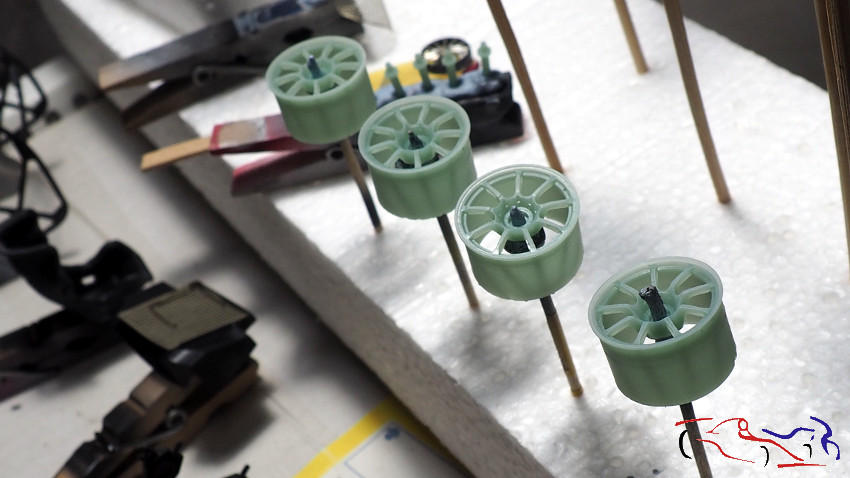
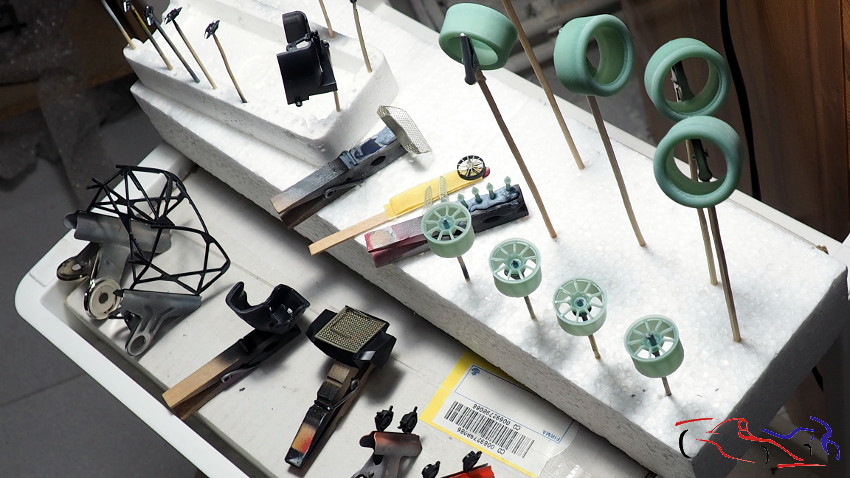
Y vamos colocabdo piezas para imprimar y pintar. Destacar las ruedas de KMP:
And we are placing parts for priming and painting. The KMP wheels stand out:
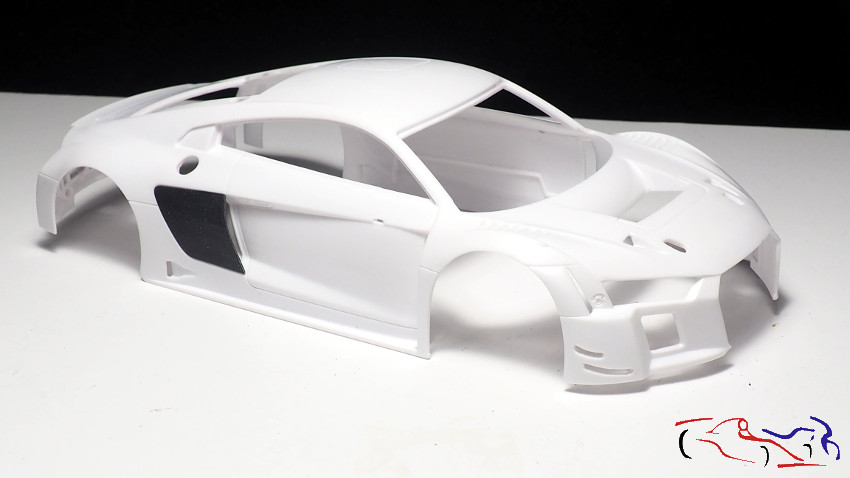
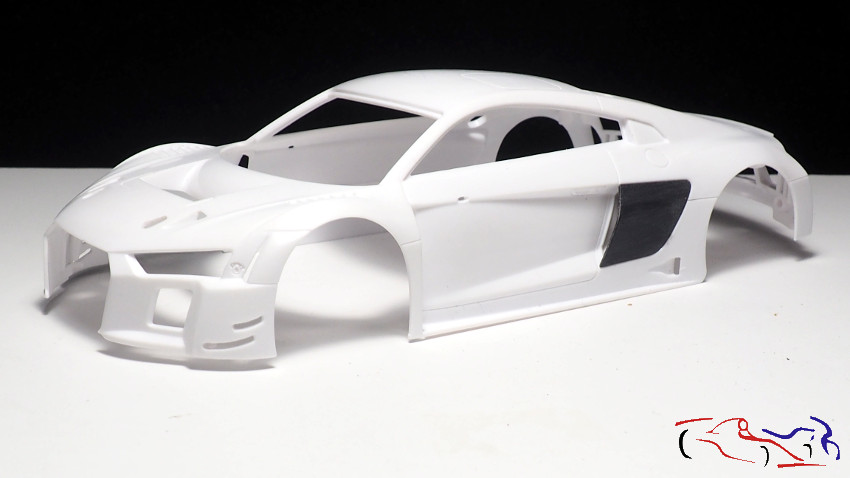
Y para finalizar, la carrocería con los laterales puestos y a falta de añadir la masilla epoxy en los lugares donde van los fotograbados
And finally, the bodywork with the sides in place and still needing to add the epoxy putty in the places where the photoetched parts are placed.
Lo siguiente será poner la masilla epoxy, lijarlas, afinar la coarrocería, y…poner la imprimación!! Gracias por ver y comentar!!
Next will be to put the epoxy putty, sand them, tune the bodywork, and… put the primer on! Thanks for watching and commenting!