En la ultima entrada, nos quedamos trabajando el vano motor, en el cual seguimos hoy. Después de imprimar,toca rellenar las zonas entre los pasos de rueda y el cortafuegos. Para ello rellenamos con láminas de plástico como base….
In the last post, we left off working on the engine compartment, which we continue today. After printing, it is time to fill in the areas between the wheel arches and the firewall. To do this, we fill them with plastic sheets as a base….
…para poner masilla epoxy por encima, trabajada con un palo de modelar y agua:
…to put epoxy putty on top, worked with a modeling stick and water:
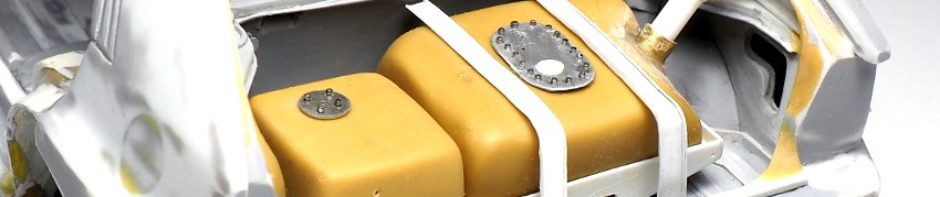
Ahora toca lijar para afinar la masilla. También, creamos la chapa donde va colocado un depósito, a partir del metal de un diskette, dando forma, agujereando y añadiendo algún detalle en plástico:
Now it’s time to sand to refine the putty. We also create the plate where a tank is placed, from the metal of a diskette, shaping it, drilling it and adding some plastic details:
Y volvemos a imprimar la zona:
And we prime the area again:
Pasamos ahora a ir pintando las piezas del motor ya que es importante tenerlo para acomodar el resto de las piezas del vano motor. Primero, las imprimamos:
Now we move on to painting the engine parts as it is important to have it in order to accommodate the rest of the engine compartment parts. First, we prime them:
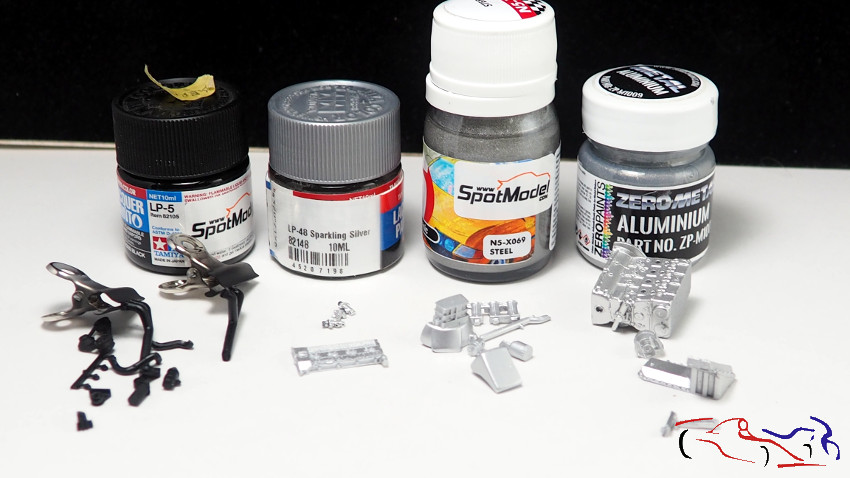
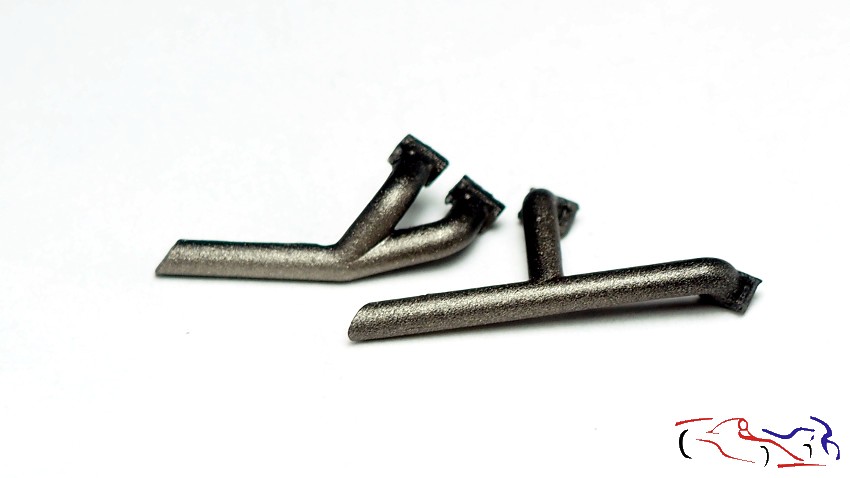
Y pasamos a pintarlas: aquí las tenemos ya pintadas con sus correspondientes pinturas. Y a continuación, en diferentes fotos, las piezas pintadas con Steel de Number5 y las de negro satinado con LP de Tamiya. Para terminar, los escapes negros aparecen repintados posteriormente con Alclad Burn metal sobre el negro semimate:
And now we move on to painting them: here we have them already painted with their corresponding paints. And then, in different photos, the parts painted with Steel from Number5 and the satin black ones with LP from Tamiya. Finally, the black exhausts appear repainted later with Alclad Burn metal over the semi-matt black:
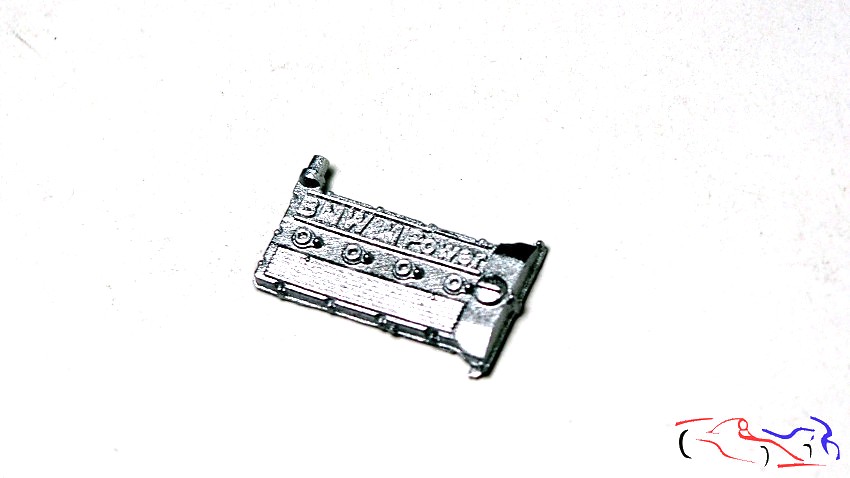
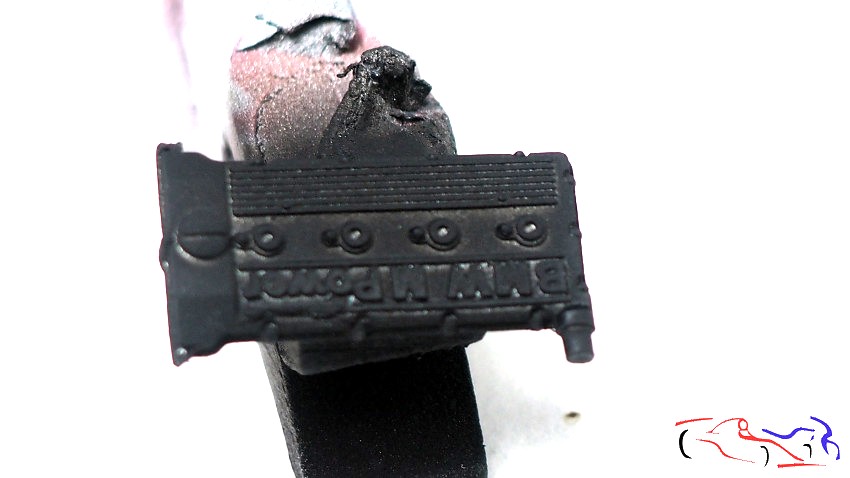
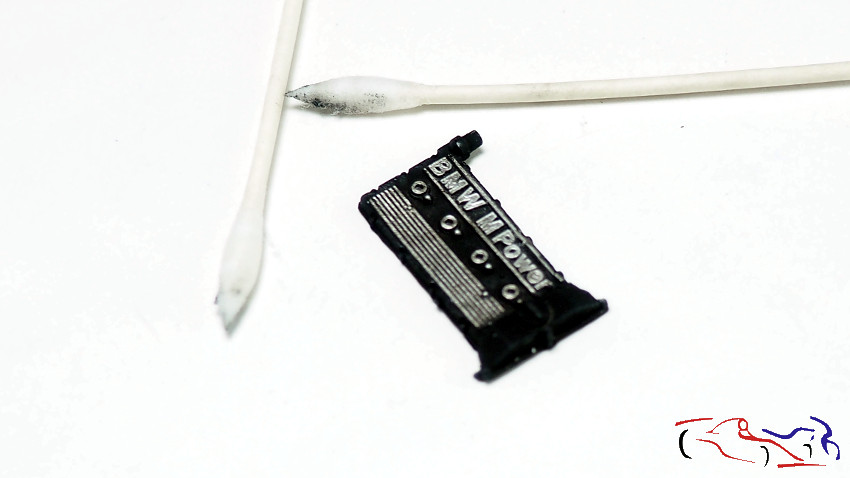
Y para terminar esta entrada, los pasos de pintura de la tapa de las valvulas del motor: Plata de Tamiya LP, Negro mate Tamiya XF1, y raspando las partes superiores con un algodon mojado en X20A, van apareciendo las letras y rasgos que no van de negro:
And to finish this entry, the painting steps for the engine valve cover: Tamiya LP Silver, Tamiya XF1 Matte Black, and scraping the upper parts with a cotton pad soaked in X20A, the letters and features that are not black appear:
Esto es todo por hoy! Gracias por ver y comentar!!
That’s all for today! Thanks for watching and commenting!!
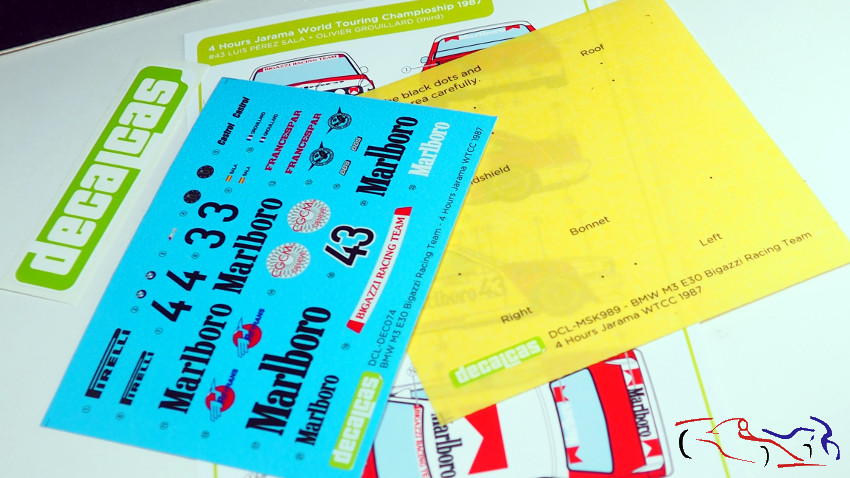
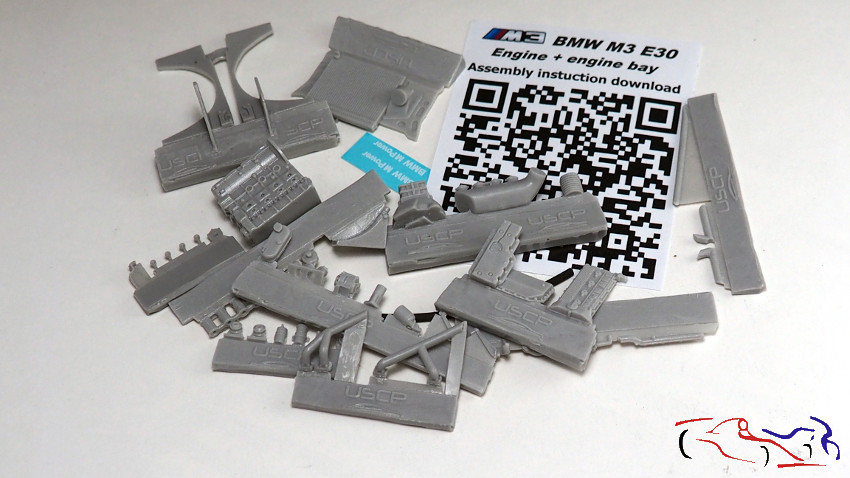
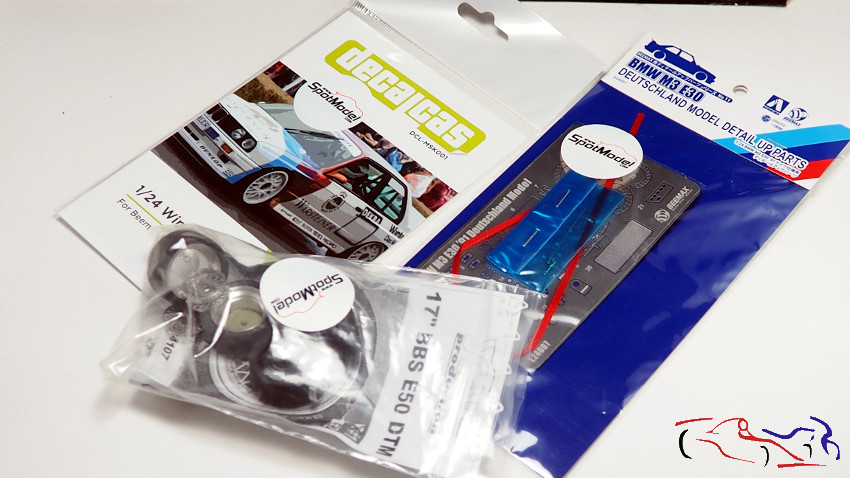
Buenos dias. El BMW M3 sigue sin descanso su proceso, gracias a la ayuda de Borja Martinez Request, que sin ella, hubiera tardado mucho más en buscar, pensar y realizar todos los pasos que estoy dando. Para empezar hoy, comentaros que llegó el correo con más componentes que me faltaban para realizar este proyecto: Pinturas de Number5, el motor de USCP que es bastante mejor que el de Scaleproduction, y las calcas para este coche realizadas por Decalcas. Decir, que estas calcas, llevan unas máscaras para ayudar a pintar el color rojo fluorescente, incluyendo las de los logos de Marlboro, que asi estarán con el mismo color.
Good morning. The BMW M3 continues its process without a break, thanks to the help of Borja Martinez Request, without which, it would have taken me much longer to search, think about and carry out all the steps I am taking. To start today, I would like to tell you that I received the post with more components that I needed to carry out this project: Number5 paints, the USCP engine which is much better than the Scaleproduction one, and the decals for this car made by Decalcas. These decals have masks to help paint the fluorescent red color, including those of the Marlboro logos, which will thus be the same color.
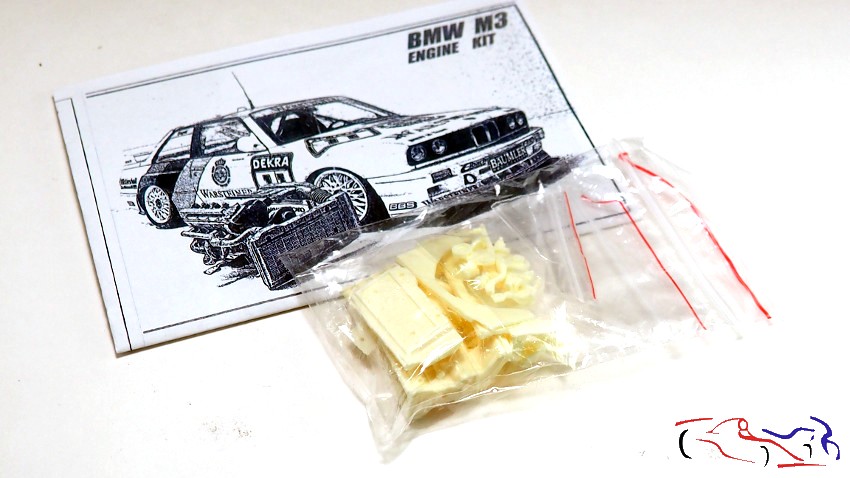
Aquí tenéis el despiece del motor, que aunque está bien, seguro que le modifico o le añado algo….
Here you have the engine parts, which although it is good, I will surely modify it or add something to it….
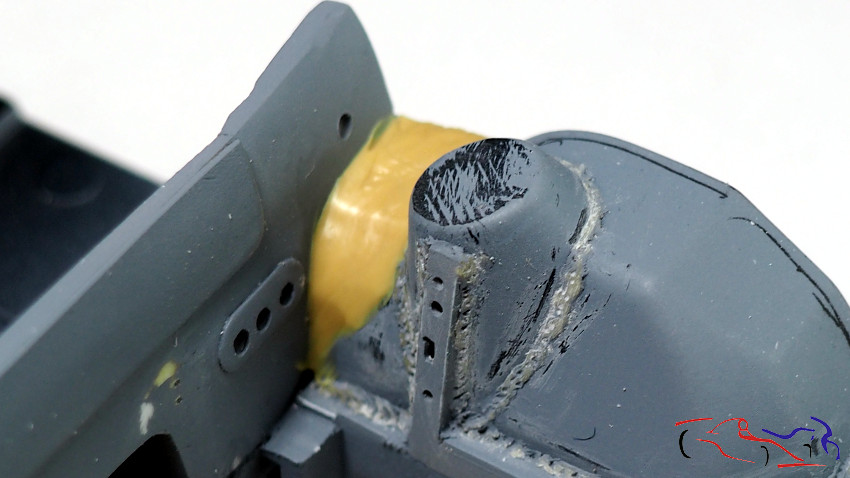
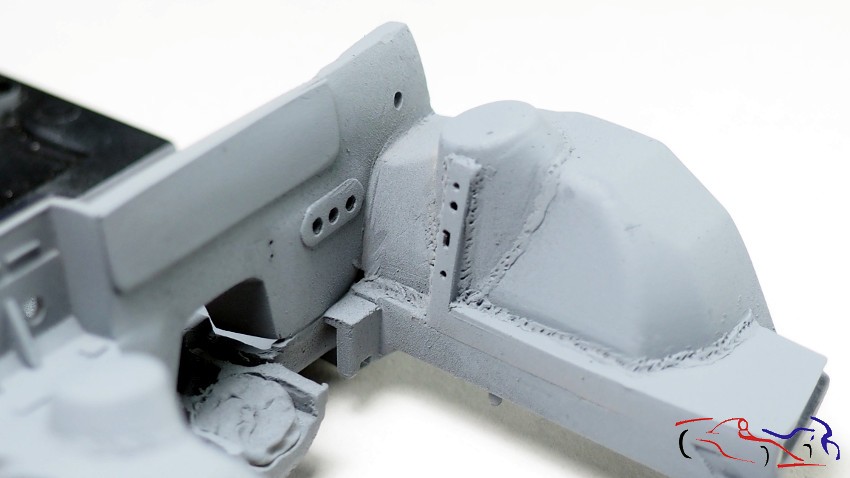
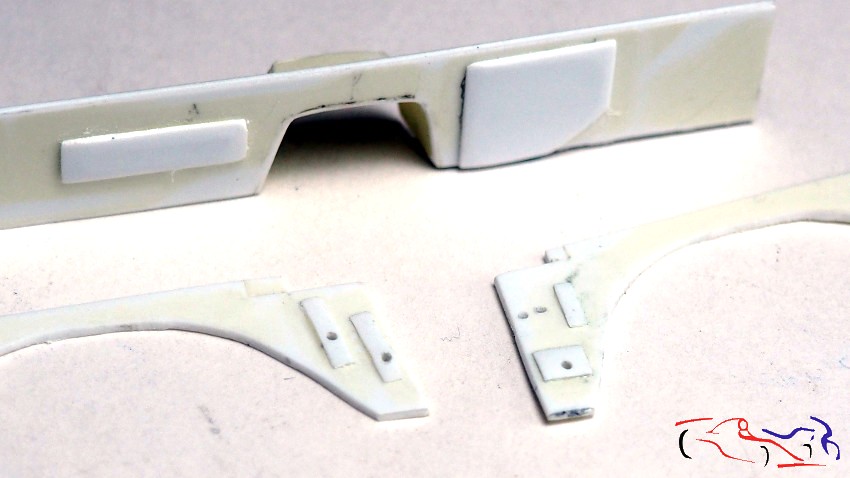
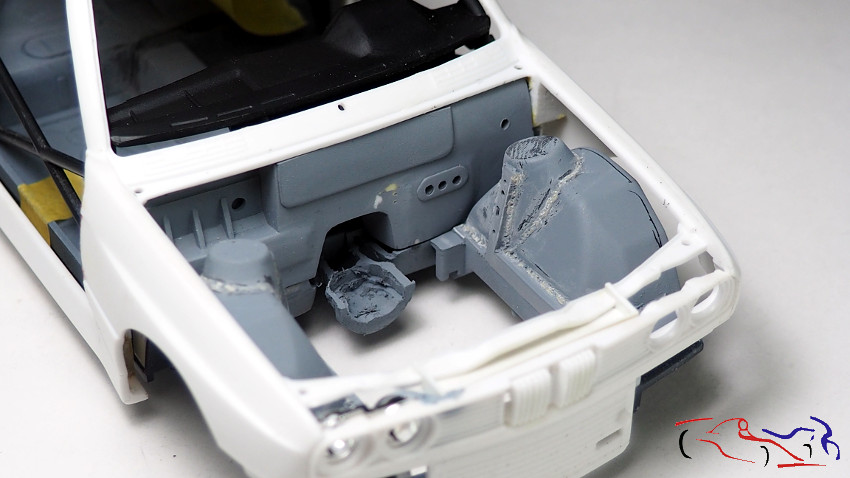
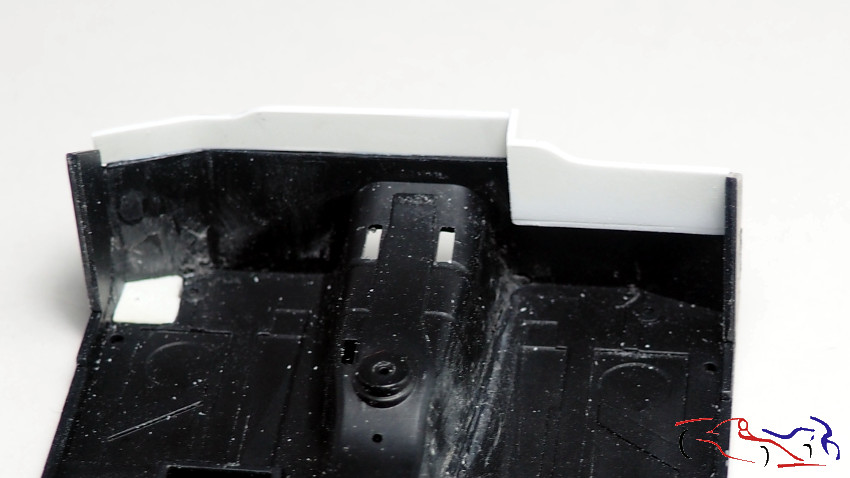
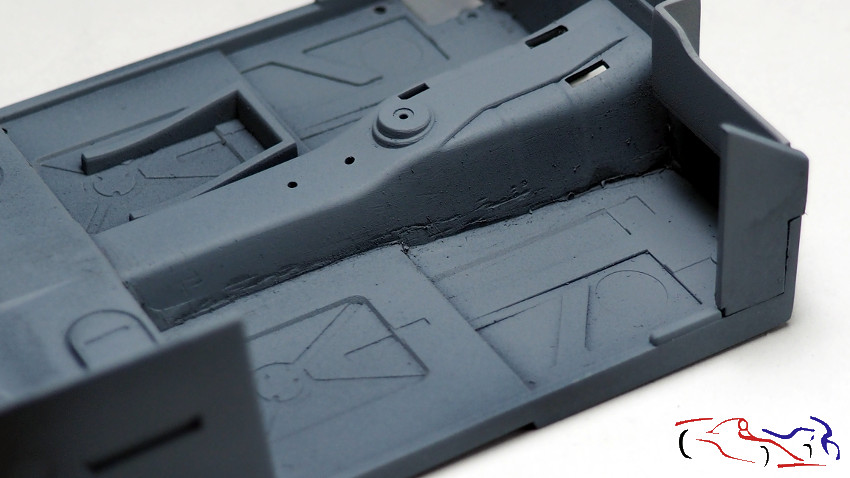
Y seguimos con el vano motor. Añado unas láminas de plastico en el cortafuegos para dar profundidad al mismo, así como en las piezas laterales.
And we continue with the engine compartment. I added some plastic sheets to the firewall to give it depth, as well as to the side pieces.
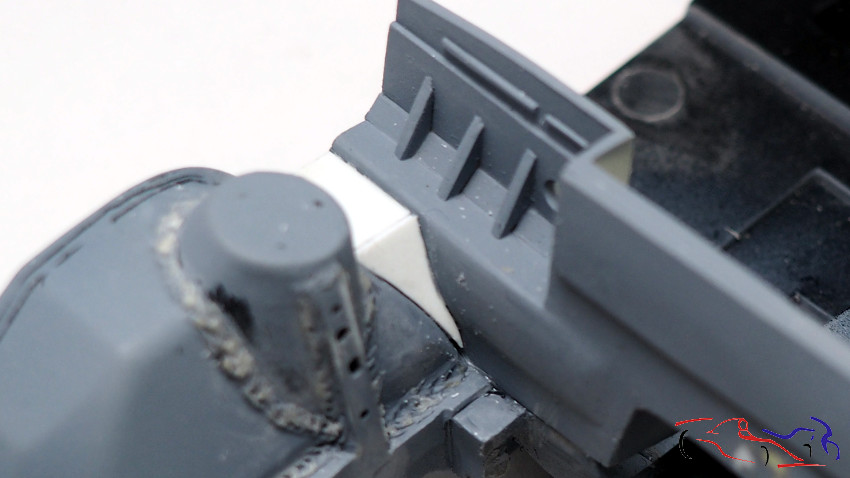
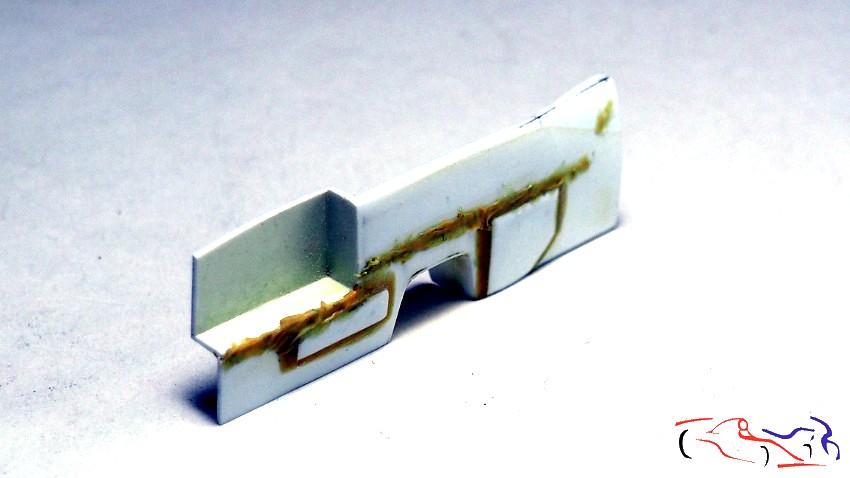
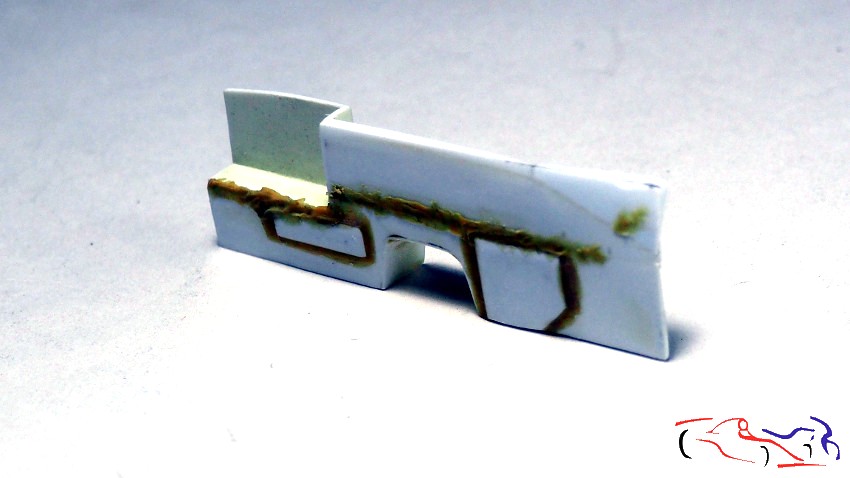
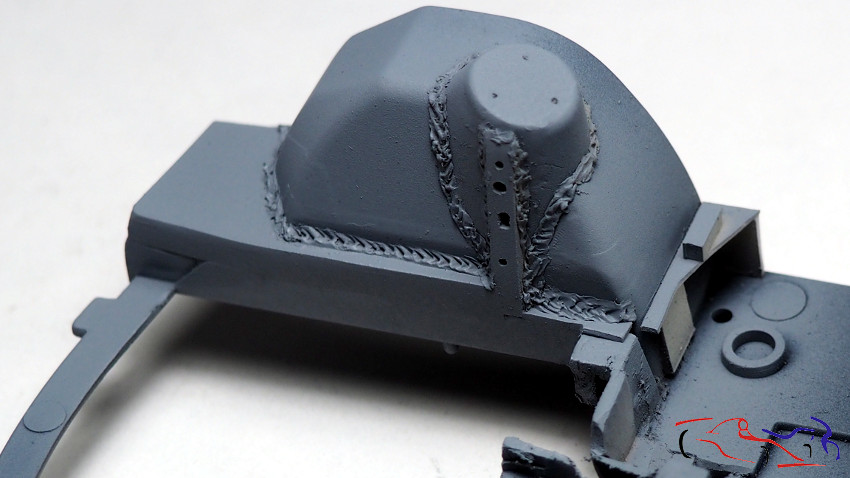
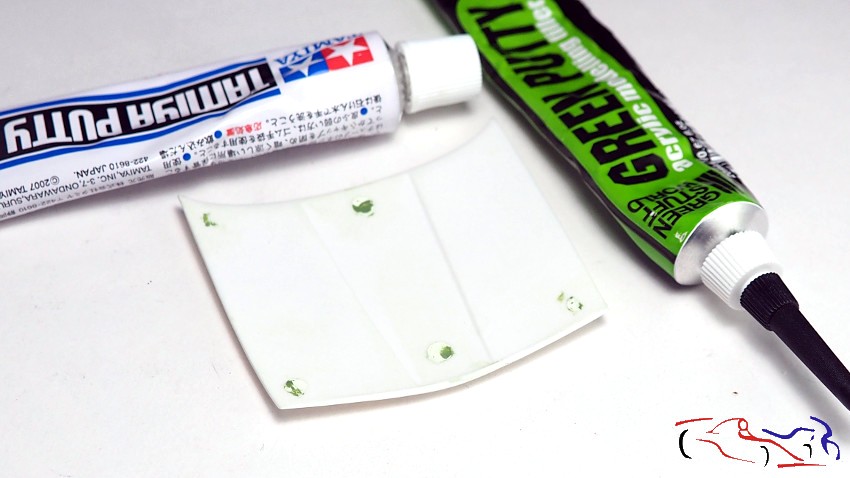
Lo siguiente es rellenar con masilla epoxy, las lineas de soldadura y el contorno de las piezas del cortafuegos, para hacerlas más reales. A las lineas de soldadura, les pasé un buril para imitar las soldaduras.
The next step is to fill the welding lines and the outline of the firewall pieces with epoxy putty to make them look more realistic. I used a burin to chisel the welding lines to imitate the welds.
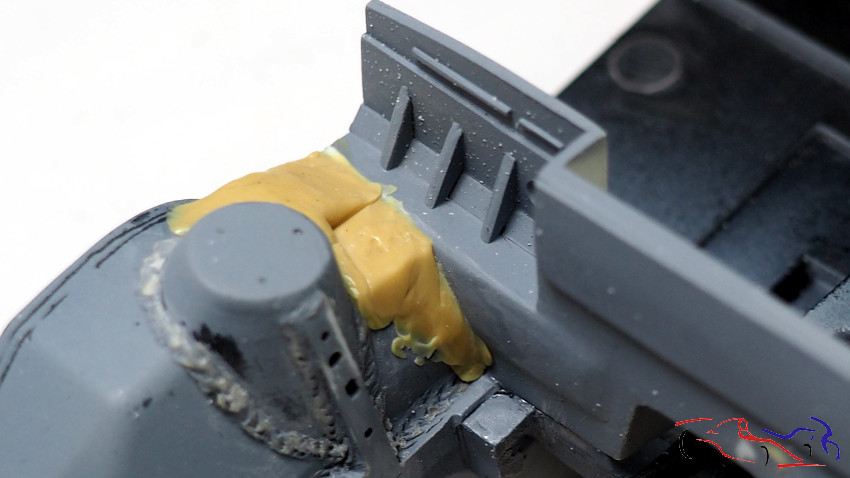
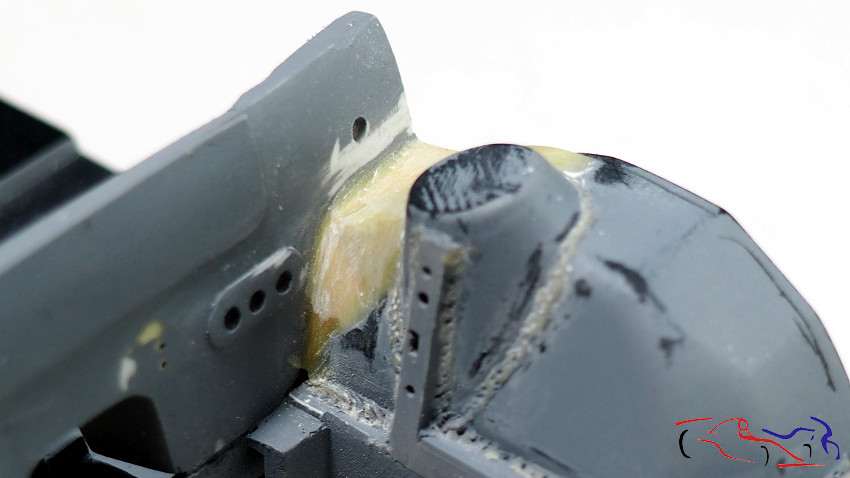
COntinuamos con el cortafuegos. Una vez lijada la masilla, pego la parte superior a la inferior, e incluyo esa caja en la parte izquierda de la fotografia, ya que es un rebaje que lleva el coche real. Y para la parte del lado contrario, le pego por detras, refuerzos de plastico porque tengo que desbastarla para darle la forma necesaria, como se aprecian en las fotos. A su vez, le ponemos más masilla epoxy en la unión de las dos piezas:
We continue with the firewall. Once the putty is sanded, I glue the upper part to the lower part, and I include that box on the left side of the photo, since it is a recess that the real car has. And for the part on the opposite side, I glue plastic reinforcements from behind because I have to roughen it to give it the necessary shape, as you can see in the photos. At the same time, we put more epoxy putty on the joint between the two pieces:
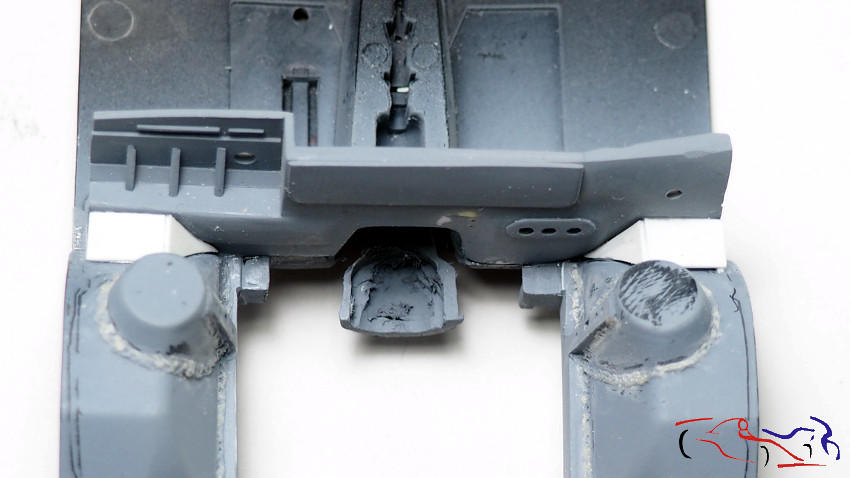
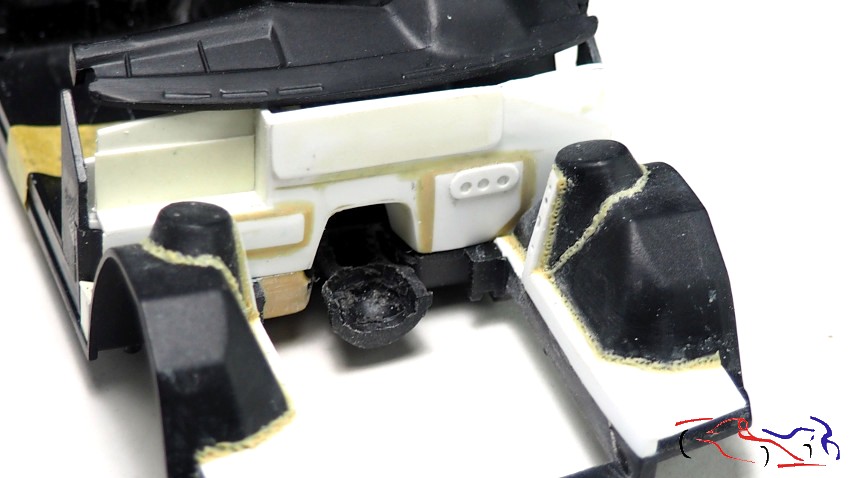
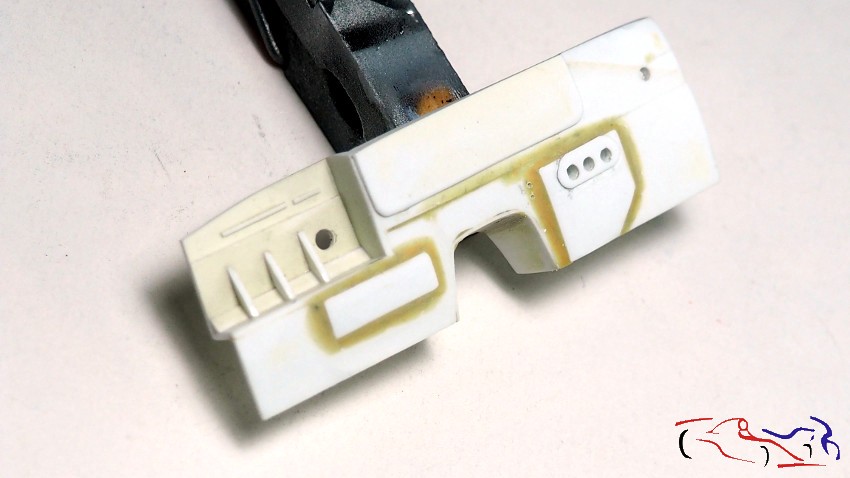
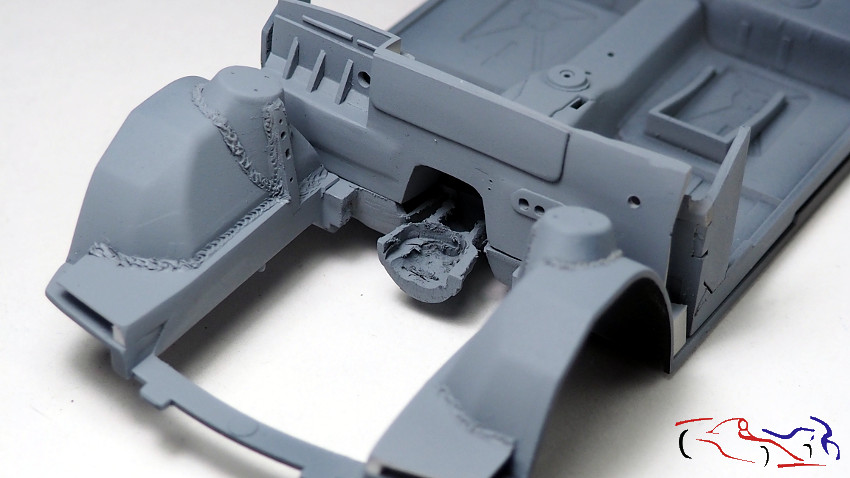
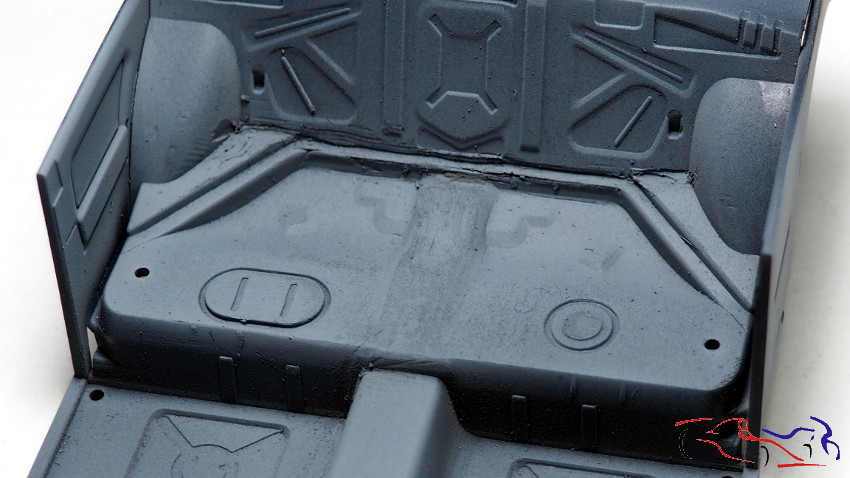
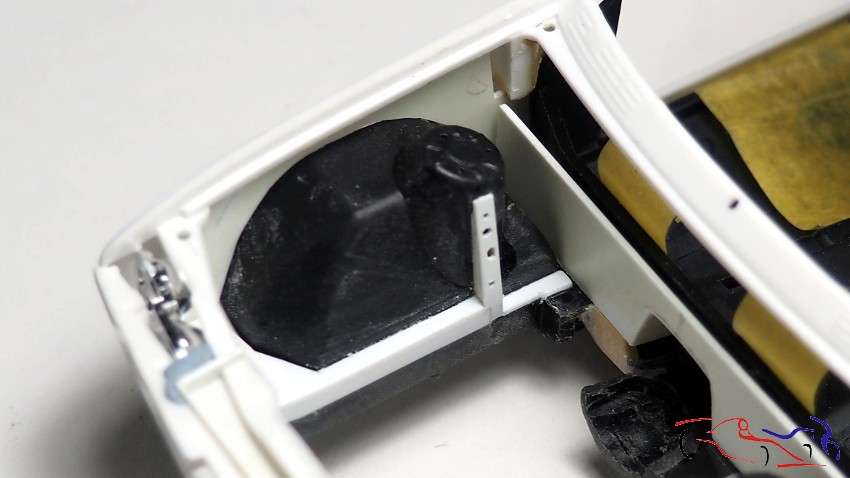
Una vez lijado todo, le añado la base donde irán las bombas de freno y embrague, y una placa en la parte superior, que irá dando forma a dicha parte del cortafuegos. Asi es como aparece incluyendo esa pieza en el chasis:
Once everything is sanded, I add the base where the brake and clutch pumps will go, and a plate on top, which will give shape to that part of the firewall. This is how it appears with that piece included in the chassis:
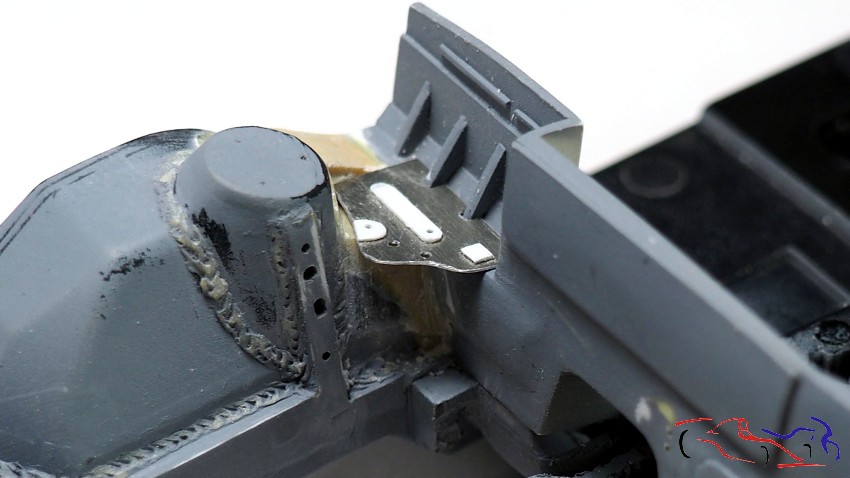
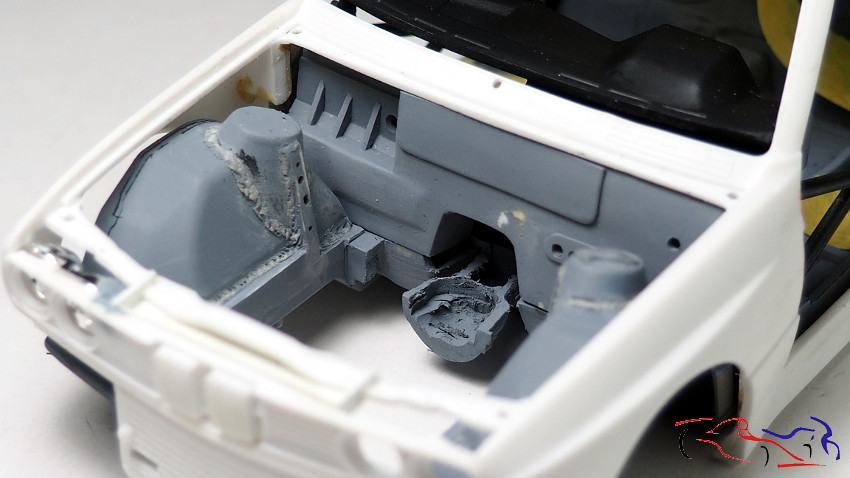
Y seguimos añadiendo piezas al cortafuegos. Con lámina de plástico cortada ad-hoc, rellenamos el hueco de la izquierda incluyendo un agujero por donde pasaráb los cables. Y aprovechamos a imprimarla….
And we continue adding pieces to the firewall. With a plastic sheet cut ad-hoc, we fill the gap on the left, including a hole where the cables will pass through. And we take the opportunity to prime it…
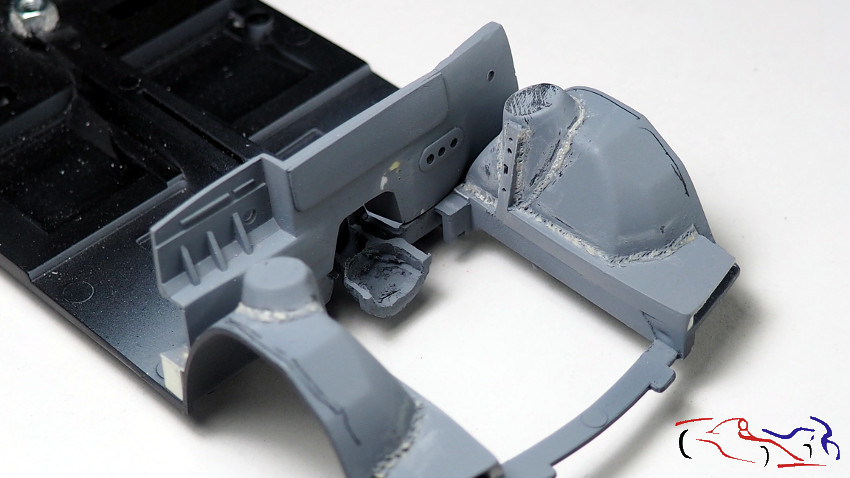
… junto con el chasis y el cockpit. Lo pongo todo junto y este es el resultado: va muy bien pero tengo que disimular un poco con lija las soldaduras porque parecen estar realizadas no por un especialista!!
…along with the chassis and cockpit. I put it all together and this is the result: it goes very well but I have to cover up the welds a bit with sandpaper because they seem to have been done by someone other than a specialist!!
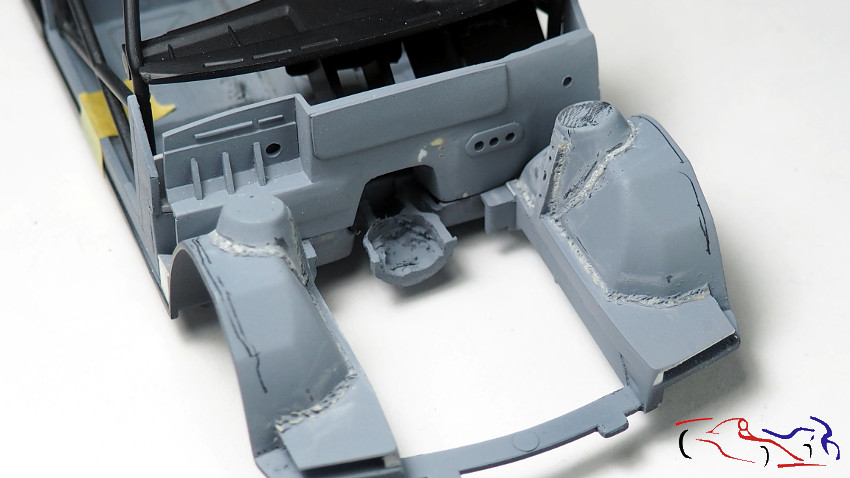
Y si, repasamos esas soldaduras y lo presentamos con el chasis, y la carrocería: el resultado va siendo bueno!!!
And yes, we reviewed those welds and presented it with the chassis and the body: the result is going well!!!
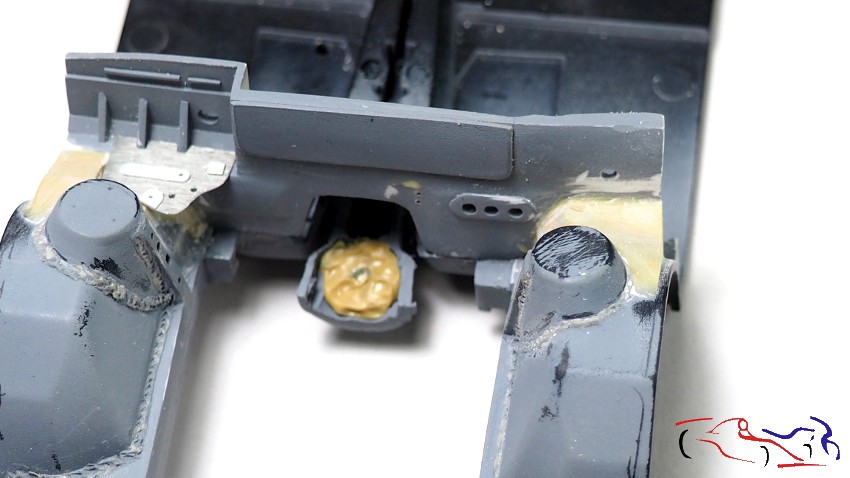
Y para finalizar esta parte por hoy, pegamos el cortafuegos al chasis. Primero lo pusimos con el cockpit y la carrocería para ajustarlo. Ahí le dimos un poco de pegamento, para depués retiralo para pegarlo a conciencia:
And to finish this part for today, we glue the firewall to the chassis. First we put it with the cockpit and the body to adjust it. There we gave it a little glue, to then remove it to glue it thoroughly:
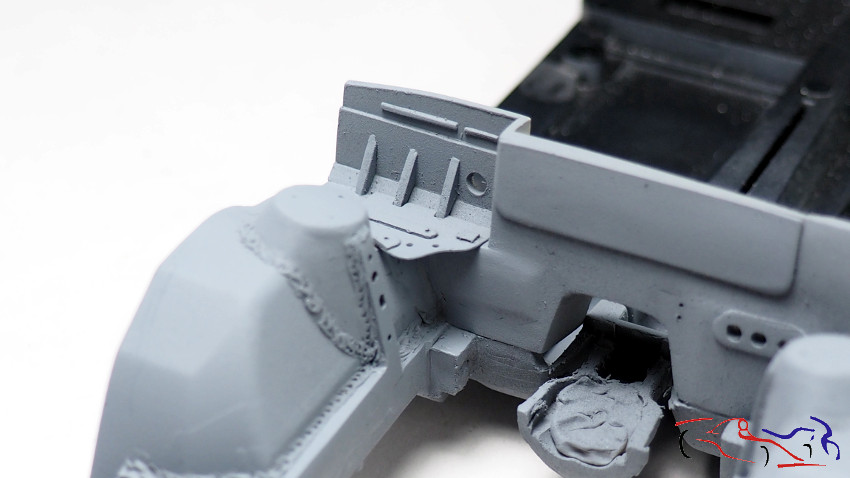
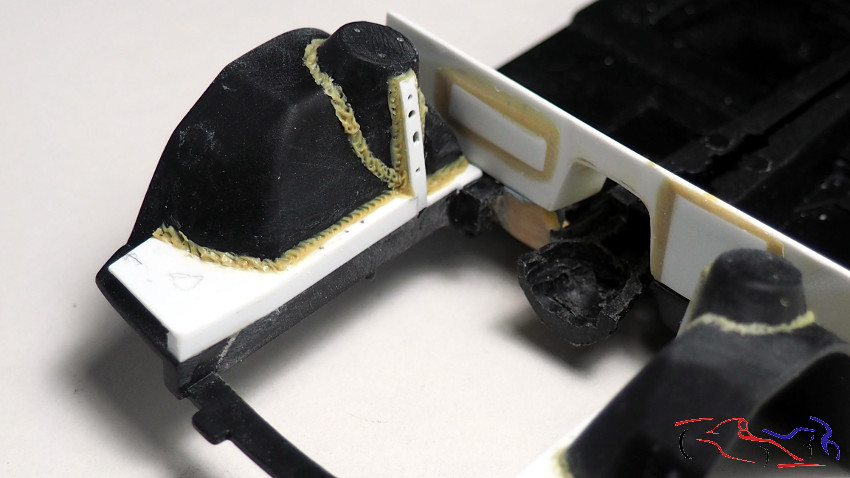
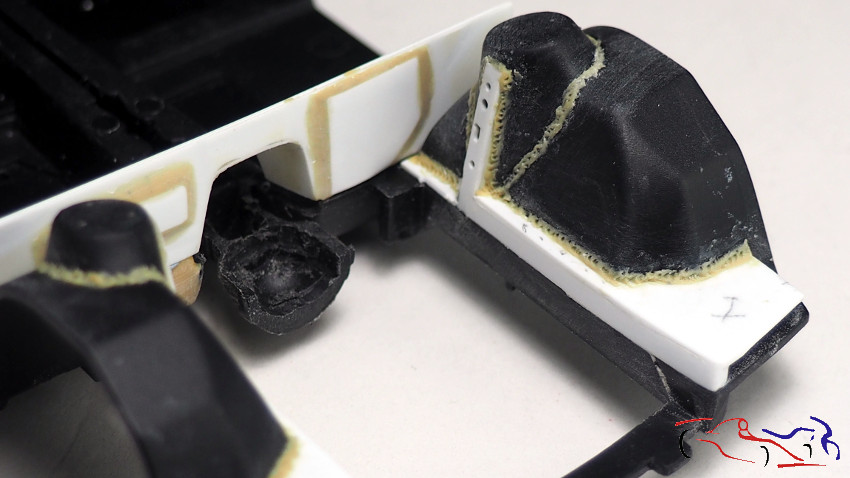
Y al igual que en el cortafuegos hemos realizado una caja en el lado derecho, el cockpit debe tener su correspondiente caja que se adapte al cortafuegos. Elevamos y damos forma al frontal vertical, e incluimos la caja:
And just as we have made a box on the right side of the firewall, the cockpit must have its corresponding box that fits the firewall. We raise and shape the vertical front, and include the box::
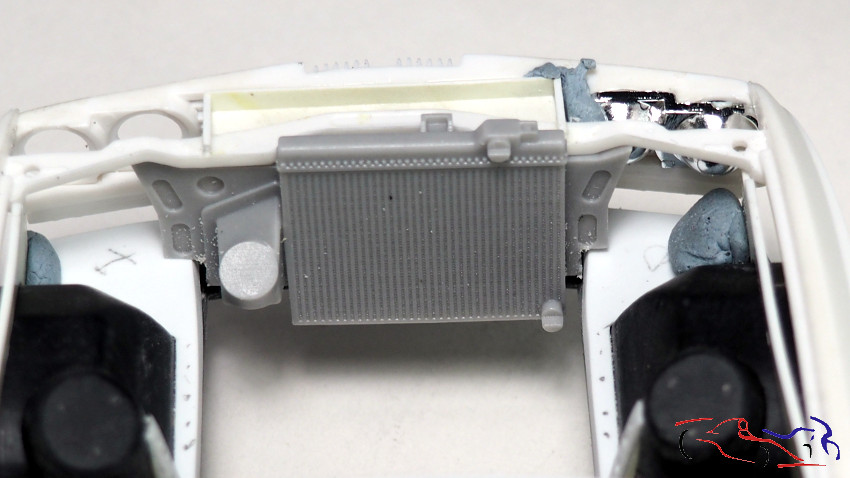
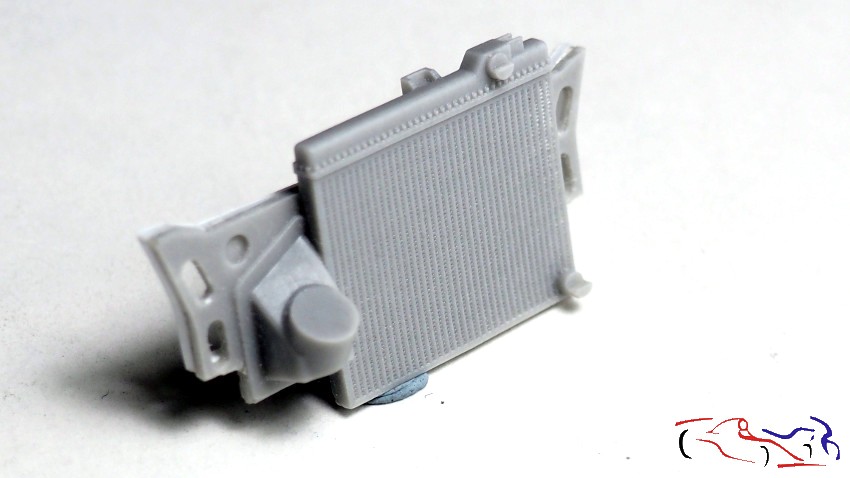
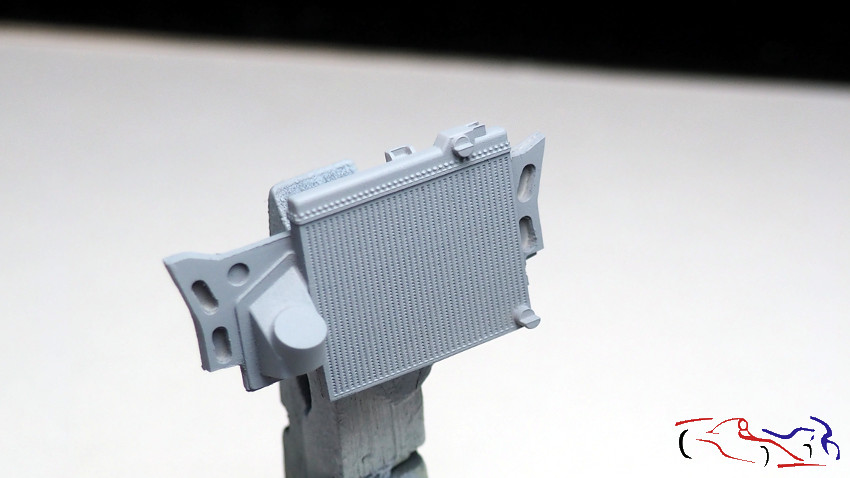
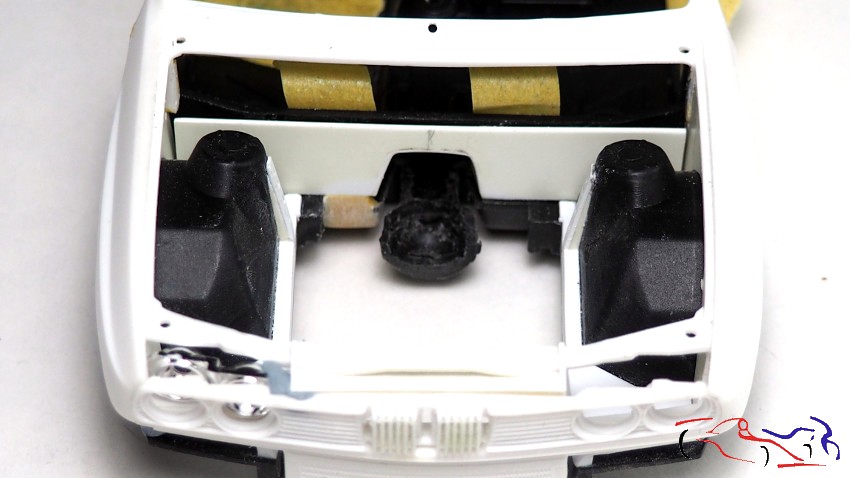
Ahora pasamos al radiador del motor de USCP. Como hemos subido la base del chasis donde se coloca el radiador, he decidido recortar la base en sus dos laterales, para adaptar la altura y que siga encajando. Además, he taladrado los agujeros de los laterales, poniendo una l.aminade plastico por detrás, para darle más profundidad. Y despues, lo he imprimado:
Now we move on to the radiator of the USCP engine. Since we have raised the base of the chassis where the radiator is placed, I have decided to cut the base on both sides, to adapt the height and still fit. In addition, I have drilled the holes on the sides, putting a plastic sheet behind it, to give it more depth. And then, I have primed it:
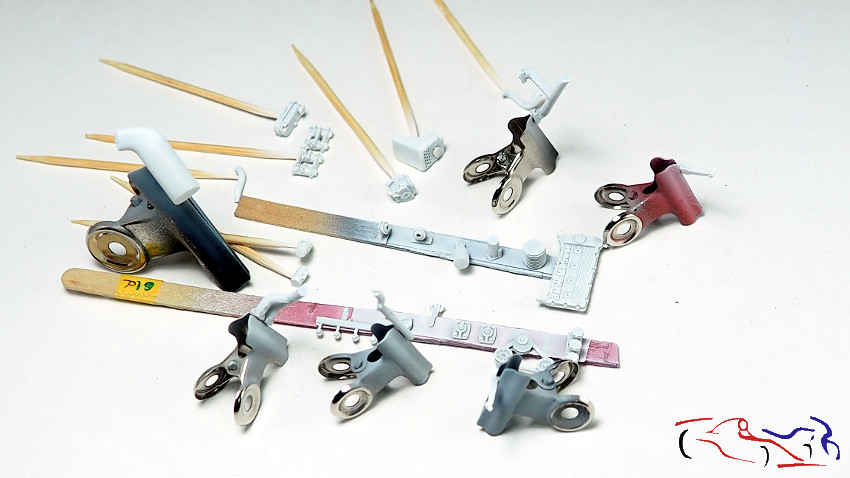
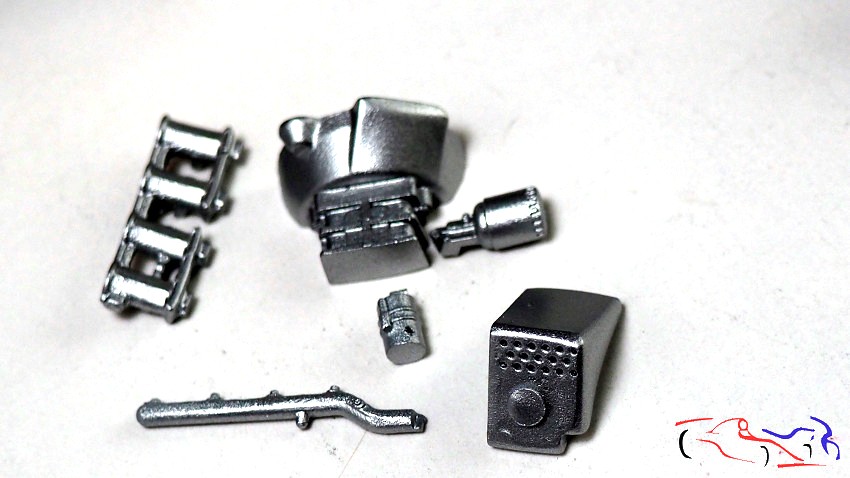
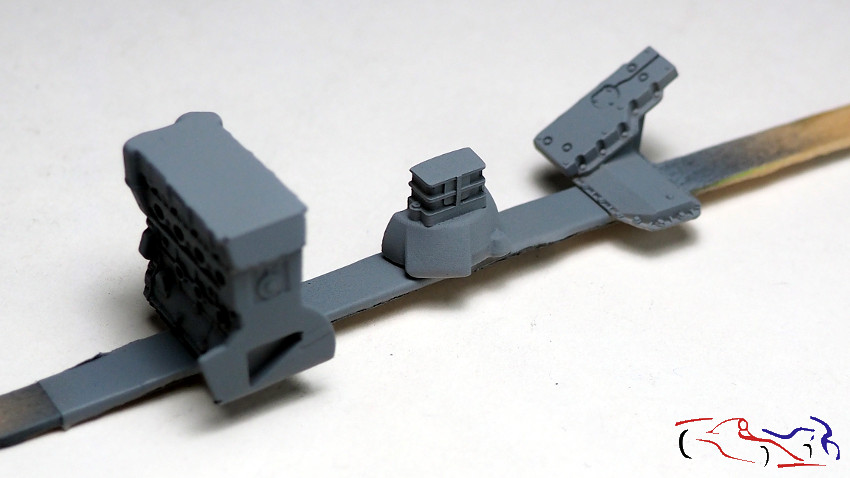
Otras piezas que imprimé del motor fueron las siguientes: el bloque, la conexión a la caja de cmabios y la tapa inferior, unas vez lijadas las bases por donde se unen, ya que cualquier parecido con una unión perfecta es pura imaginación.
Other parts of the engine that I printed were the following: the block, the connection to the gearbox and the lower cover, once the bases where they join were sanded, since any resemblance to a perfect union is pure imagination.
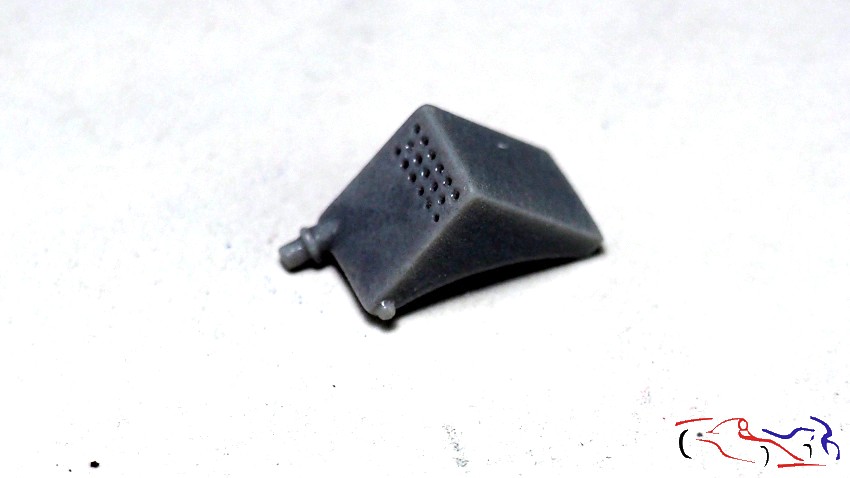
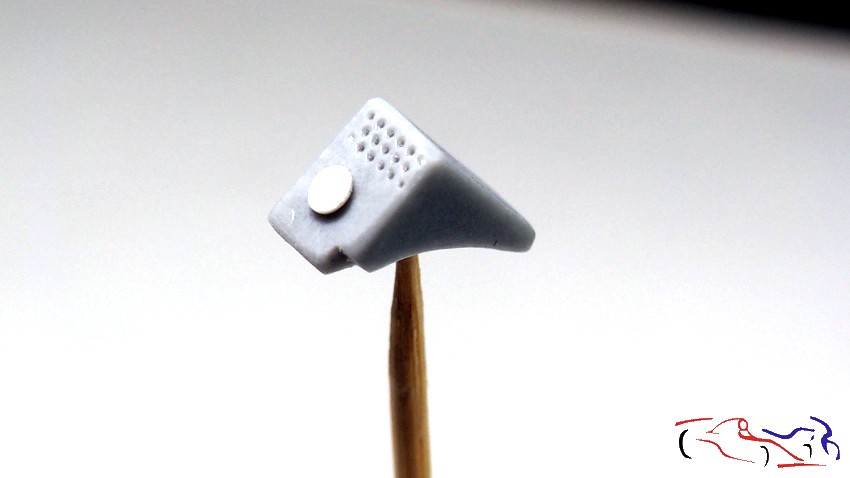
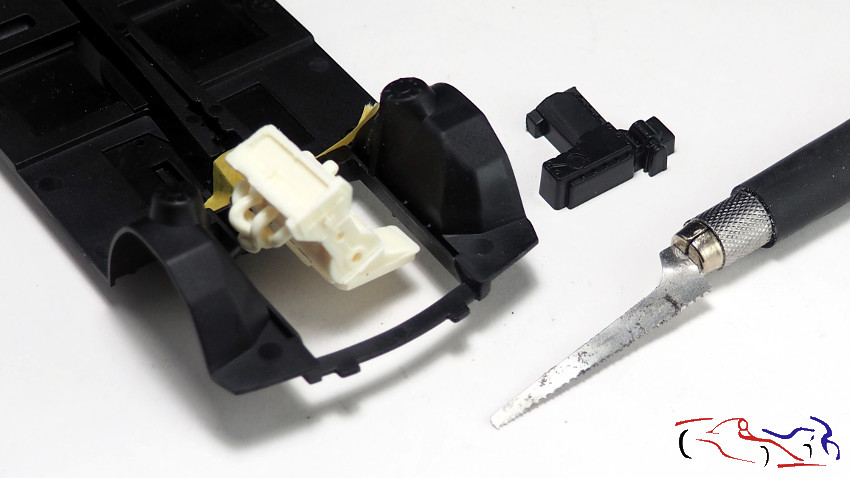
Otra pieza del motor que ya he modificado es este depósito, que le he cambiado el lugae de la toma y le he puesto un tapón de llenado. Esta pieza está a falta de imprimar.
Another part of the engine that I have already modified is this tank, which I have changed the location of the intake and I have put a filler cap on. This part is still waiting to be primed.
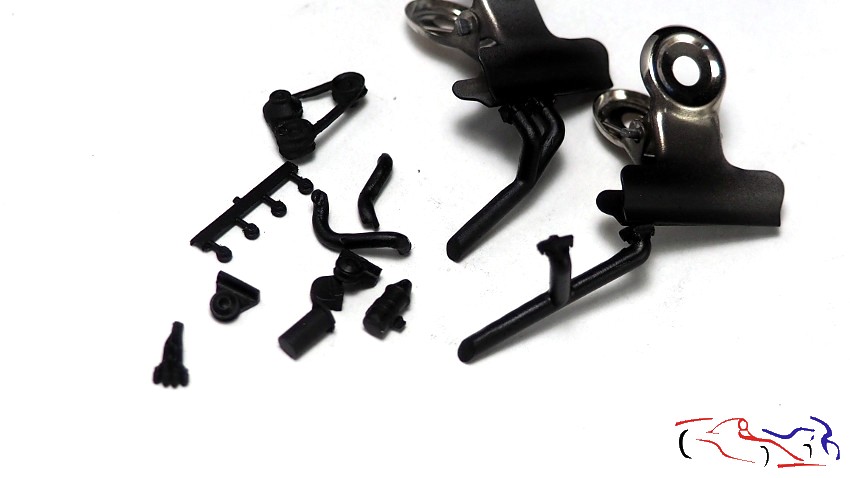
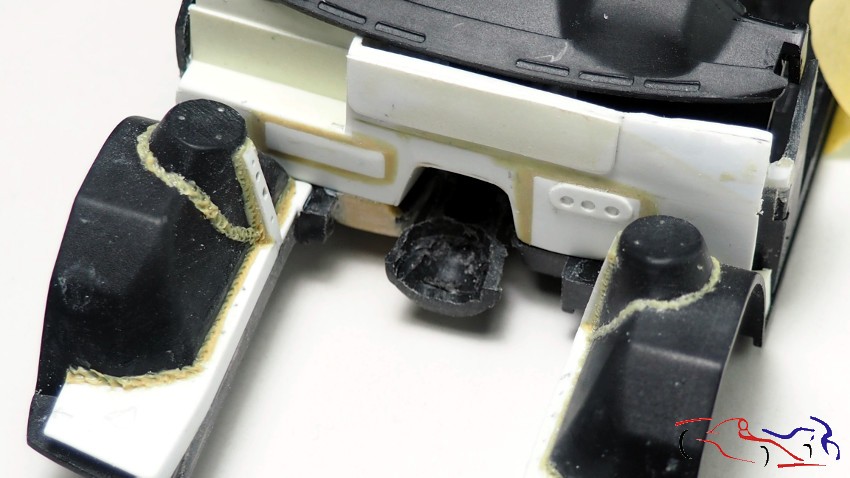
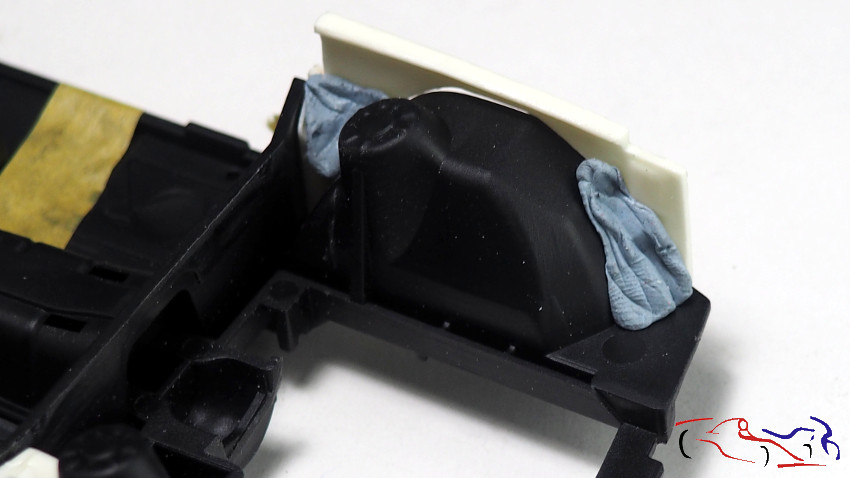
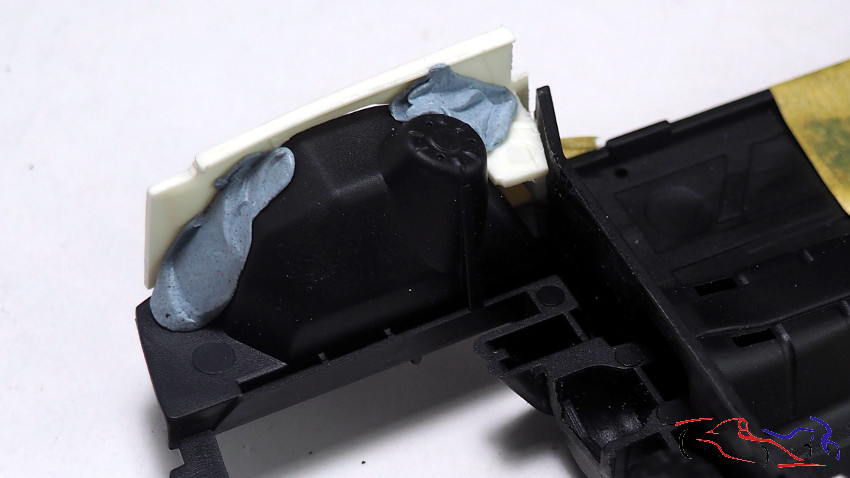
En el proceso del cortafuegos, habési visto que hice 3 agujeros para las bombas de freno y embrague. Pues en esos agujeros irán estas tres bombas, que aquí las veis imprimadas, realizadas por Decalcas.
During the firewall process, you have seen that I made 3 holes for the brake and clutch pumps. Well, these three pumps will go in these holes, which you can see here primed, made by Decalcas.
Al imprimar, también lo hice con la cuna del cockpit para ver el resultado de eliminar el cableado existente del kit. En la siguientes fotos, vemos que hay que trabajar más esas partes con masilla y putty:
When priming, I also did it with the cockpit cradle to see the result of removing the existing wiring from the kit. In the following photos, we see that those parts need more work with putty:
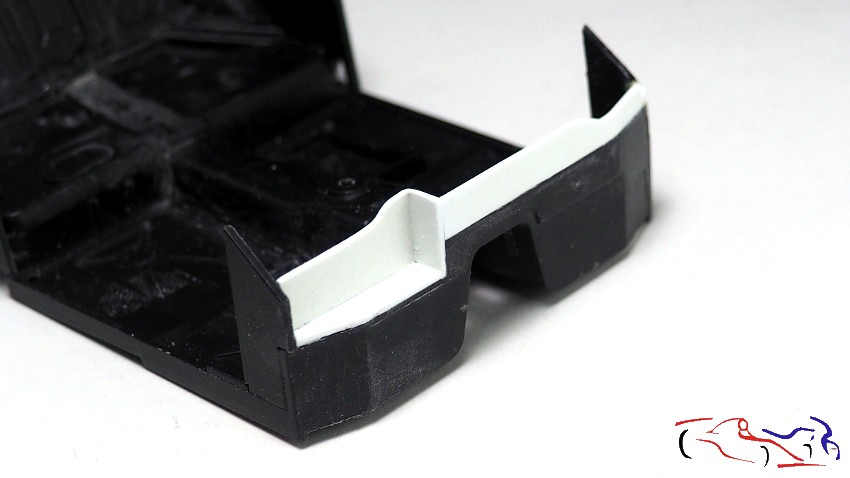
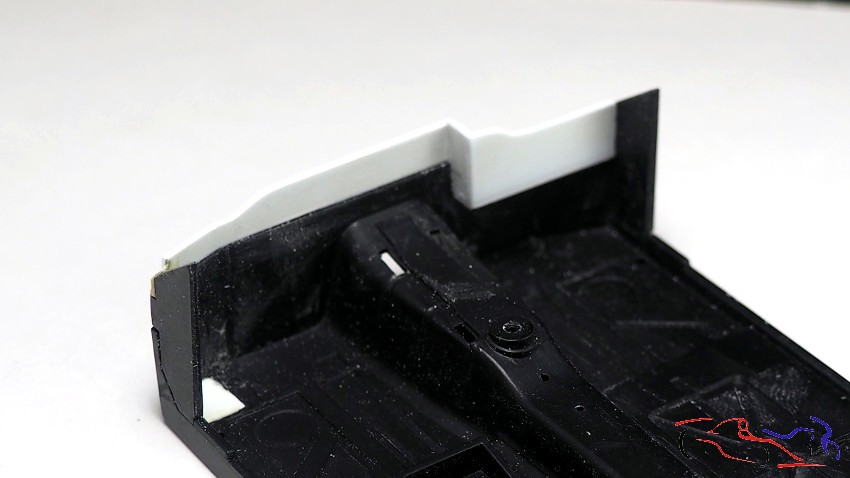
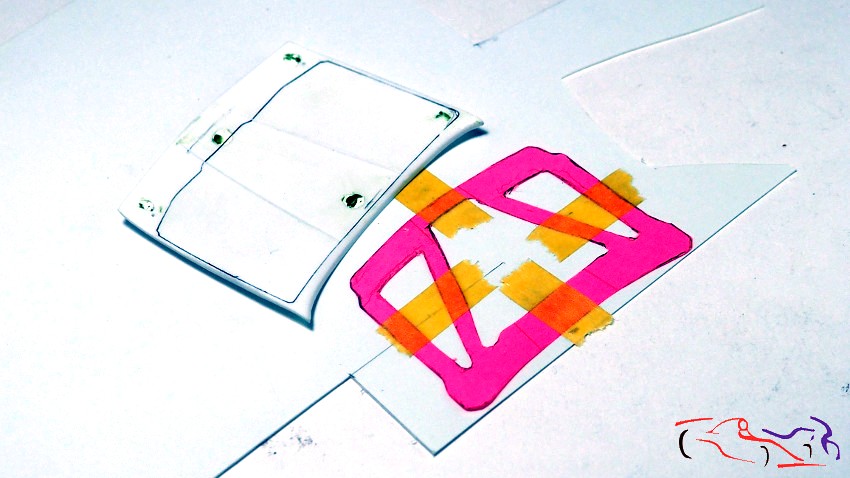
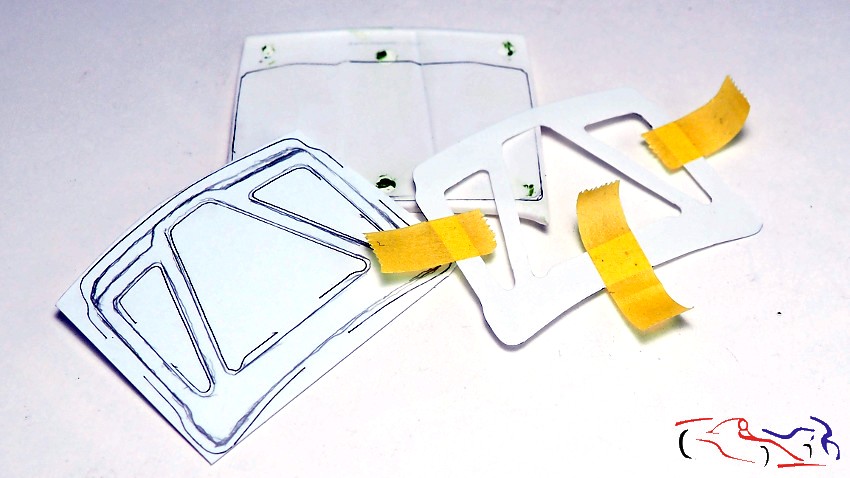
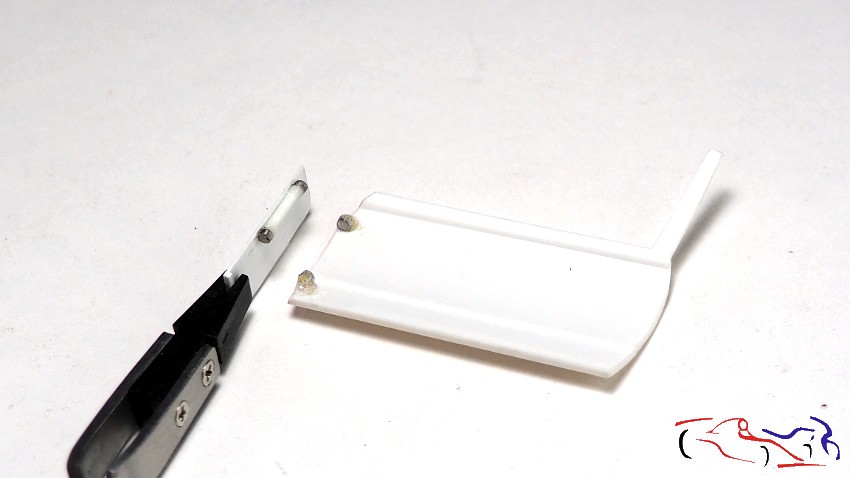
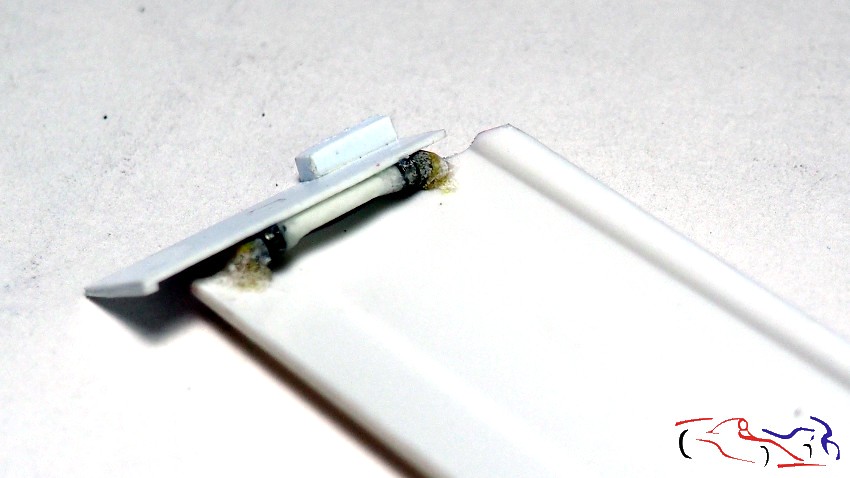
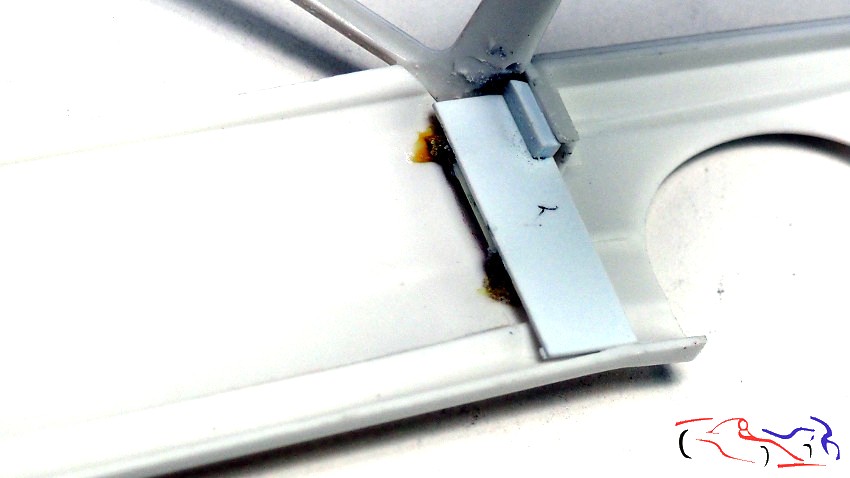
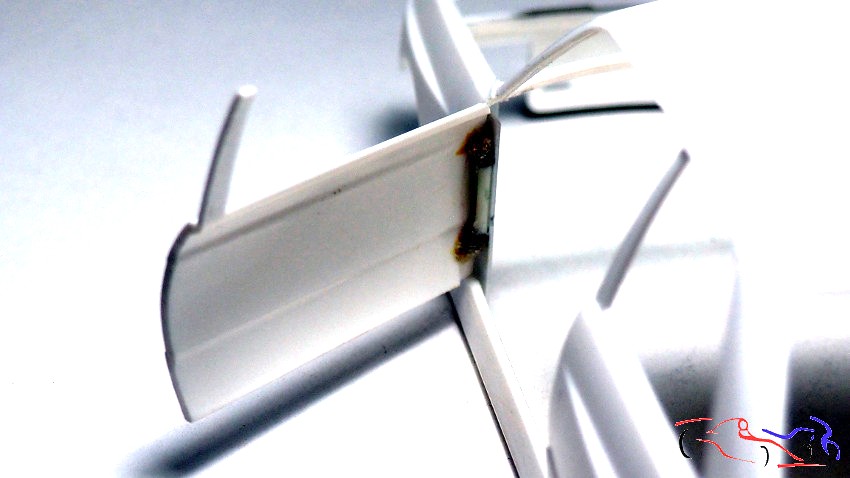
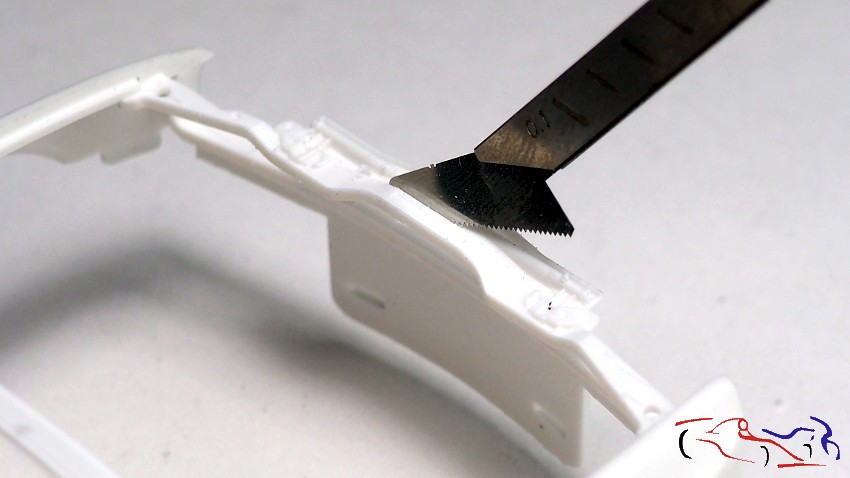
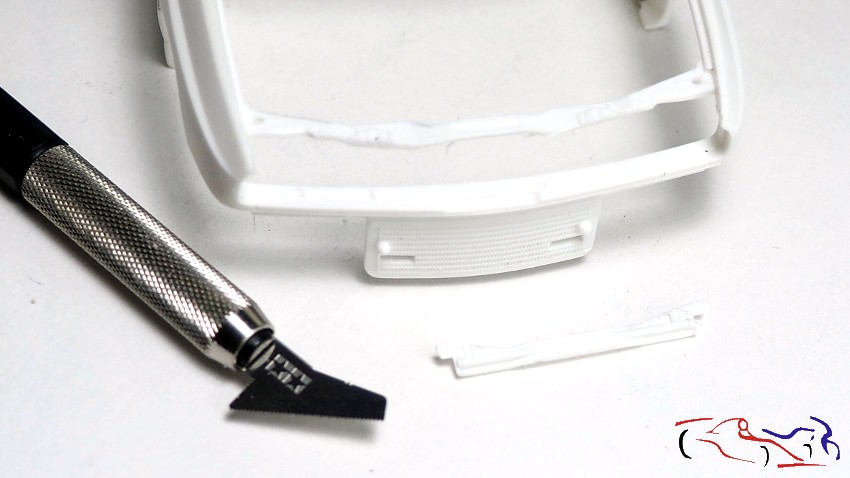
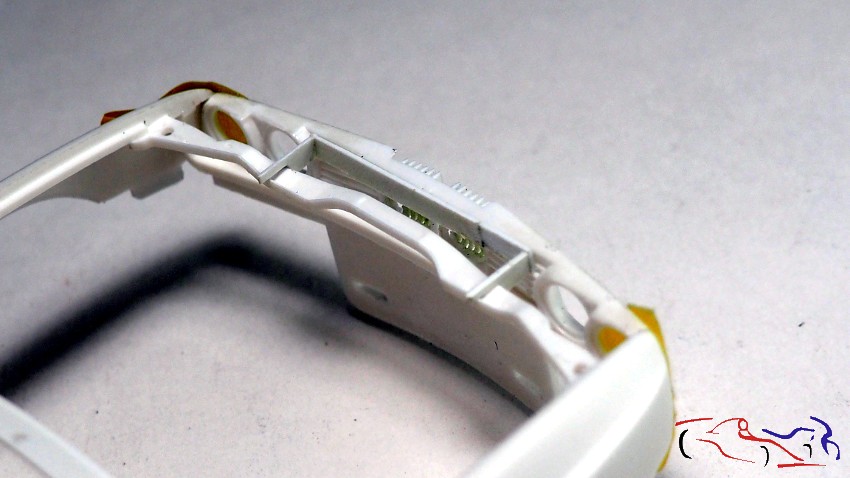
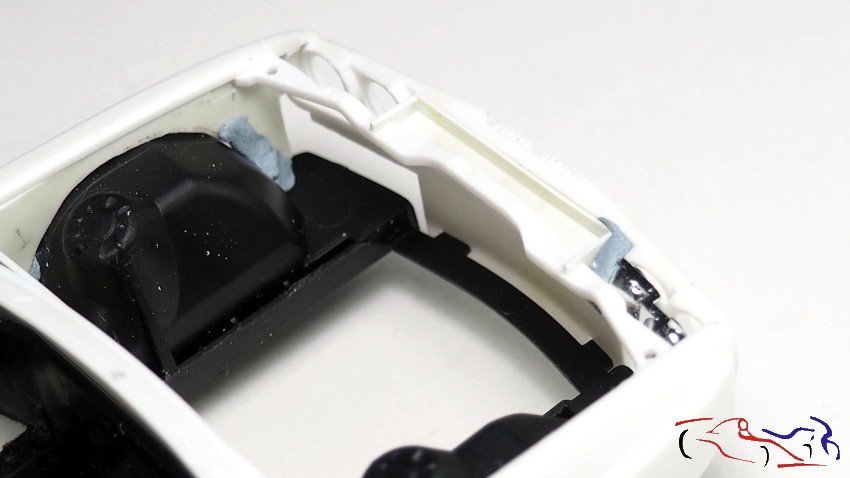
Todo el proceso anterior del vano del motor lo comencé con vistas a hacer las bisagras del capó, como hice con las puertas, y así meterme de lleno con el interior de la carrocería. Y una parte imprescindible para hacer las bisgaras del capó es el entramado de nervios que tiene el capó por debajo, y que influyen en la altura de la posición de dichas bisagras. Por tanto, he empezado a gestionarlo. Lo primero, es un dibujo en cartulina, que trasbaso a una lámina de o,3mm (primera foto), para psoteriormente, traspasarlo a otra de 0,5mm que irá por encima de la anterior, pero un poco más pequeña. En cuanto acabe con el vano motor, seguiré con esta pieza.
I started the whole previous process of the engine compartment with a view to making the bonnet hinges, as I did with the doors, and thus fully immerse myself in the interior of the body. And an essential part to make the bonnet hinges is the network of ribs that the bonnet has underneath, and that influences the height of the position of said hinges. Therefore, I have started to manage it. The first thing is a drawing on cardboard, which I transfer to a sheet of 0.3mm (first photo), to later transfer it to another of 0.5mm that will go above the previous one, but a little smaller. As soon as I finish with the engine compartment, I will continue with this piece.
Espero que os haya gustado. Gracias por ver y comentar!!
I hope you liked it. Thanks for watching and commenting!!
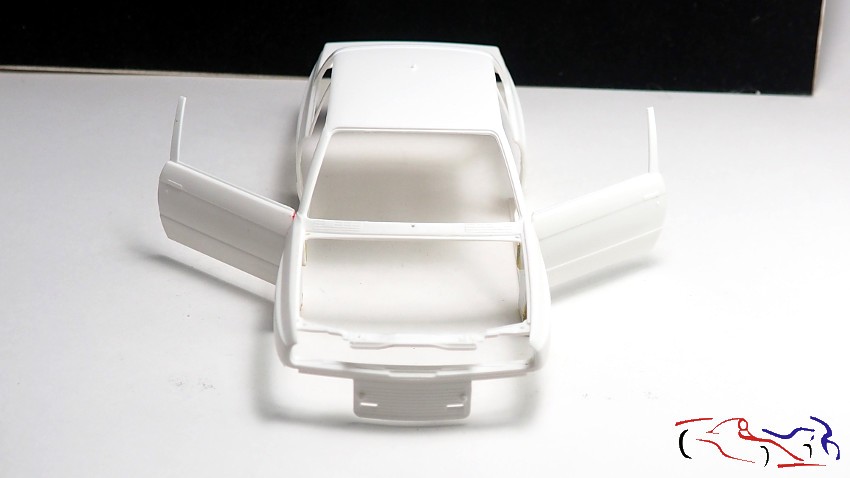
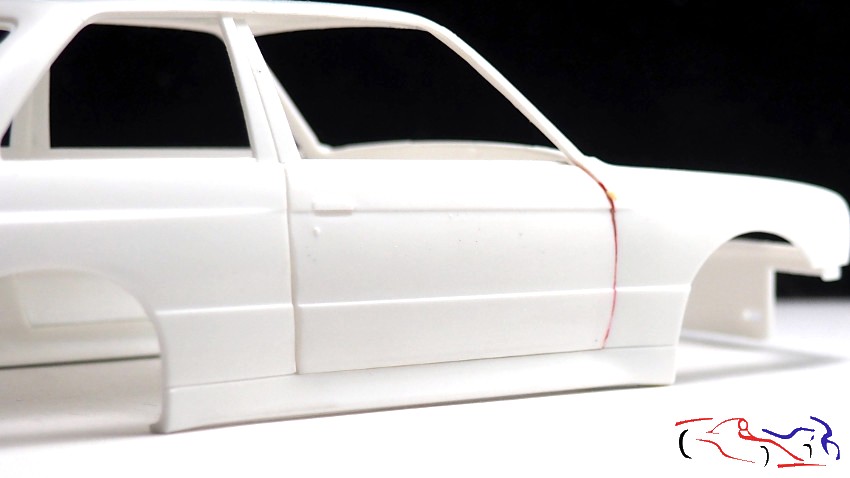
Segunda entrada de este proyecto, y seguimos con las puertas, y su mecanismo. Una vez la puertas están recortadas de la carrocería, tenemos que adelgazar el borde delantero de la carrocería donde la puerta bascula. Para ello, pinto el borde con rotulador permanente para saber donde tengo que adelgazar. En la foto, veis que la parte superior, ya está más delgada, trabajo que hice con el minitaladro de Dspiae. Ahora queda el resto y la parte correspondiente a la otra puerta.
Second entry of this project, and we continue with the doors and their mechanism. Once the doors are cut out of the body, we have to thin the front edge of the body where the door swings. To do this, I paint the edge with a permanent marker to know where I have to thin. In the photo, you can see that the upper part is already thinner, work that I did with the Dspiae mini drill. Now the rest remains and the part corresponding to the other door.
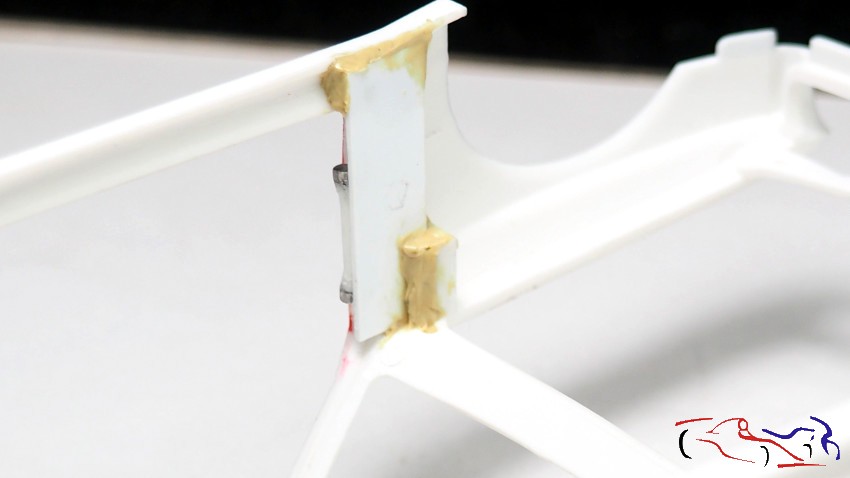
Y ahora vamos con las bisagras. Un problema que existe al analizar el tema de las bisagras, es crearlo todo de tal modo, que se puedan tratar por separado la carroceria y las puertas, y despues colocarlas. Y de ese modo, se utilizan varillas que se insertan en tubos, o imanes, que son los que he decidio usar para este modelo. En mi caso, el interior de la carrocería tiene hueco para un rectágulo de plástico, donde poner un redondo y en sus extremos dos imanes. Y en la puerta, se fijan otros dos imanes colocados a la altura de los anteriores.
And now we come to the hinges. One problem that exists when analyzing the subject of hinges is to create everything in such a way that the body and the doors can be treated separately, and then placed. And so, rods are used that are inserted into tubes, or magnets, which are the ones I have decided to use for this model. In my case, the inside of the body has space for a plastic rectangle, where to put a round one and at its ends two magnets. And on the door, two other magnets are fixed placed at the same height as the previous ones.
Para colocarlos en su posición, primero pego el plastico con el redondo, que ya tiene sus dos imanes en los extremos, y los otros dos imanes que irán pegados a la puerta. Colocamos la puerta y la fijamos con cinta de enmascarar. Y entonces, por dentro de la carrocería, pegamos los dos imanes de la puerta con cuidado de no pegar los otros imanes: solo los de la puerta. Y en este caso, he utilizado masilla epoxi. Y con eso, ya podemos abrir y cerrar la puerta.
To put them in position, I first glue the plastic with the round one, which already has its two magnets at the ends, and the other two magnets that will be glued to the door. We place the door and secure it with masking tape. And then, inside the body, we glue the two door magnets, being careful not to glue the other magnets: only those of the door. And in this case, I have used epoxy putty. And with that, we can now open and close the door.
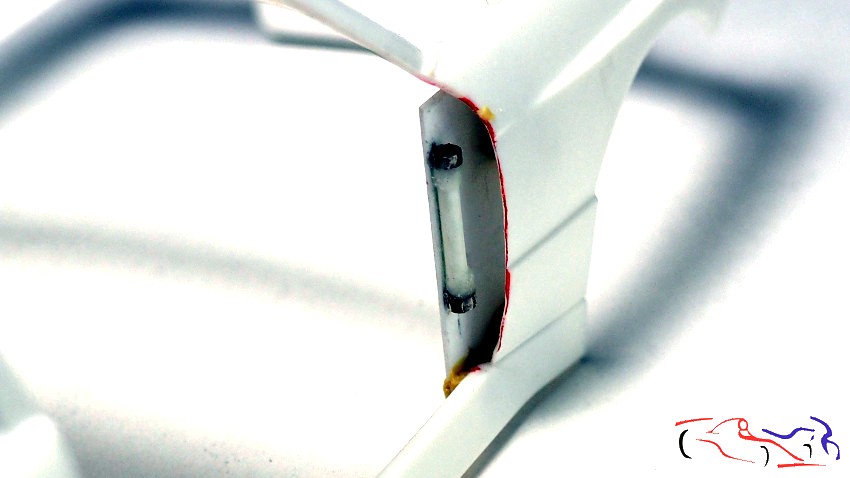
Pero hay que asegurar esas uniones y la pieza extra, para que se pueda extraer la puerta sin problema. Para ello utilizo epoxi para la pieza pegada a la carrocería, y para los imanes, ciano con bicarbonato (pongo ciano y después bicarbonato, asi varia veces), limando y ajustando despues con lima y lija en ambos casos:
But you have to secure these joints and the extra piece, so that the door can be removed without any problem. To do this I use epoxy for the piece glued to the body, and for the magnets, cyano with bicarbonate (I put cyano and then bicarbonate, so it varies from time to time), filing and adjusting afterwards with a file and sandpaper in both cases:
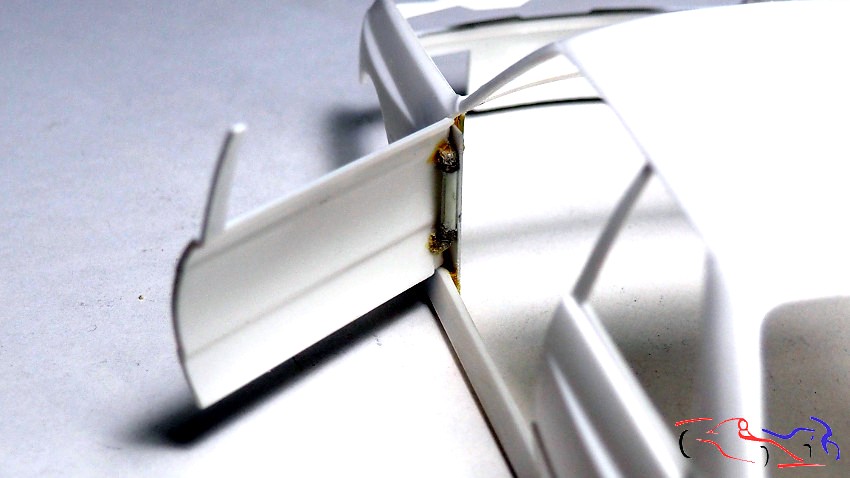
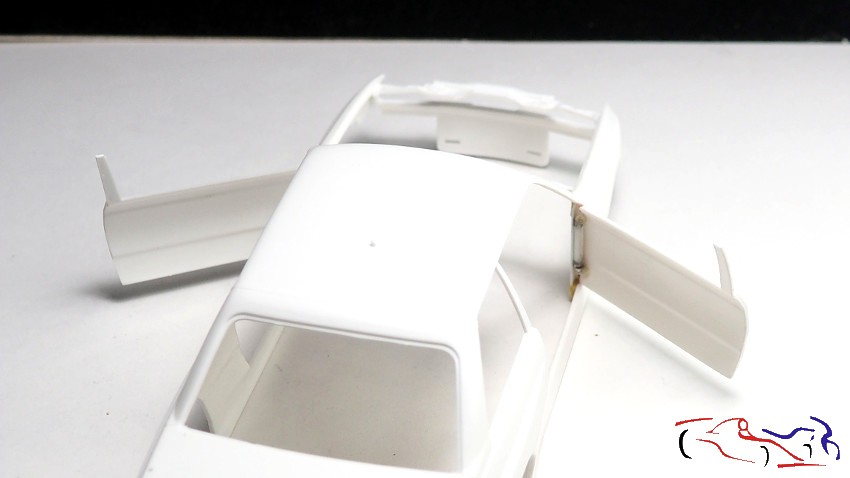
De esta forma podremos abrir y cerrar las puertas sin problema. Más adelante, cuando haga el interior de las puertas, pondré otro imán para que cirren en su posición y no se abran solas.
This way we can open and close the doors without any problem. Later, when I do the inside of the doors, I will put another magnet so that they close in their position and do not open by themselves.
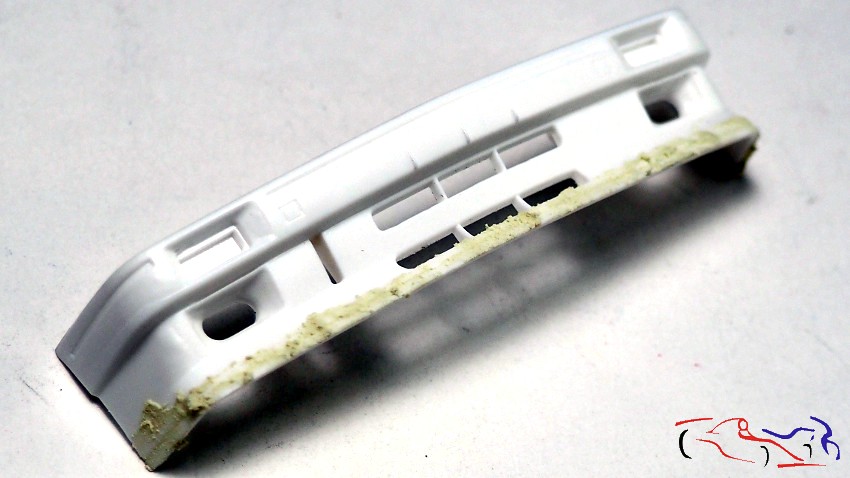
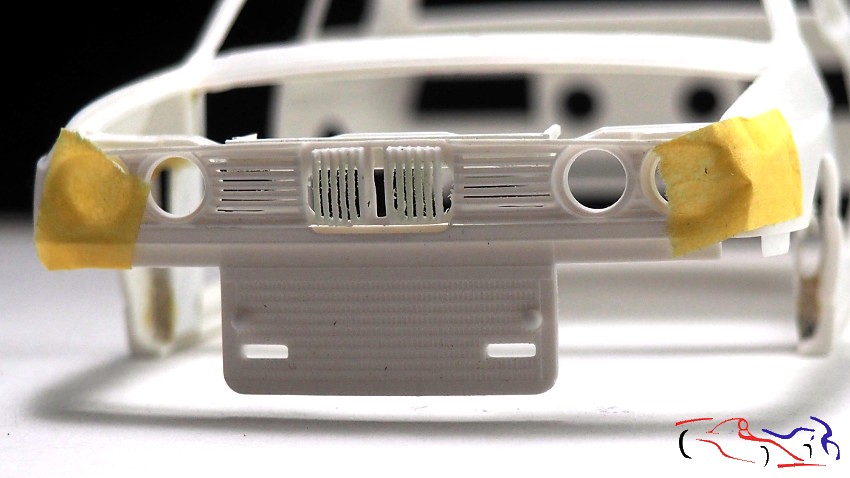
Continuaremos más adelante con las puertas, y mientras tanto, trabajamos otras partes del kit. En este caso, el paragolpes delantero. que tiene una muesca en la parte inferior, y que tapamos con putty de poliester:
We will continue later with the doors, and in the meantime, we will work on other parts of the kit. In this case, the front bumper, which has a notch at the bottom, and which we cover with polyester putty:
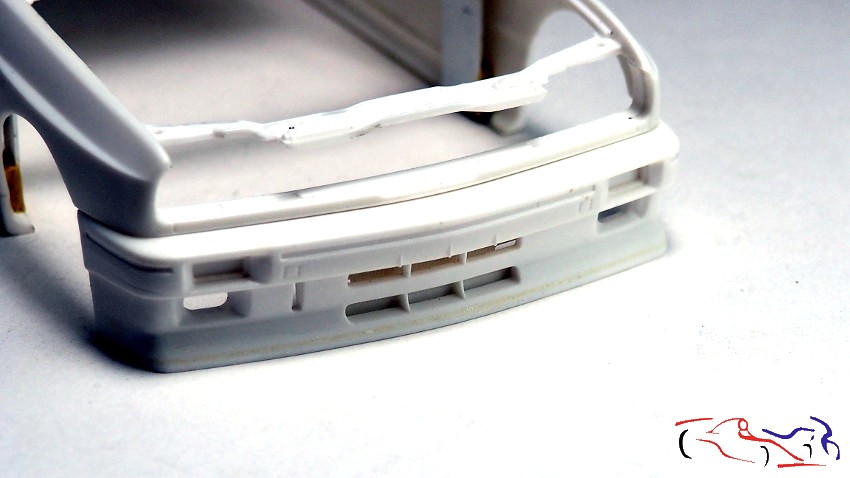
Y ya que estamos por esa parte delantera, vamos a modificar el tirante delanteros para colocar el sistema de apertura del capó. Basándonos en los trabajos de mi amigo Borja, y con la ayuda de una sierra de Tamiya, cortamos la parte delantera, colocando en su sitio, una plancha con laterales a modo de caja, donde irá el sistema de giro del capó.
And since we are on the front part, we are going to modify the front strut to place the hood opening system. Based on the work of my friend Borja, and with the help of a Tamiya saw, we cut the front part, placing in its place a plate with sides like a box, where the hood turning system will go.
Y un poco más abajo, le abrimos lo huecos verticales de los riñones, lijando la parte de detrás con el minitaladro, y afinando después con limas. Deciros que uan falta afinar dichas aberturas:
And a little further down, we open the vertical spaces of the kidneys, sanding the back part with the mini drill, and then refining with files. I tell you that these openings need to be refined:
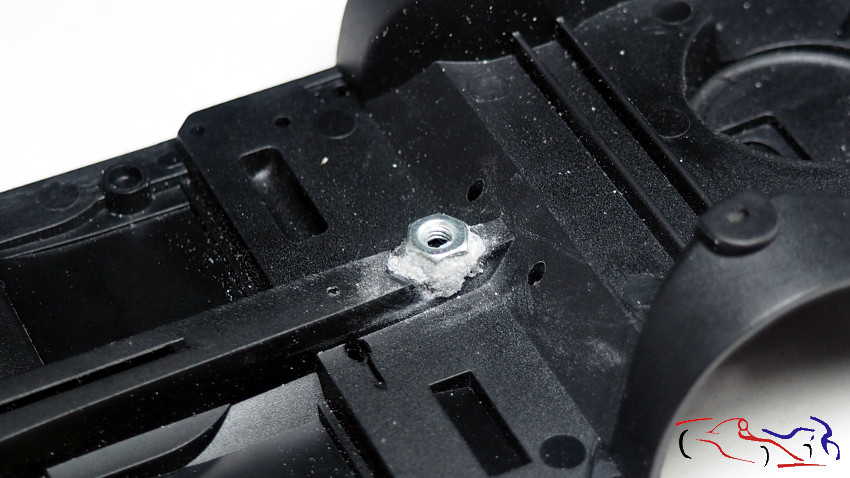
Otra tarea que hago siempre: buscar un lugar dond eponer la tuerca que fijará la maqueta a la base de la urna, pegada con ciano y bicarbonato, en un lugar donde no molesta y que no se ve:
Another task that I always do: find a place to put the nut that will fix the model to the base of the urn, glued with cyano and bicarbonate, in a place where it does not get in the way and cannot be seen:
Pasamos al habitáculo, cortando los laterales de la puertas y pegando el resto al cockpit. También he eliminado tanto el apoyo del pie izquierdo (tapado con una trooz de plástico blanco) como los cales que van a lo largo de la parte central del cockpit.
Moving on to the passenger compartment, cutting the sides of the doors and gluing the rest to the cockpit. I have also removed both the left footrest (covered with a piece of white plastic) and the rails that run along the central part of the cockpit.
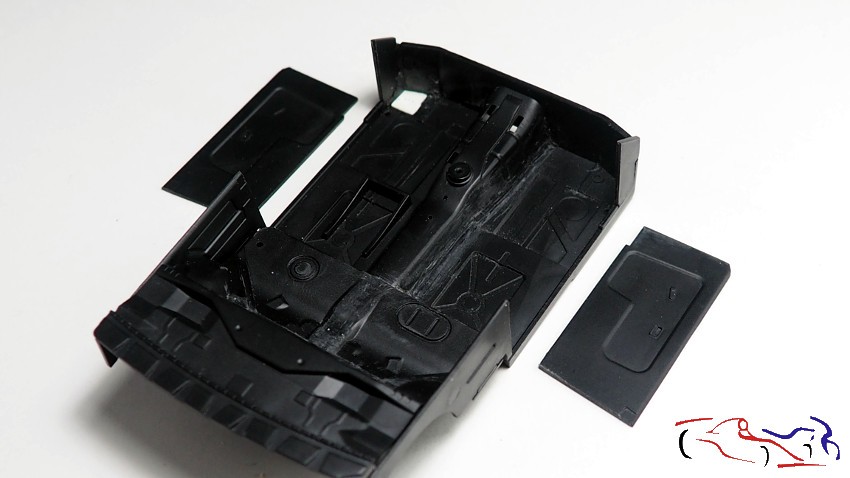
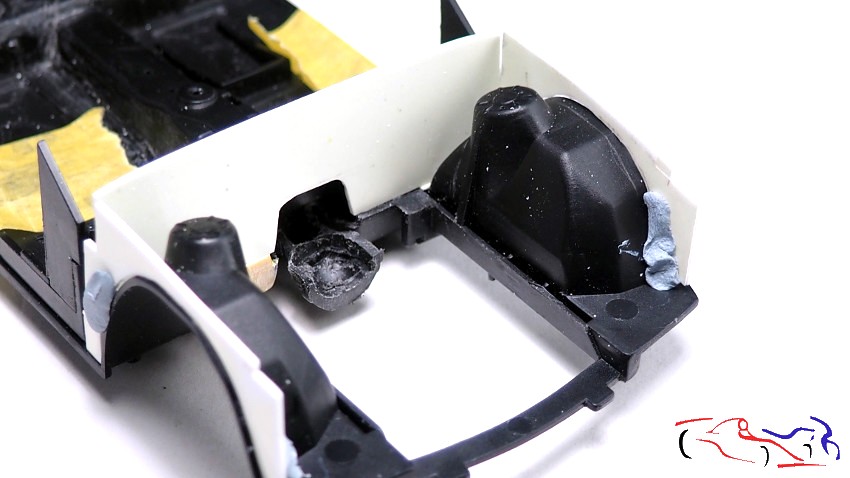
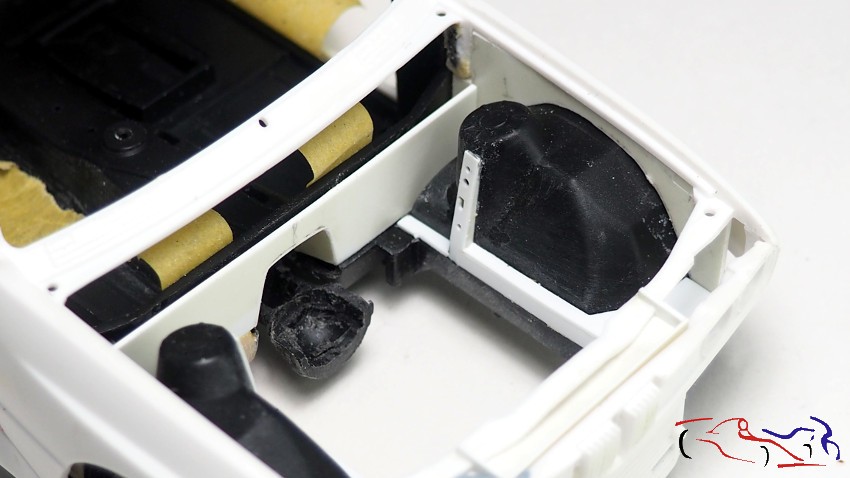
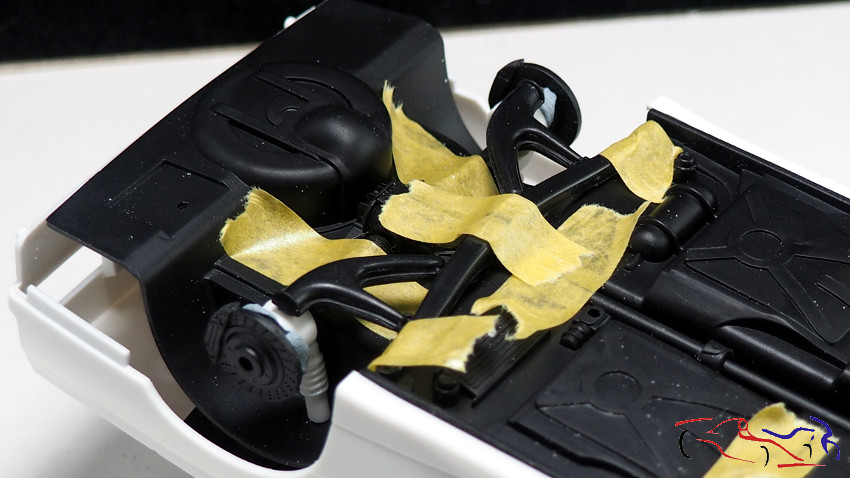
Y nos vamos hacia el hueco del motor, y su adaptación para incluir el motor. Deciros que de nuevo, la valiosa ayuda de Borja con su trabajo en otro BMW M3 ha sido fundamental para que yo pueda ir haciendo todo ésto. Ya tenemos el cortafuegos en su estado inicial, y los laterales, que son copiados de los que trae el TK del motor. Los prefijamso con Bluetack para comprobar su encaje.
And now we move on to the engine bay, and its adaptation to include the engine. I must say that once again, Borja’s valuable help with his work on another BMW M3 has been fundamental for me to be able to do all this. We already have the firewall in its initial state, and the side panels, which are copied from those that come with the engine TK. We pre-fixed them with Bluetack to check their fit.
EN los laterales del vano motor, eliminamos los refuerzos que trae de origen, creamos unos más adecuados, y subimos los laterales pegando unas tiras como base, para ponerle después una plancha por encima. Se lija todo para que cuadre todo lo añadido:
On the sides of the engine compartment, we remove the original reinforcements, create more suitable ones, and raise the sides by gluing some strips as a base, to then put a sheet of metal on top. Everything is sanded so that everything added fits:
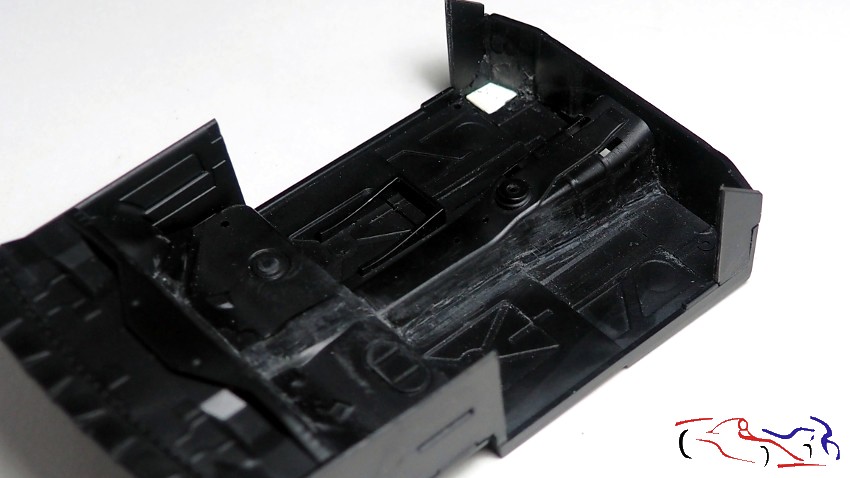
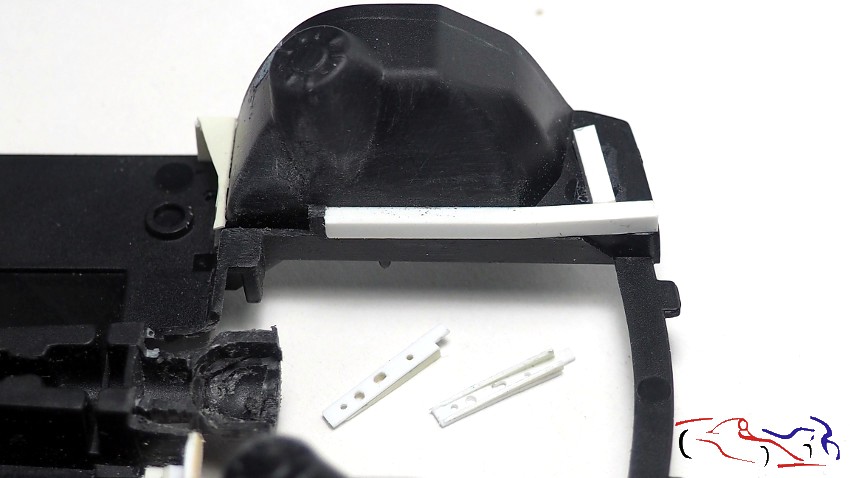
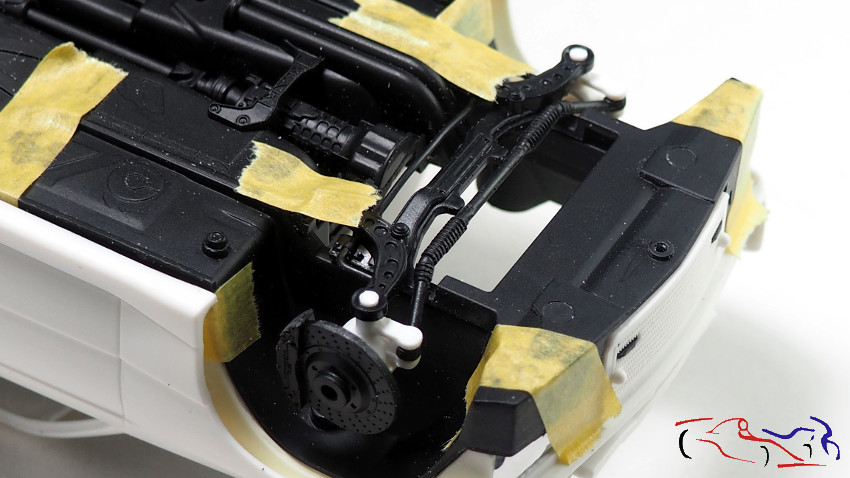
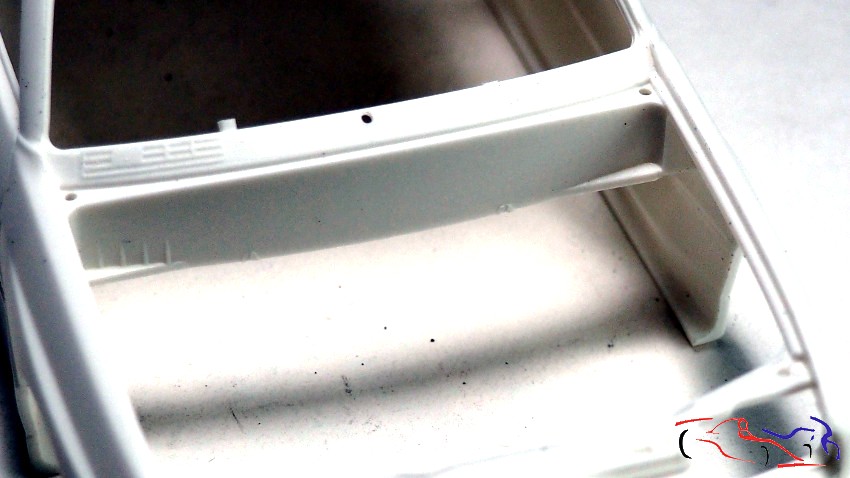
Y ponemos la carrocería para ver como cuadra todo. Al mismo tiempo, le recorto la parte de arriba al cortafuegos para adaptarlo a la carrocería, ya que no es un plano recto, sino que se va redondeando hacia detrás, por debajp del parabrisas. Y ese cortafuegos, tambien tiene alargado el tunel de la caja de cambios, como hizo Borja en su BMW:
And we put the bodywork in place to see how everything fits. At the same time, I cut the top part of the firewall to adapt it to the bodywork, since it is not a straight plane, but rather it rounds towards the back, below the windshield. And that firewall also has the gearbox tunnel elongated, as Borja did in his BMW:
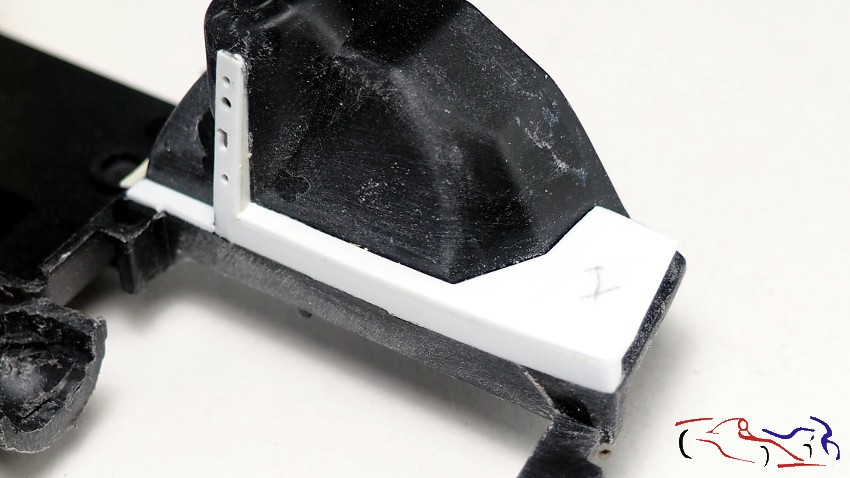
Por ultimo, y como paso previo a crear el armazón inferior del capó, relleno con masillas y lijo, los huecos que tiene:
Finally, and as a preliminary step to creating the lower frame of the hood, I filled the gaps with putty and sanded:
Aun necesita mucho trabajo, pero con la ayuda de Borja, que ha ido pensando y haciéndolo, es todo mucho más fácil, y rápido!! Gracias por ver y comentar!!
It still needs a lot of work, but with the help of Borja, who has been thinking and doing it, everything is much easier and faster!! Thanks for watching and commenting!!
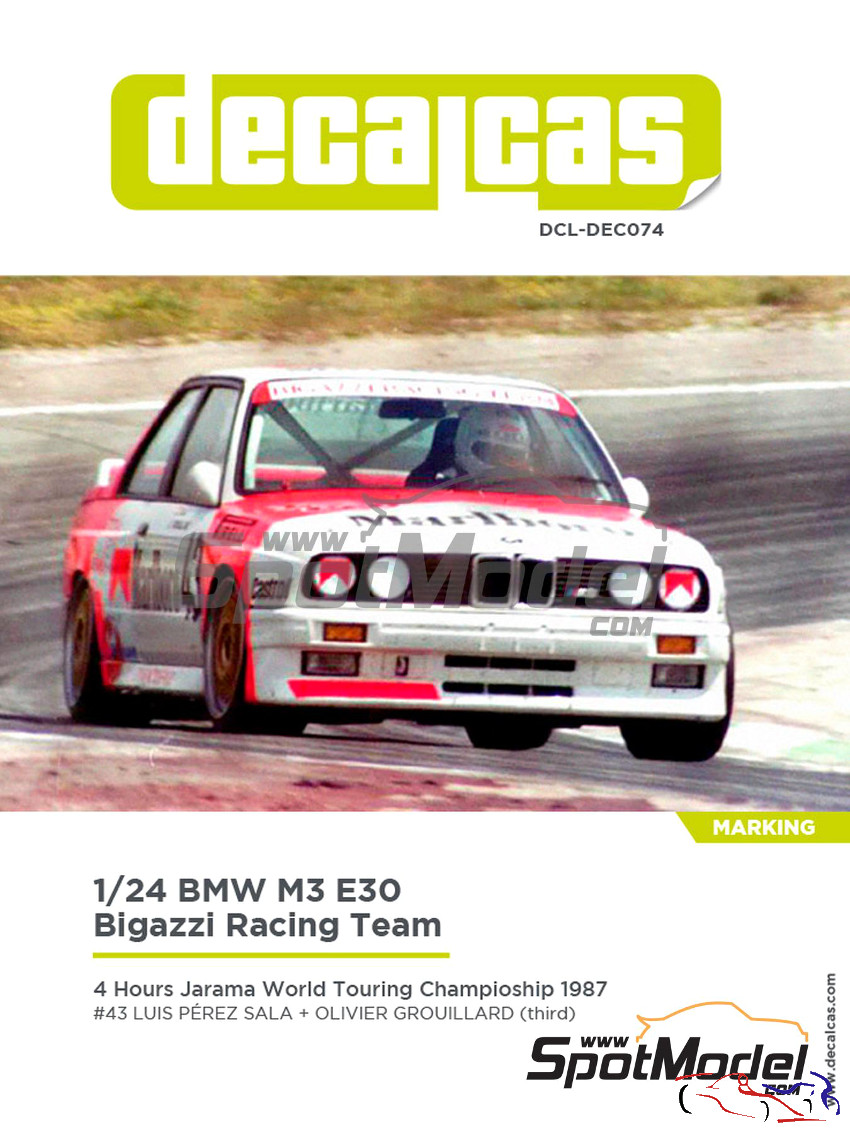
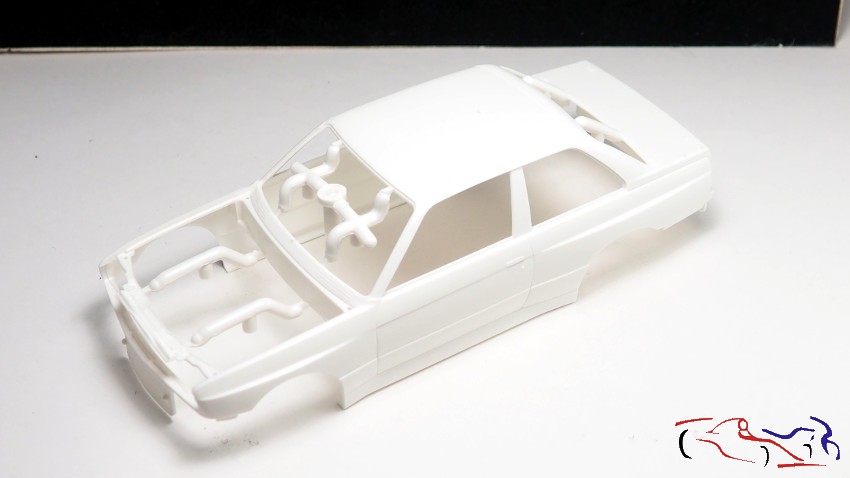
Empezamos un nuevo proyecto, que como últimamente, no me quedo quieto y tengo que hacerle algo más!! EN este caso, voy a realizar el BMW M3 E30 patrocinado por Marlboro, en manos de Luis Perez Sala y Olivier Groulliard, en las 4 horas del Jarama de 1987, valedero para el campeonato Mundial de Turismos, y que tuve la suerte de preseciar en vivo. De hecho, la foto que utiliza Decalcas para las calcas, la hice yo ese dia. Ya demás de las calcas, utilizaré los fotograbados de Beemax, las llantas BBS de Scale Production, las mascaras de los cristales de Decalcas, el motor de Scalwe Production, y el libro de Komakai. Decir, que también tengo la ayuda de los paso a paso que está haciendo mi amigo Borja al construir su M3, pero, no voy a llegar a su altura de detalles, que aun, tengo que mejorar mucho mucho para estar a su nivel!!
We started a new project, which like lately, I can’t sit still and I have to do something else!! IN this case, I am going to make the BMW M3 E30 sponsored by Marlboro, in the hands of Luis Perez Sala and Olivier Groulliard, in the 1987 Jarama 4 Hours, valid for the World Touring Car Championship, and which I was lucky enough to witness in alive. In fact, the photo that Decalcas uses for the decals was taken by me that day. In addition to the decals, I will use the photo-etched parts from Beemax, the BBS wheels from Scale Production, the glass masks from Decalcas, the engine from Scalwe Production, and the book from Komakai. To say, I also have the help of the step by step that my friend Borja is doing when building his M3, but I am not going to reach his height of details, I still have to improve a lot to be at his level!!
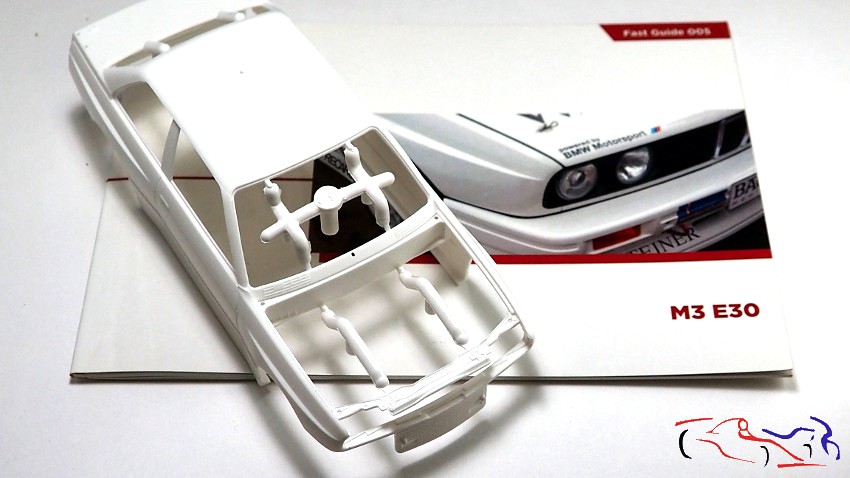
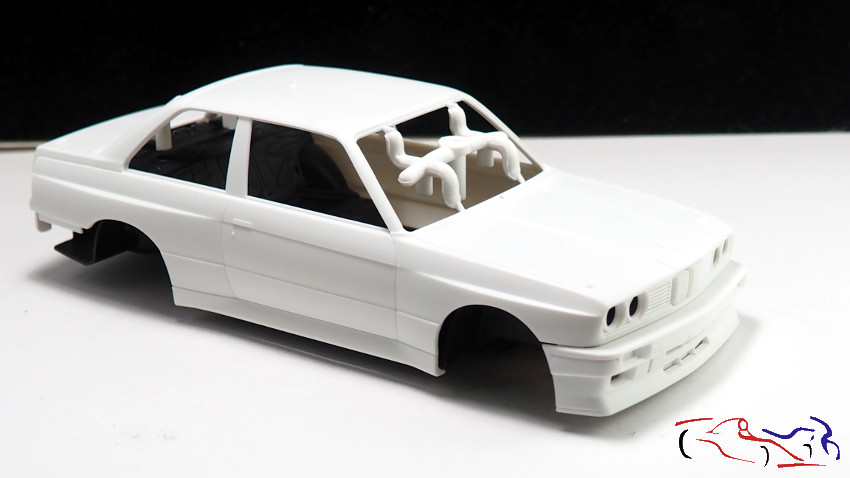
Y esta es la carrocería, con el capó delantero abierto de serie:
And this is the body, with the front hood open as standard:
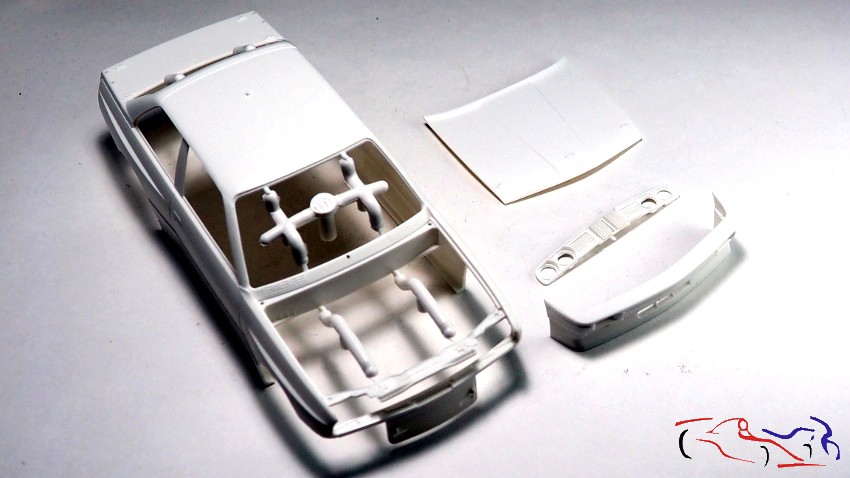
Un poco más del despiece del kit:
A little more about the kit breakdown:
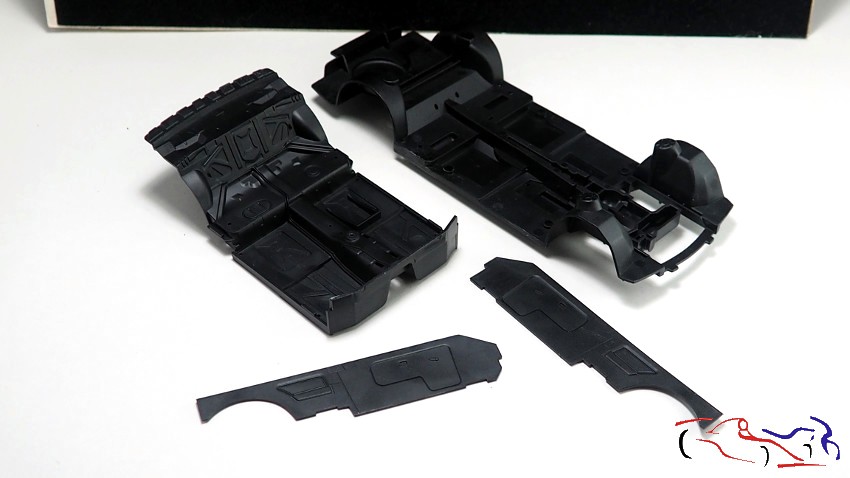
Y empezamos mostrando los paneles laterales del capó, que vienen con el motor. Y al mismo tiempo, voy eliminando lo que sobra del chasis para adaptar el motor.
And we start by showing the side panels of the hood, which come with the engine. And at the same time, I am eliminating what is left over from the chassis to adapt the engine.
Hacemos los test de los ejes trasero y delantero:
We do the tests of the rear and front axles:
También, eliminamos el cortafuegos superior que va unido a la carrocería. Este lo haré fijado en el chasis, para colocar toda la piecería que tiene éste:
Also, we eliminated the upper firewall that is attached to the body. I will fix this on the chassis, to place all the hardware that this one has:
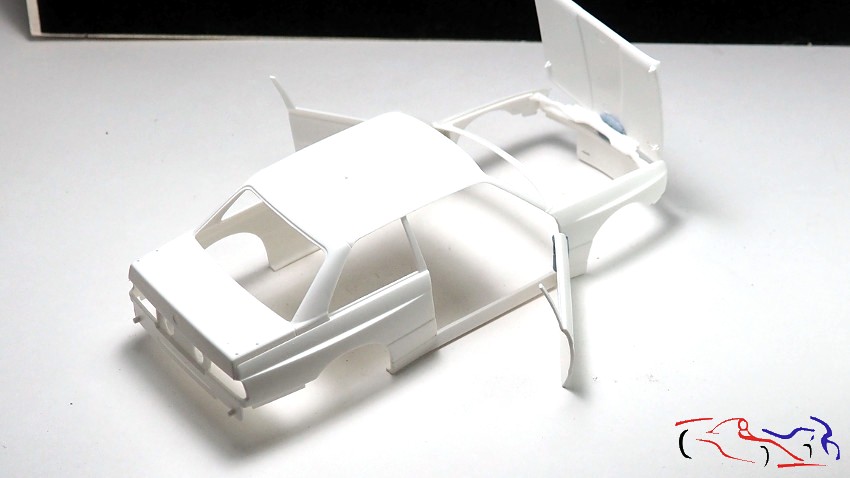
Y como dije que no me quedo quieto, ahí tengo las máuinas para abrir partes del plástico: las puertas!!
And as I said, I can’t sit still, I have the machines there to open parts of the plastic: the doors!!
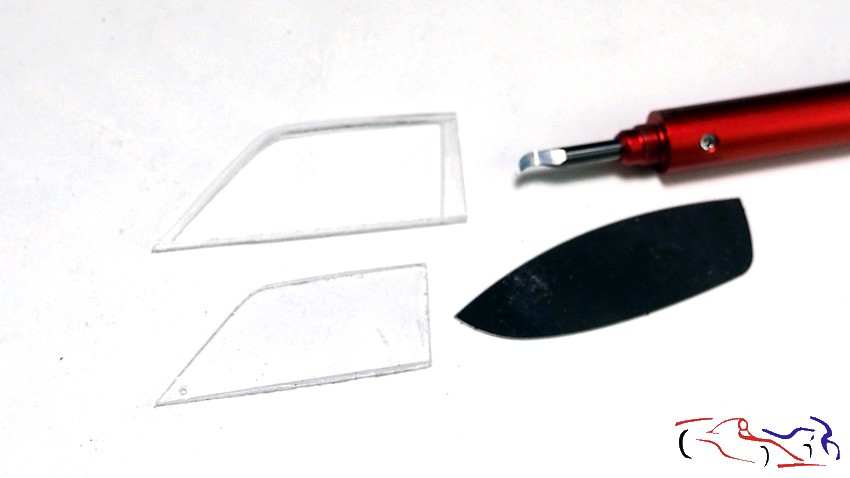
Y lógicamente, también tengo que dividir los cristales, y al ver como queda, aquí tenemos el primer inconveniente: el cristal se abre por el pilar delantero, por lo que decido eliminar el cristal propiamiente dicho del marco, para fijar el marco a la puerta, y hacer el cristal más adelante de acetato:
And logically, I also have to divide the glass, and seeing how it looks, here we have the first problem: the glass opens through the front pillar, so I decide to eliminate the glass itself from the frame, to fix the frame to the door , and make the glass later from acetate:
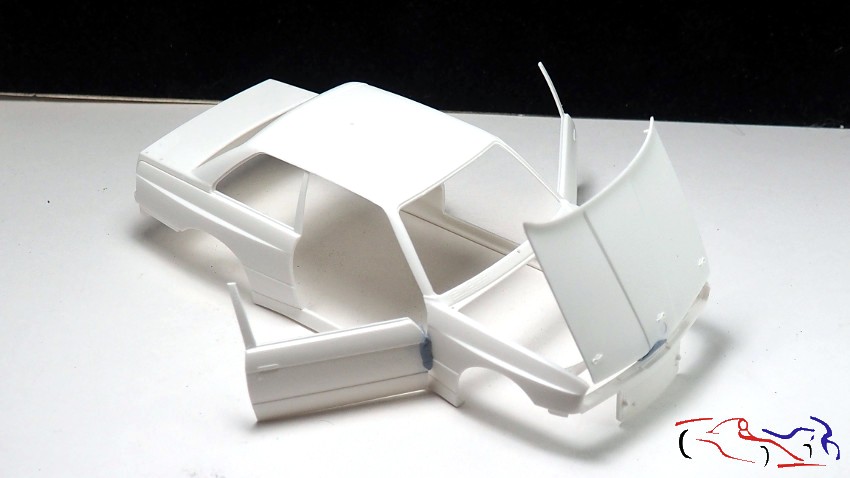
Y este es el objetivo!!
And this is the goal!!
Espero que todo vaya bien!! Gracias por ver y comentar!!
Hope everything goes well!! Thanks for viewing and commenting!!
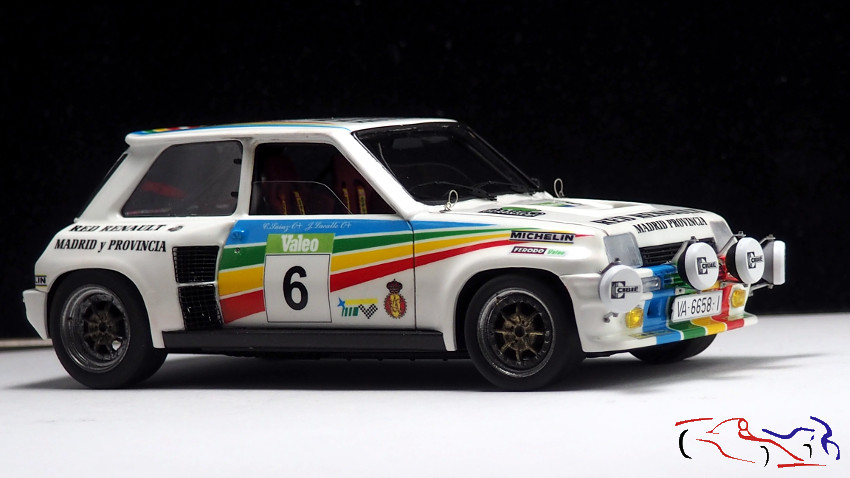
Y llegamos al final! Después de 11 años con paradas grandes donde tomar decisiones o buscar materiales, este proyecto llega a su fin!! Y como siempre, mi valoración:
And we reach the end! After 11 years with big stops to make decisions or look for materials, this project comes to an end!! And as always, my assessment:
Empecemos por el kit. El kit en si es muy báscio con pocas piezas. Si bien es un kit preparado para ponerle motor, a nivel de chasis deja mucho que desear en cuanto a conjuntos de suspensión, triángulos, ya que el eje trasero es un redondo de metal con una corona para acoplar un motor eléctrico, y en el delantero, tiene lo básico para que las ruedas giren y se muevan a derecha e izquierda. De la carrocería, diré que está bien de formas y los detalles que le hacen ser más real los eliminé, como son los intermitentes, luces de posición, antinieblas y matrícula delantera, que iban integrados para ser pintados, yo hice una copia de los originales con Oyumaru, para eliminarlos y rehacerlos en plástico transparente.
Let’s start with the kit. The kit itself is very basic with few pieces. Although it is a kit prepared to put an engine, at the chassis level it leaves a lot to be desired in terms of suspension sets, triangles, since the rear axle is a round metal one with a crown to attach an electric motor, and on the front , has the basics for the wheels to turn and move right and left. Regarding the bodywork, I will say that it is well shaped and I eliminated the details that make it more real, such as the turn signals, position lights, fog lights and front license plate, which were integrated to be painted, I made a copy of the originals with Oyumaru, to remove them and remake them in transparent plastic.
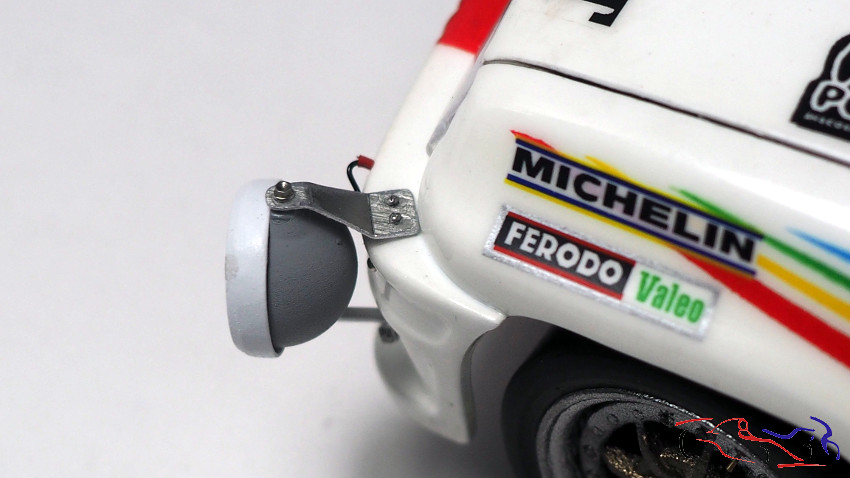
De los extras, utilicé las hojas de fotograbado del Studio27 para este coche y el del Alpine Gr2, eliminando las rejillas de las entradas de aire para sustituirlas por las de los fotograbados. Los faros de largo alcance y cuneteros de DAB Models le van muy bien, habiendo creado las fjaciones, que son muy específicas paar este coche. Y las ruedas, con unas llantas Braid que no son fáciles de conseguir y que un modelista de las Islas Canarias me proporcionó. SIn ellas, no hubiera podido crear este coche. Los asientos también son distintos, proporcionados por la marca Renaissance.
Of the extras, I used the Studio27 photo-etched sheets for this car and the Alpine Gr2, eliminating the air intake grilles to replace them with those from the photo-etched parts. The DAB Models long-range and side-direction headlights fit very well, having created the fixings, which are very specific for this car. And the wheels, with Braid rims that are not easy to find and that a modeler from the Canary Islands provided me. WITHOUT them, I would not have been able to create this car. The seats are also different, provided by the Renaissance brand.
Las Calcas. SI bien partí de una hoja de calcas realizada por KitCar43 en España, decidí pintar las frnajas de colores ya que las calcas no eran muy buenas. Y respecto a los logos algunos me valían y otros no, porque las calcas originales pertenecían a un rally distinto del que yo quería hacer, por lo cual, las encargué a un modelista, que lamentablemente, ya no trabaja. Pintura, laca y pulido, se aplicaron sin mayor problema.
The Calcas. Although I started from a sheet of decals made by KitCar43 in Spain, I decided to paint the stripes in colors since the decals were not very good. And regarding the logos, some worked for me and others didn’t, because the original decals belonged to a rally different from the one I wanted to do, so I ordered them from a modeller, who unfortunately no longer works. Paint, lacquer and polish were applied without any problems.
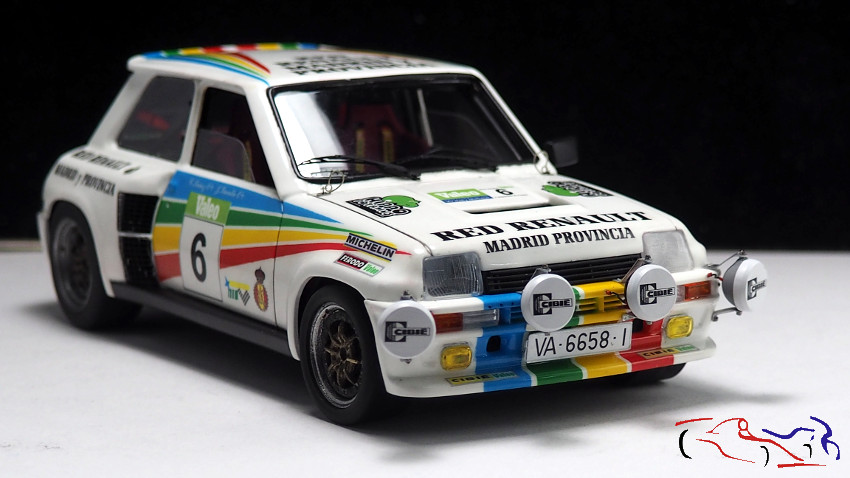
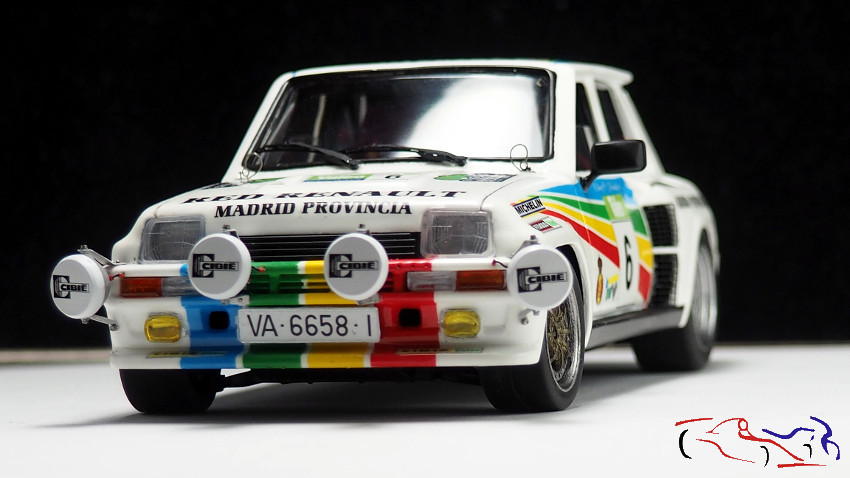
Con esto, doy por terminada la valoración, y paso a mostraros las fotos. Empezamos por las vistas delanteras:
With this, I conclude the evaluation, and move on to show you the photos. We start with the front views:
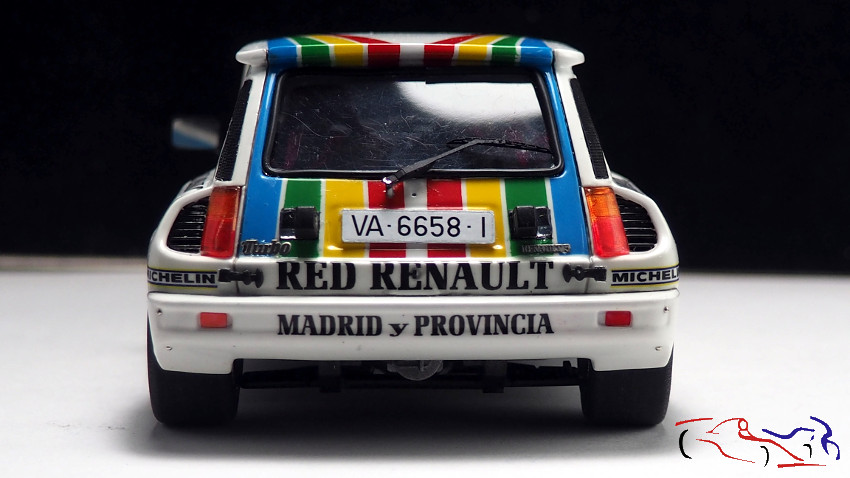
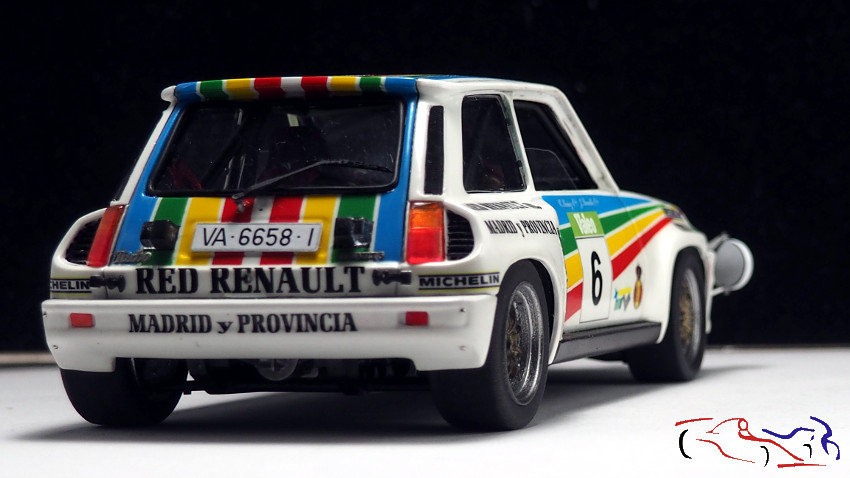
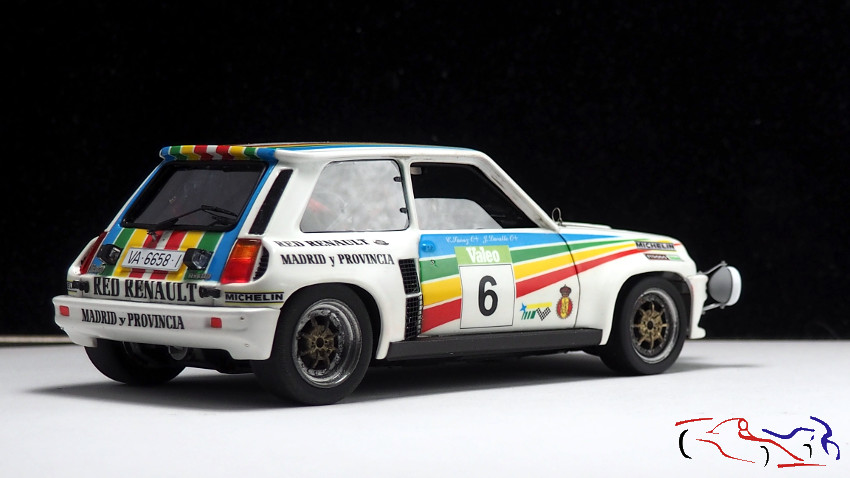
Vista trasera:
Back views:
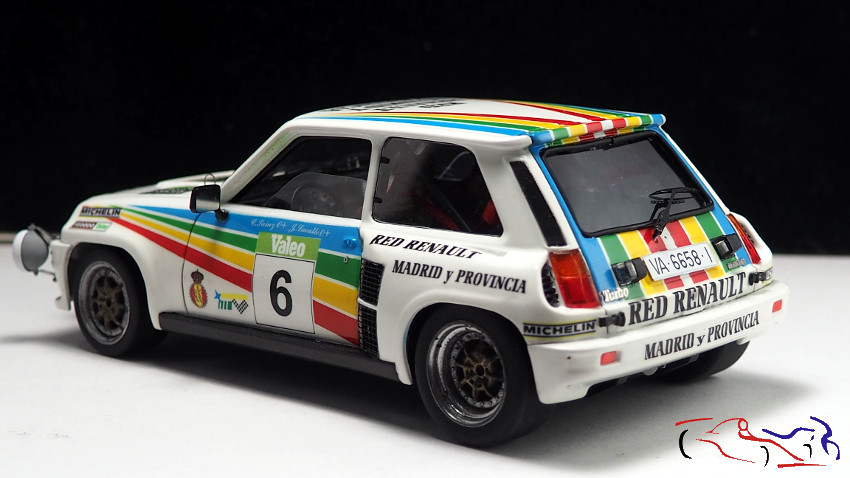
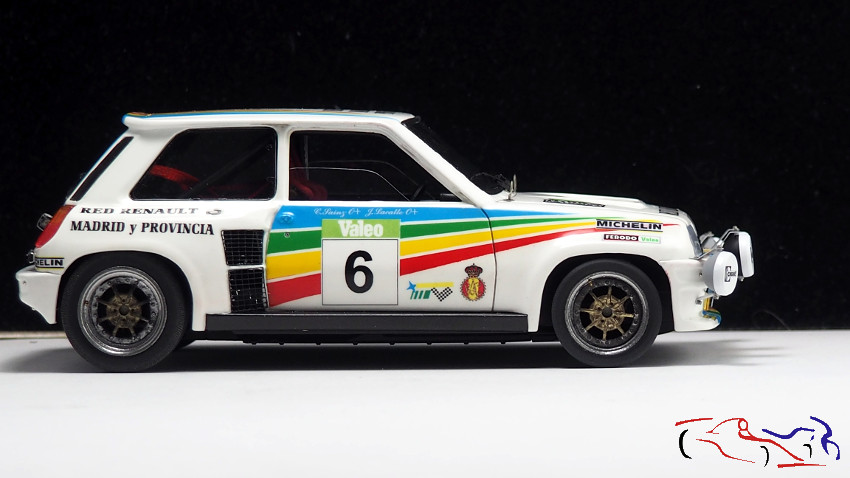
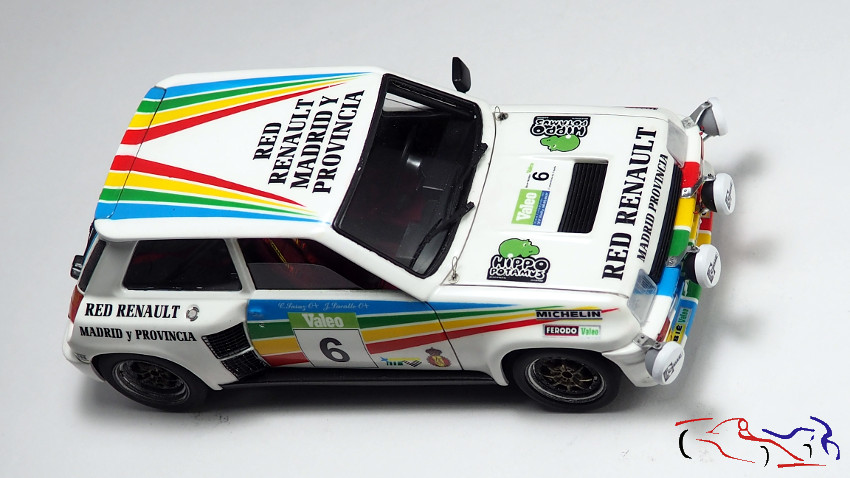
Vista lateral:
Side view:
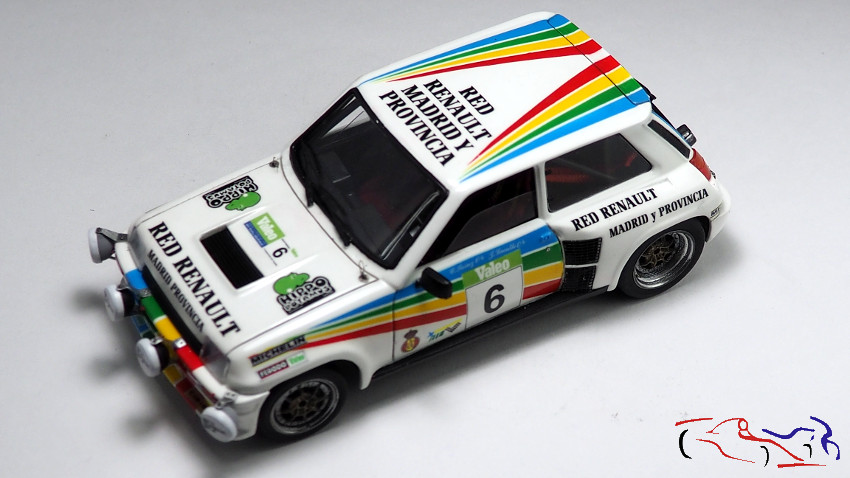
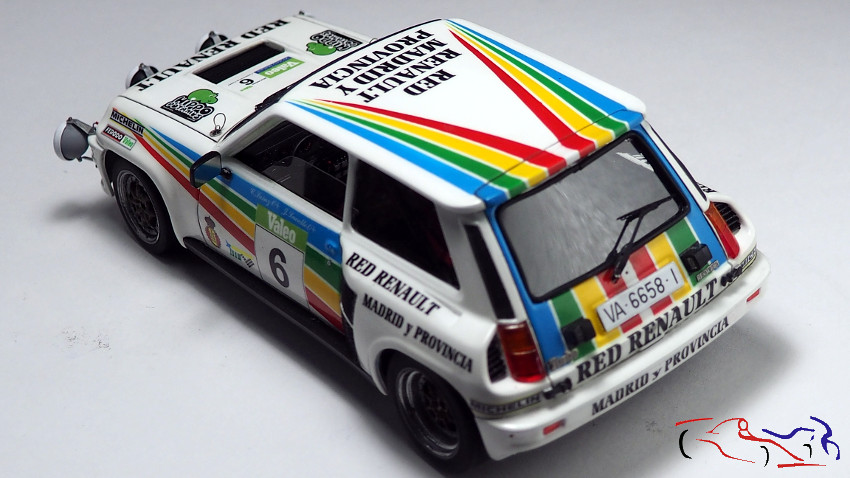
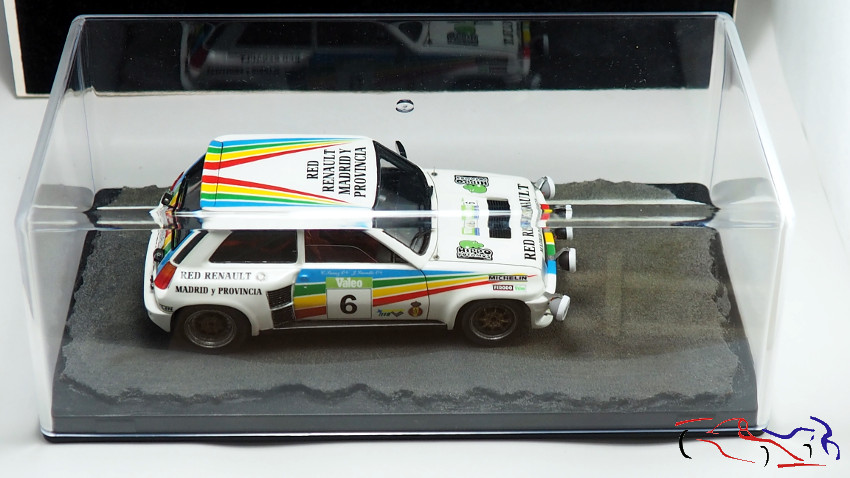
Vista elevada:
Elevated view:
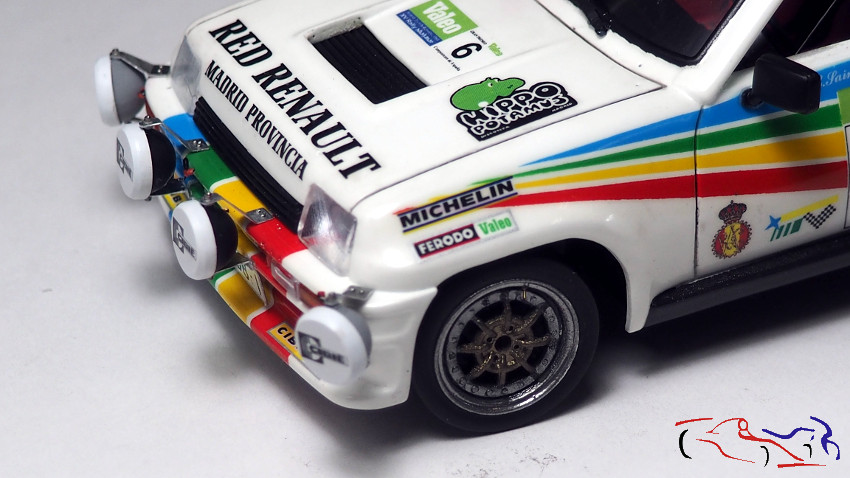
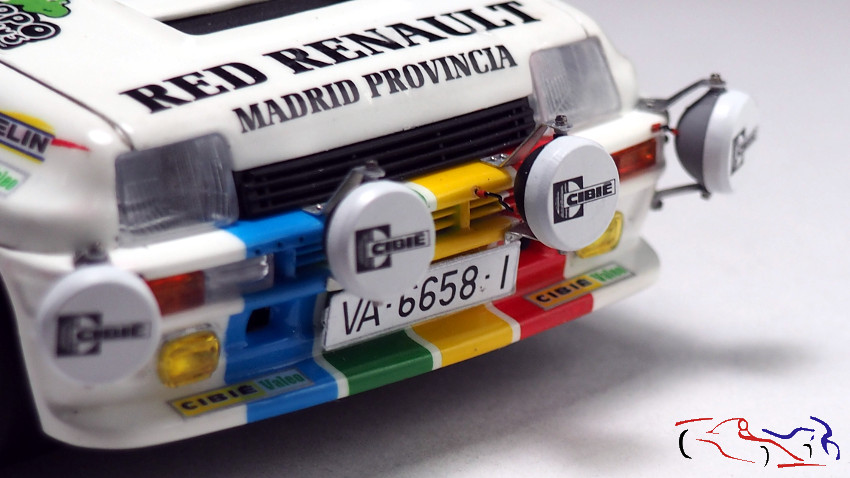
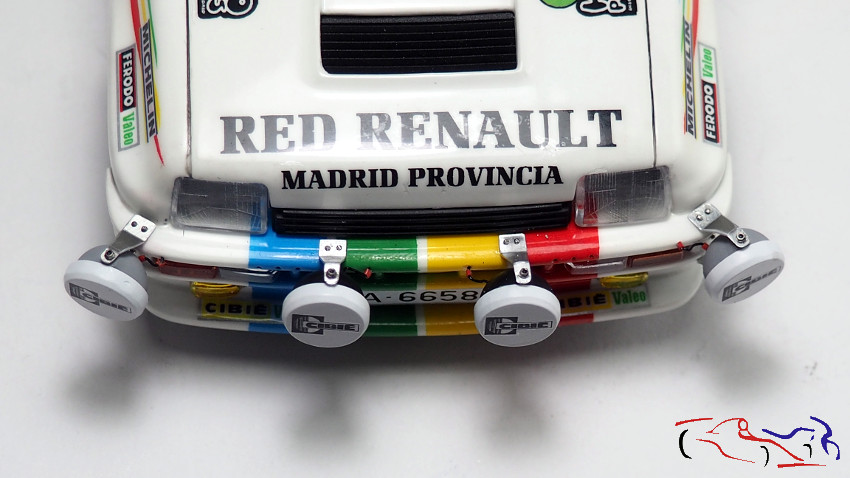
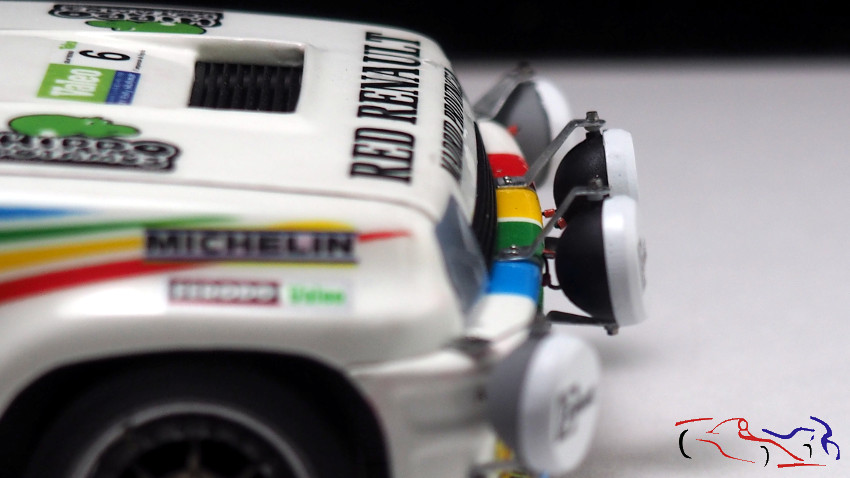
Detalles de los faros extra de DAB Models:
Details of DAB Models extra headlights:
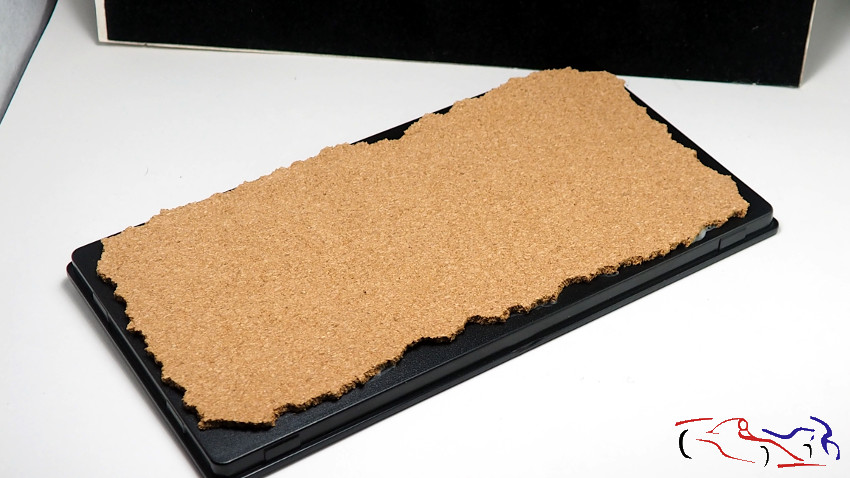
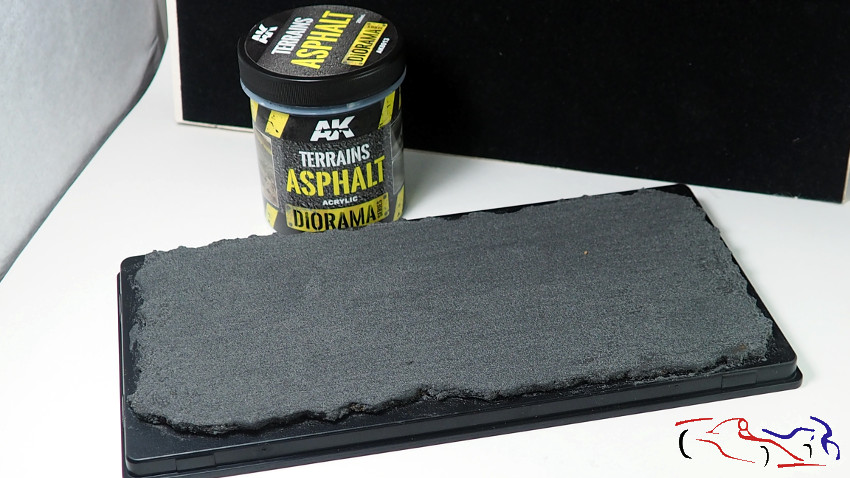
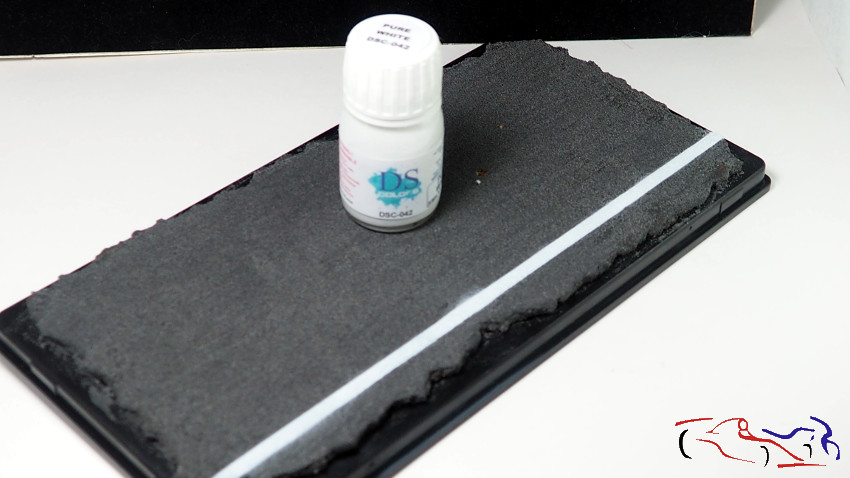
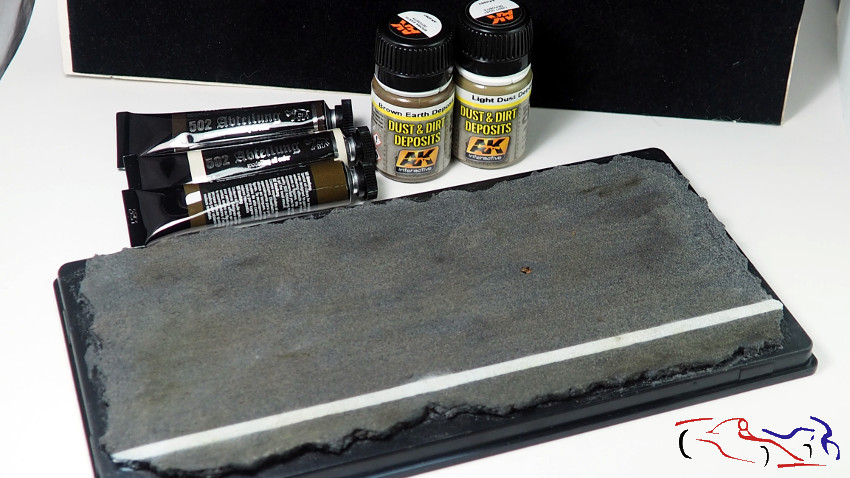
Y ahora, la esplicación de como ice la base de la urna: Primero puse corcho pegado con cola blanca. Le añadí “Asfalto” de AK, aplicado con una brocha. Una vez seco, enmascaro y pinto la linea blanca lateral de la carretera, para terminar con oleos y lavados de AK, que voy dando muy diluidos por toda la base, para ensuciarla:
And now, the explanation of how I iced the base of the urn: First I put cork glued with white glue. I added AK’s “Asphalt”, applied with a brush. Once dry, I mask and paint the white line on the side of the road, to finish with oils and AK washes, which I apply very diluted throughout the base, to get it dirty:
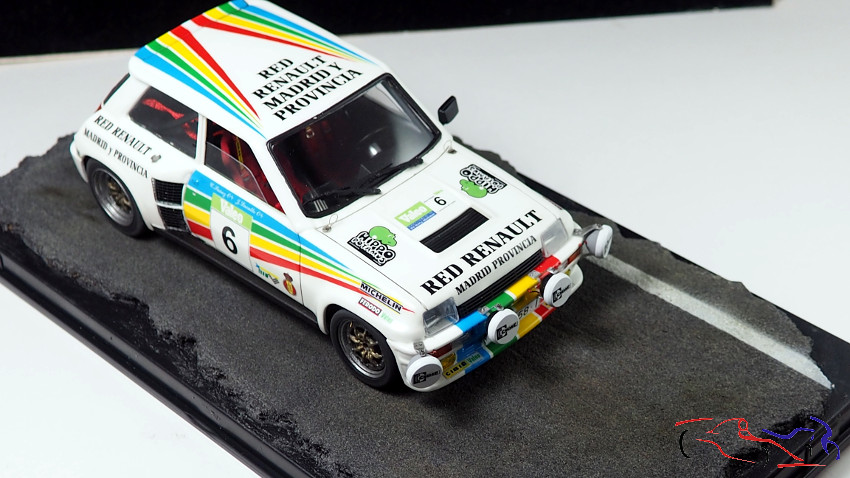
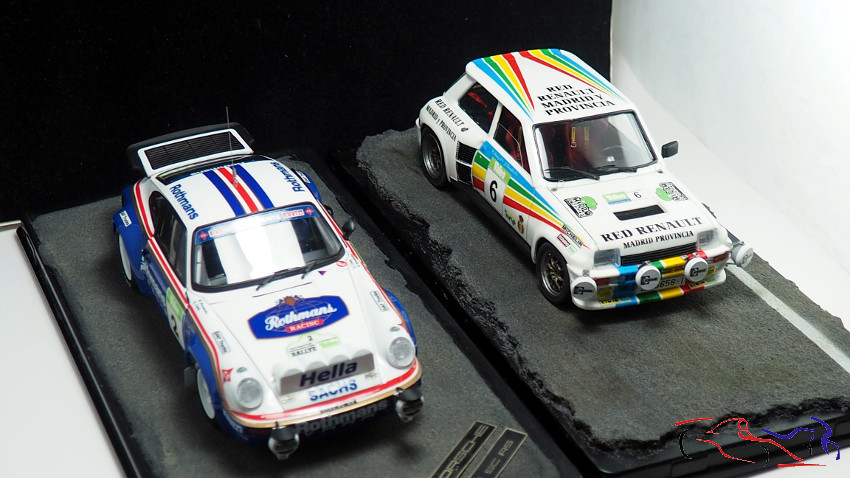
Y aquí las fotos finales en la base, dentro de la urna, y con el Porsche 911 Rothmans, coche con el que compitieron el mismo año 1984 en el rally Valeo, aunque el R5Turbo lo llevara Antonio Sainz, hermano de Carlos Sainz. Deciros, que Carlos Sainz fichó por entonces con Renault España, y que condujo el R5 Tour de Corse en ese rally, siendo el vencedor absoluto (ese R5T TdC también le tengo pendiente de hacer).
And here are the final photos at the base, inside the urn, and with the Porsche 911 Rothmans, a car with which they competed in the same year 1984 in the Valeo rally, although the R5Turbo was driven by Antonio Sainz, brother of Carlos Sainz. Let me tell you that Carlos Sainz signed with Renault Spain at that time, and that he drove the R5 Tour de Corse in that rally, being the absolute winner (I also have yet to do that R5T TdC).
Espero que os haya gustado!! Gracias por ver y comentar.
I hope you liked it!! Thanks for viewing and commenting.